Pages

Tuesday, April 23, 2013

5th Grade Cookie Color Theory

Every year since I started teaching, my cookie color theory lesson has been a staple in 5th grade...something the students always look forward to doing.  Usually, however, I do this lesson in the beginning of the year as an attention grabber.  Due to the "excitable" nature of this year's 5th graders, I decided to hold off on this lesson until the students were able to better control themselves, and I think it was for the better!


In the past when I've done this, it took a lot of yelling to get students to calm down enough to listen and review what the primary, secondary and tertiary colors were.  However, since I held off until the end of the school year, the students already knew what these colors were, so I gave them my "if you eat or lick any frosting off your fingers during this process, you will not finish the project" speech and let them go to town in groups.  I didn't have to interject about how to mix colors in any groups because if a student STILL didn't know how to mix tertiary colors, their group mates helped them out!

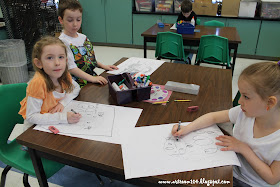
 Before the students come to class, I have a tray for each table ready to go.  There are there empty Dixie cups (for color mixing) and three Dixie cups filled with the primary colors in vanilla frosting.  I count out and pre-bag 13 vanilla wafers (bought in bulk from BJs Wholesale).  I give them a handful of Popsicle sticks for color mixing, and these 12"x 12" laminated color wheel place mats I made three years ago.  The place mats clean up real nicely with a squirt of hand sanitizer and a paper towel!


At the end of class, students have to clean their table up, wash off the tray and throw out any remaining frosting.  Then they get to split up the cookies.  Depending on teacher preference, they are allowed to eat their cookies after I have photographed their group with their color wheel or they take the cookies back to their room on a paper plate to eat during snack time.

Students each received a grade out of 15 points for this project based on the following:
          Is the color wheel ordered appropriately?
          Did you work well with your group members?
          Did you follow directions and have good self-control with the frosting and cookies?

I definitely think that next year I will not being doing this project at the beginning of the year.  It will be an end of the year review given to students based on good behavior!


Monday, April 22, 2013

Kindergarten: Pattern Cows

I've seen these pattern cows based on Peter Diem all over Pinterest and decided that the right place for me to use it would be with my kindergartners!  I figured that next year it will work really well with the Common Core Listening Strand for Farms!  (Plus it incorporates patterns, which deals with math and logic!)  I don't really know much about Peter Diem and I'll admit that I did not teach my students about him (too much talking makes me woozy yet...) so I focused more on reviewing patterns and drawing the cows using basic shapes.
This is my example that I did with students.

Before we jumped into the cow drawings, we spent the last two art classes reviewing patterns and doing these pattern grids.  I showed students a power point that talked about how line makes different shapes and how line and shape together can create patterns.  We folded a piece of drawing paper hot dog and hamburger style, and then in each box, students had to draw a different pattern.  In the second class, we finished the patterns and then painted each square using some liquid watercolor paint (which I just bought with a gift coupon from my SmartTeacher winnings!).  I LOVE how bright the colors are!  I think I'll be switching to liquid watercolors permanently!

Today my first kinder class tackled the cow project.  After we put our names on our papers, I did the step-by-step demonstration of drawing a cow.  After each step, the students mimicked the cow on their paper.  We started with the nose and nostrils, then added the head and ears, the mouth, the body, the legs and finally the spots.  A few students pointed out that my cow was missing the tag in its ear (we're from a VERY rural area... ;) and some gave their cows horns to make them boy cows (or earrings for girl cows!).

We did these drawings in pencil first, and then I gave everyone a black crayon to trace over their pencil lines with (since we will be doing a watercolor resist).  After they traced with the black crayon, they started adding various patterns inside each shape.

I've tried to get away from doing these kinds of drawings this year because all the drawings usually end up looking the same, but I must say that everyone's individual cow had a different personality!  Some were short and fat, tall and skinny, or big bodied with tiny heads and legs!  More to come Wednesday when this class hopefully finishes these cows!


Sunday, April 21, 2013

Mondrian Inspiration...

This morning a colleague sent me this link on my Facebook: "Modern Art Desserts: How to Bake Mondrian in Your Oven."  Upon reading the link, I found myself at the actual website for this "art" and I was inspired!

MAD invitation SFMOMA
The Blue Bottle Cafe creates and sells these awesome recreations of famous artworks that are shown in the San Francisco MOMA.  The desserts are constantly changing based on the current artworks.  If you go to the website, you can check out the story behind the Cafe, as well as the awesome desserts they serve!

Now, the person who sent me this link is an aide that comes with the 12:1:1 class that I teach, comprised of Kindergarten to third graders.  There are a variety of students in the class...students with Down Syndrome, social disorders, extreme Autism, among a few other learning disabilities.  Lately, the aide and I have been discussing the kinds of projects students could do in art class that they could carry out at home instead of video games.  It seems during discussion and interaction in their regular classroom, most of the students only talk about their video games.  

I decided that we could try a sewing unit.  Next class we'll start off by doing some basket weaving using some leftovers from a Roylco Basket Weaving Kit I purchased for the Extended Day program.  Depending on how things go, we'll move onto sewing on burlap with yarn and buttons.

After that (and hopefully after all of my food aversions and morning sickness are over), I want to do a Mondrian inspired cake with the students!  Over the summer, I made a rainbow cake with the Extended Day program, so I'm thinking that this probably won't be too difficult.  It will be good for the students to learn how to read a recipe (we'll probably use 2-3 boxed cakes) and to learn a little about baking as well!

Since there are two aides that come with the class, I think we may split the 9 students that come into three groups and each of the adults will work with each group to bake a cake.  We mix three batters and then split the batter into four portions.  One will remain white, and the other two will be dyed red, yellow and blue.  I'll bake them in 9" square pans (or loaf pans, I'm undecided) and then the next class, we will frost them together (I think that I will cut them up into squares and rectangles beforehand, of course).  

Hopefully we'll have enough cake made to make little individual cakes so that each student can actually take their cake home with them!  

Gosh, I'm really excited about this idea...I can't wait to get through the next two lessons and onto the baking aspect!

Wednesday, April 17, 2013

2nd Grade Printmaking Unit: Gyotaku Prints

And finally, for the last post in this series, the final project in the 2nd grade printmaking unit...Gyotaku prints! There have been quite a few blogs showcasing Gyotaku prints lately...it seems this is the time of year that they are popular!

The first year I started teaching, I bought this 9-piece set of rubber fish from Dick Blick and I've used them with multiple classes since then!  I don't generally use all of the fish though...the starfish and really small, skinny fish are harder to take prints off of, and the way the students sometimes manhandle them, I know they'd fall apart quicker.  A few of the larger fish are starting to crack a little bit where the smaller fins are attached, so if you have these or are going to get them, make sure you teach the students to handle them and wash them with care!

Anyways, here's what we did for the Gyotaku prints.  I've done Gyotaku prints differently each time I've done them, and so far I like this version the best!

On the first day, I set up multiple stations around the room.  At three stations there were a stack of white tissue paper, two pencils, two brayers, two bench hooks, one tube of black ink and two fish.  At two stations, there was two brayers, two bench hooks, a tube of blue and turquoise ink, and two pieces of bubble wrap large enough to cover a 12"x18" piece of drawing paper.  Finally, at my 6th table, I had a stack of 12"x18" drawing paper and pencils.

At the beginning of class, we looked quickly at a power point about Gyotaku prints and looked at the Hawaiian artist and fisherman Naoki Hayashi.  We talked about the history of Gyotaku and looked at pictures of artists using real fish to make prints.  Afterwards, I did a demonstration at the two stations of what students needed to do.  At the bubble wrap station, students put a glob of blue and a glob of turquoise ink on the same bench hook and rolled them together to make a swirled color on the bubble wrap.  By this point, we had about 20 minutes left in class to make three fish prints and one background print.

On the second day, students chose two of their best fish from their three prints to cut out and glue to their background (with a glue stick).  Then, I showed them how to add sand at the bottom using Elmer's glue and a paint brush.  Finally, I passed out metallic, fluorescent and regular colored paint for students to add details, such as eyeballs, scales, seaweed, coral, etc.


Here are some examples of how I've approached Gyotaku in the past...
During my first year of teaching, the elementary did a Christmas program that revolved around penguins.  The decorations on the stage had to be Christmas trees decorated with fish ornaments, so I had my 6th graders do these Gyotaku lacings.  They made prints of fish and then cut them out with construction paper for the back.  They punched holes all the way around and then laced yarn through, stuffing the fish with stuffing before closing it up.

Last year I did these Gyotaku prints with my Kindergartners.  They had to print 3 fish on a piece of paper.  Then, they simply colored the background with crayons.

This project I've posted about before...I did these fish on the black construction paper at the beginning of the year with the extended day program after school.

Tuesday, April 16, 2013

2nd Grade Printmaking Unit: Symmetrical City Scapes

For the second project in our printmaking unit, students created these symmetrical city scapes using the intaglio process.  On the first day, we reviewed the warm and cool colors.  We folded our paper in half and drew a border around the edge (sans Phyl at There's a Dragon in My Art Room!).  The top half was painted with warm colors to represent the sunset and the bottom half was painted with cool colors to represent the water.  The great thing I found that I like about having the kids add the border is that it makes their artwork easier to crop on Artsonia!  Some students didn't do that great of a job drawing an even border all the way around, but that's okay, it still made it a little easier to get a nicer crop done.

On the second day, I introduced students to the intaglio process.  I showed them how to lightly draw into a piece of Styrofoam (which were pieces of to-go boxes I bought from a local restaurant) to create the city.  I made sure to show students how their buildings needed to be touching.  After I gave students the go-ahead, they cut out their city and then made their print.

I had my students use black block printing ink for this.  They squirted the ink onto a bench hook and then used a brayer to roll it out and onto their Styrofoam.  Now, here's where I changed this project up a bit from what I found on Pinterest.  The pin I found brought me to the Laugh, Paint, Create blog where this project was done as well.  The teacher there had the students make two prints from their city, one for the city and one for the reflection.  My OCD hit me at this point because I didn't like how the reflection isn't actually a reflection on their projects!

So, I had the students place their inked plate onto the water and press down.  Before they pulled it up, I had them put glue on the back of the plate.  Then, they were allowed to pull the plate up and glue it onto the warm colored side.


2nd Grade Printmaking Unit: Introduction to Printmaking

My second graders have just finished up their printmaking unit and I've finally gotten around to photographing, grading and uploading all of their artwork to Artsonia!

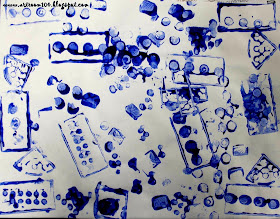
To kick off the unit, we did a one day project that involved stamping with Legos (I've seen multiple variations of this on Pinterest...).  I took this opportunity to talk to the students about the Principles of Art.  We've talked about them here and there, one at a time, but I felt like this quick project was a great way to get students to think about the principles all together.  We talked about patterns, having balance (symmetrical and asymmetrical), movement, unity, contrast, rhythm, and emphasis.  Now, a lot of these are a little over some of the 2nd graders heads, but none the less, I think some of them really thought more about their composition.

I showed students these simple visual rubrics I made for the project and we talked about each one.  "Is it interesting to look at?  Why or why not?"

This one would be worth 3 points...

This one would be worth 2 points...

This one would be worth 1 point...

 I posted these on the bulletin board int he front of the classroom and gave the students their instructions.  Keeping in mind the principles of art, they had to create an interesting design using different sized and shaped Legos.  They would only get one color, so that had to use placement of their stamps to create an interesting factor to look at.  I gave each table a small plate of finger paint and a small variety of Legos and let them go to town!

Now, even though we spent about 15 minutes going over what makes a good composition, it seemed as if the combination of using Legos and finger paint made all the other points mute.  The outcome of this project was NOT what I had expected!  I had some students smearing their designs together after they finished with their fingers, some only used one Lego for the entire print, and many tried to make actual, representational pictures instead of non-representational like I asked for.  Next time I think I may have to tweak my instructions a bit!


Sunday, April 14, 2013

A little about what's been going on lately...

So, I feel like I can't hold this in much longer!  I feel like I've been a little absent from blogging lately, but there's been A LOT going on that has kept me from my computer!  The first thing (and most exciting thing!) that's happened to me?  My husband and I have found out that we're expecting!!! :-D
I'm only about 7 weeks along, but boy oh boy am I feeling it!  School has been a drag, as well as that constant nausea all day.  I've resorted to showing some of my younger classes movies because I just can't seem to keep up!  I've also noticed that the more I talk, the more sick I feel at times!  This means our output of projects has slowed down a bit...I just keep telling myself 5 more weeks to go and I should be back to normal (just in time to put up the art show!).

The second thing that's happened?  Budget cuts at my district.  The very good news about this is that it appears that my position will not be affected in any way.  In the last 10 years, whenever there were cuts, a majority of them happened at the elementary end, so they plan on cutting more at the high school end.  The superintendent sent a list of discussed cuts that was created at the last board meeting, and I was not on there!  Whew!

There are two positions that are retiring this year that won't be filled, and it looks like they are offering an early retirement package to three others with the anticipation that they won't be filled, or at least won't be filled at full time.  Unfortunately, though, for the art department, (which was second on the cut list), they are looking at cutting art electives.  This really stinks because I was hoping to become full time after the art teacher retired so that I could try and liven up the high school end with some new electives!

It's not really known yet if I will become a K-12 teacher next year, but I'm guessing not.  It will depend on if the art teacher in the high school takes the early retirement package or stays on for another year.  If she decides to stay on, she'll be cut down from full time. :-/  At this point, I don't think they could get away with making me teach K-12.  I've done a little research and found the NYS requirements for art (when I talk about "the arts," this encompasses visual arts, music, dance and theater).

1.  Pre-K and Kindergarten programs must only include activities that revolve around the arts.  These can be done in the classroom.

2.  Grades 1-3 must receive instruction in the arts to the equivalent of 20% of the week be devoted to visual arts, music, theater, etc.  In 4th grade the time allocated must be 10%.  It is only recommended that a certified Arts teacher give this instruction
At the rate they plan on cutting positions, they would have to hire someone on just to teach these younger levels if I was made 5-12 art.  Right now art is used to give these teachers their daily free periods.  Because they're planning on cutting at music and gym as well, it would be impossible to pick up the slack if art class was eliminated from these younger grades.  Also, at the rate they need to cut, the aides will be taking over duties such as lunch detention, lunch monitors and in-house detention, duties that were rotated between high school teachers.  Now with the lower number of high school teachers per subject area, these teachers will lose their duties and gain another class or two.

3.  Grades 5 and 6 must receive 10% instruction in the arts taught by a certified arts teacher.

4. Grades 7 & 8 must receive instruction according to the NYS art standards.  1/2 the study must be art and 1/2 the study must be music.  Guidelines recommend that both be taught to students in 7th and 8th grade, however it can be split.  (In my district, 7th grade receives art for 1/2 a year only.  There is no 8th grade art.  Most students cover the music aspect by participating in chorus or band.)  Certified art teachers must provide the instruction at this level.  If AIS services are required, these amounts may be lessened, but the arts cannot be eliminated.

5. All students in grades 9-12 are required to complete one unit of art study in order to graduate with a diploma and must be taught by a certified art teacher. All public schools must provide students with the chance to participate in a 3-unit or 5-unit sequence in arts starting at grade 9.  The three unit gives students a chance to receive a regents diploma.  The 5-unit gives students a chance to receive a regents with advanced designation.  Now this is the part that interests me...if my district gets rid of art electives, none of their students will be able to graduate with a regents diploma.  I only say this because they are also talking about getting rid of music electives as part of the cuts (aside from band and chorus).  I don't think that the students can fulfill the arts requirement by only taking music courses past Studio Art...any NYS art teachers know about this?  Phyl, you mentioned something about this in my last post....  Plus, this makes students have to take music/band/chorus even if they don't want to in order to earn a regents diploma!

Thursday, April 11, 2013

VanGogh Essays

I have finally finished correcting the VanGogh essays my 5th graders did, and I have to say I'm impressed by a few.  Quite a few of them really did not want to write at all because it was art class and I hate to say it, but they won't be happy with their grade.  They're teachers also were not very happy because they've been working very hard on essay writing in class.  And, never mind the fact that state testing is starting next week!

Anyways, I wanted to share a few of the essays that I really enjoyed reading.  When students wrote these essays, I did have the September 2012 Scholastic Art magazine available for reference, as well as 5-6 VanGogh books from the library.  These students obviously used their resources as well as information they retained in their memory from the VanGogh presentation.

Essay #1:
     Do you know facts about VanGogh?  He was one of the most tragic artists who ever lived.  Van Gogh was born in Holland in 1853 and died in France in 1890.  VanGogh didn't want to be a painter until he was grown up.  He worked in a bookstore and he was a preacher like his dad.  He went to different art schools to learn how to draw.
     Mine is a landscape and my landscape is compared to Starry Night.  Ours are the same because we both have swirls in our sky.  Also we both have a building.  Also VanGogh has bushes.  I'm now going to tell you how they're different because I don't have trees and he does.  He also has buildings and I don't because I only have 1 building.
     I used lines and texture.  I used them in my barn and my sky and I used them with a short brush.  I went back and forth.  I have nothing that I want to change because I think it looks good.  Well I would like to change the sky but that's it.
     I like his artworks because it has lots of elements.  Also because he has lots of sad colors.  I have seen Starry Night and that's my favorite. Starry Night is my favorite because it has my favorite colors on it.  Also I like Starry Night because it has bright colors on it.
     I would ask him what painting out of all of them he likes best.  I would ask him that because he has so many paintings and I think that he has a favorite.  If I would get to see him I would tell him that some of his paintings are hanging up in McDonald's and I would tell him that I like his Starry Night.
I loved this essay because it was surprising from the particular student who wrote it!  I honestly hadn't expected it to be as detailed as it was.  I also really loved that the student made the connection at our local McDonalds!  There are faded reproductions of VanGogh's art hanging in the restaurant.  The student told me that they had been at McDonalds and realized those were VanGogh paintings.  When they started talking about it, they said the workers there were asking questions to see what the student knew!  I was impressed.


Essay #2:
          Do you know who Vincent VanGogh is? Vincent was named after his brother that diet.  He after when painting used a very small variety of colors.  No one wanted to buy any of his paintings.  His brother Theo sent him money because he was poor.  Theo was four years younger than Vincent was.  Vincent and his brother were really close.  Now do you know some things about Vincent VanGogh?
          Have you ever drawn or painted something and compared it to a famous artist's painting?  I compared my painting "Alone" to Vincent Van Gogh's "Starry Night".  Our artworks are the same because well one the texture of our sky.  Then because we both used a tree in the foreground of our paintings.  They are not alike because his tree is different from mine and in his your like looking down on a village.  Also because his has houses and buildings and mine doesn't.  Can you somewhat understand how my painting and his painting are alike and unlike?
          Do you know what the elements of art are and how to use them?  In "Alone," I used the line element in my sky.  My sky is swirly like Vincent's sky in "Starry Night."  Then I used texture in my tree.  I dotted the leaves on my tree.  If I could change anything about my painting, it would probably be the shape of my hills and where they are in my painting.  Can you name all the elements of art?
          Do you like Vincent Van Gogh's art?  I like his art because each painting says something and has its own personality.  Each of his paintings are different and are special in their own little ways.  They are based on emotions and feelings.  I think they are one of a kind and unique in their own way. My favorite is Starry Night because I really love the colors, the style, the texture.  I just love everything about it!  What is your favorite painting by Vincent Van Gogh?
          If you could ask or tell anything to Vincent Van Gogh what would it be?  I could ask him something it would be how or what inspired him when he paints.  Then if I could tell him anything it would be why I love his art and that I think he is a brilliant artist.  I hope you have enjoyed my essay and that you want to read it again.
This essay was the best one I had.  The student used awesome details and a lot of art vocabulary!  It was also one of the most well-supported essays that was written!


Essay #3:
          Do you know some facts about Vangogh?  First Vincent wanted to paint pictures of things he cared about.  Vincent painted a picture of poor people and called it The Potato Eaters.  Second Vincent made friends with artists named Paul Signac and Georges Seurat.
          Do you know the difference and similarities between my painting Blue Vase and Van Gogh's painting Vase with Sunflowers?  First the difference is Van Gogh's painting is all yellow but my painting is blue.  They are similar because we each used one color throughout the painting.
          Do you know the elements of art I used for the painting Blue Vase?  First I used line in the vase's designs.  Second I also used space in the painting when I put the vase and flowers closer than the wall behind them.
          Do you know why I like Van Gogh's art?  First I like his art because he uses a lot of paint.  My favorite painting is Starry Night.
          If I could ask Van Gogh one question I would ask him why do you like painting?  If I could tell Van Gogh something I would say I like your art.


Essay #4:
          Vincent Van Gogh was an artist who painted hundreds of paintings in his whole lifetime, though he only sold one.  He cut off his ear and sent it to his ex-girlfriend.  Ya, Vincent was seriously messed up.  He shot himself in a field during his blue time.
          My artwork is compared to Vincent's painting Flowers.  They are the same because they are both flowers in a vase.  They are also both lights and darks from the same color and we both have it on a table with a wall in the background.  Our artwork is different because they are different colors.  Also that they both have different flowers.  His flowers are some droopy and some straight and mine are all straight.
          In my artwork I used line, form, colro and value.  I used value when I painted tints and shades of the same color.  I used color when I painted color onto the canvas.  I used line because I used lines that go in different directions.  I used form when I drew my flowers and the vase.
          I love Vincent's artwork because he is a very good artist and I like how he uses swirly lines and tints and shades of one color.  My favorite would be Starry Night.
          If I could ask VanGogh one question i would ask him if he could give me art lessons.  If I could tell VanGogh something I would tell him that his artwork is fantastic and that I love it.  But of course, I can't do any of this 'cause he's dead.
This one is pretty good but I think it's pretty funny because of the random comments written in as if the writer was talking out loud!


Wednesday, April 10, 2013

Budget Cuts and Such...

Yesterday was my day off, in which I missed a faculty meeting.  Unfortunately, I wish I would have been here for it!  

In Northern New York, many of our schools are struggling with funding.  We have quite a few school districts that have essentially run out of money are are defaulting on their bills.  The hard part is that in some areas, our schools are so spread out that it's hard to combine districts.  But, on the other hand, some would be good to combine, but the buildings wouldn't be able to handle the influx of students.  

My second year of teaching, we were on a contingency budget.  As hard as it seemed, it really wasn't that hard.  Our administrators squirreled away money in secret funds to help up through the year if we ran out of supplies or wanted to do an impromptu field trip.  

Yesterday at our faculty meeting, we were informed by our superintendent that the business manager we had last year from Boces essentially "screwed up" and now, our district essentially only has enough money in our surplus fund to get us through one more school year before we run out of money.


It was told that next year, there will be job cuts that this district has never had to approach before...jobs will be cut that they have never dreamed of cutting. That being said, it makes me slightly nervous. The high school art teacher is planning on teaching one more year and then retiring, so I suppose worse case scenario, I'm cut or brought down to 50% until she leaves, as she has more seniority.

Our budget needs to be approved by the board by next week, so I'm sure we'll find out who will be getting pink slips by then.

As far as I know, art only needs to be offered to 4th-6th grade, 7th grade and there has to be a studio art class offered as well in NYS. That means I could be cut to 50%...however I know that would be a problem because the music and gym department can't pick up the slack without hiring another teacher for free periods...that's the one thing that keeps me hanging on.

Maybe they'll offer the high school teacher a retirement incentive...chances are I'd become a K-12 teacher or at least full time, and someone else would be hired at a very part time rate.

How many of you have faced this before? I obviously have always known that it could happen to me, given the subject of choice that I wanted to teach. At this point, I am taking everything with a grain of salt until everything is figured out. I have the feeling though, that this will be a very stressful end of the year now. Waiting to see if the budget will pass our finicky public will be hard. They have not had a raise in school taxes in about 10 years. Our budget last year wasn't passed because there was going to be a raise in taxes for the public. It will be interesting to see how things go...

Tuesday, April 9, 2013

6th Grade: Native American & Aboriginal Art

Argh!  Where is the school year going?  This is the last week of the 3rd quarter...that means 10 weeks left!  And, I have approximately 6 weeks until my art show!  Eek!

If you haven't already checked out my pages from my first two art shows (2011 and 2012), please do so!  Every year I try to do a theme, and this year's theme is nature.  Generally what I do is keep all of the projects that fit under that theme.  We take one day to sign the fronts of our artworks and glue them onto black construction paper for a frame (if they need it).  Then, I pick 1-2 pieces from each student's stack that are their best works to hang.

I always end up having trouble with one grade level having enough artworks to fit my theme...and this year it is 6th grade!  Plus, it's taking a lot longer to get through my units than I thought it would...so I think I'm going to have to combine my Native American unit and my Aboriginal unit into one "natives" unit.  I think it might actually be a smart idea to do this because then we can compare and contrast the indigenous cultures of western and eastern world.

I've got to rework my note packets and create one that has simple notes (or maybe not do notes at all for this unit??)  I plan on doing my Native American animal spirit linocut project (which will incorporate a self-portrait in the form of an animal and the incorporation of line as texture) and I want to do fixed sand paintings based on the Aboriginal culture and symbolism.  (I did a sand painting project with a Studio Art class when I did my student teaching.)  Here are some of the past projects...once we finish up the Greek unit (hopefully by the end of the week!) I'll keep you updated on my indigenous cultures unit!


Last years linocut project was not specifically the Native American animal spirit one...but it was similar.  For these particular prints, I had asked students to depict something from nature.  They had to try and show 2-3 different types of texture using line.  


The following sand paintings were done by a Studio Art class.  We used Masonite board that was primed with gesso and sanded.  They drew their design on with pencil and Sharpie.  Then, one color at a time, they painted on Elmer's glue and sifted the colored sand onto the glue.  When I did this at the time, my cooperating teacher didn't have sand.  I went to a local pet store and asked for a donation of fish tank sand.  I used powdered tempera to color the sand, which worked really well (but also stained hands like paint).  This year, however, I have TONS of pre-colored sand so this process will be much easier!