Showing posts with label Studio Art. Show all posts

Friday, January 29, 2016

Studio Art: Grid Portraits

I promise I haven't left you!  I've just been doing a little soul searching, if you want to call it that.  In other words, I have been feeling like I'm in a rut and I'm not happy with the way I'm teaching, particularly in my elementary grade levels.  So, with that being said, my next few posts are going to be about my adventures in TAB!!  Yep, that's right.  I'm working on transitioning a few elementary classes into choice based learning.

At the high school level, I feel as if the choice based learning comes a bit more naturally, though I still feel as if I need to loosen the reigns a bit.  So, as I share some of our high school projects that we have completed this year so far, you'll hopefully notice me loosening up on requirements.  

But, enough of that for now.  These oil pastel self-portrait projects were completed by my Studio Art students (9th-12 graders), and it was something that really pushed the boundaries for them.  We looked at artwork by various portrait artists, including VanGogh, Frida Kahlo, Kehinde Wiley, and Chuck Close, discussing how each artist used the self-portrait for a different reason.  Using the grid method, I had students draw a "selfie" they had taken of themselves onto 16"x 20" paper.

Initially, I left the choice of material open ended for students, as long as they used color.  I decided to use oil pastels to do my self portrait, something I've never done with oil pastels before.  Many of the students decided to follow suite, seeing how I was challenging myself to do something new.  I have to say I'm extremely happy with how these turned out!

The 10 Looks of Mrs. Impey: "I left my sketchbook in my locker...can I go get it?"


Done by our two exchange students...fabulous work for two ladies who haven't hard art classes in years!


These students used colored pencils, or a combination of colored pencils and oil pastels.


I also used these drawing projects as my interim assessment for DDI.  I don't know if any of you have to do Data Driven Instruction, but my fellow art teachers and I have been getting creative with how we give our assessments.  Instead of doing tests or quizzes, like we had to do last year, we are making the artwork the assessment.  Since we have been stressing observational drawing, this fit in perfectly as it fell in line with my curriculum but it also worked for our DDI rubric for the 2nd quarter.  Less work for me and less work for my students!


Tuesday, October 27, 2015

Studio Art: Unit 1 Projects with Zentangles

This year I decided to start off my Studio Art students with zentangles.  Yes, I know it's up for debate among art teachers because it's technically doodling, but I like the word!  And, I have quite a few high strung students this year, so using the term "zen" and getting them to relax a bit worked perfectly for them.  Whether you prefer to call it doodling, these zentangled alphabets turned out great.  I love using these kinds of projects at the beginning of the year because (1) it's an easy way to cover the elements and principles in a way that's easy for students to understand and (2) it's very easy for students to be successful!  

We started out by creating zentangled alphabets.  We spent a day in the computer lab finding a font to use that would be wide enough to doodle in.  Students were required to do at least 9 letters.  Some simply chose alphabet letters whereas some did their names.  I've done this project in the past and the students loved it as well...you can see our results here.


For the final project in the first unit of Studio Art, students had to incorporate zentangles into a bigger picture.  Now, I'm trying this year to really give students more choices.  I don't know a lot about TAB but I'm slowly trying to incorporate more and more TAB techniques.  Last year, I attempted a completely TAB assignment and it flopped big time in my Studio classes, so I came to the assumption that I can't just do TAB cold turkey, especially when a majority of the students in that class are there because they have to take it.  So, each unit I do this year will have a final project that incorporates more choices.

The final zentangle project allowed students to choose a subject matter of choice, and I was quite pleased with most of the results!
The student who did the zentangled Darth Vater did a lot of little composition thinking...he played around with the patterns he used on each side of the face.  I was quite impressed with the thought he put into it!  The student who did the flaming skull...well let me tell you he brought tears to my eyes with this project.  When he was in 7th grade, he did absolutely nothing.  He hated art.  He struggled a bit during the first week or two of school to get into the swing of things in Studio Art, but once he made the decision to remove himself from the negative Nancy's in the class, he began to excel!  He did such an awesome job blending and shading his colors, and he did it all on his own!

The portrait on the left was created by one of our exchange students from Denmark.  I find it fascinating that they don't get art in the upper grades (she hasn't had it since grade school), and yet she is so willing to learn and soak up the information I have to give! 

This is another artwork from an exchange student.  She is from South Korea.


This student is going to Boces for criminal justice.  She wishes to be a dispatcher.  Despite her nature to complain and be negative, we figured out something she could do for her final project that actually meant something to her and she somewhat enjoyed doing!  Score one for Mrs. Impey. ;)

Here is my rubric and project sheet from the final zentangle project.


Thursday, October 9, 2014

More Artist Bell Ringers & Sketchbook Use

A week or so ago, I posted about how I am using sketchbooks this year in my Studio class.  I am going to add to that article by posting the latest things we've added to our sketchbooks IN CLASS via bell ringers and classwork.

First off, students did have a sketchbook assignment over the weekend a few weeks ago...but only because it pertained to what they were doing in class.  Students were completing the zentangled master's project (I will be sharing the completed ones from this year in the next few days), so I had them practice zentangles by zentangling a random object.  (Mine is the camera!)

Along with the zentangle project, students had to create a page in their sketchbook to doodle, practice and make notes about their main project.  I printed out a copy of each person's original painting.  Some students decided to grid it, so I had them tape transparency paper over the original.  I encouraged students to try out different zentangles on that page before putting them on their final drawing.
Eventually, I want to start photographing student progress periodically throughout the project and have students past the photograph into their sketchbook.  I'll then have them reflect via bell ringer on what they want to accomplish during the week on the project, what they might be wanting to change, what they are having a hard time on, etc.

We are currently onto our next unit, which is 2-D media, focusing on drawing.  In an effort to cut down on the notes I had students take last year in their note packets, I'm trying to transfer a lot of these notes into class activities in the sketchbook.  The first one we've done is this value page.  Students had to create a value scale, a shaded cube, and write the name and definition for each of the four shading techniques (blending, hatching, cross-hatching, and stippling).  What's great about this being in the sketchbook is that it's less paper I have to copy and waste and it's always in their sketchbook as a reminder of what value is for homework sketch assignments.

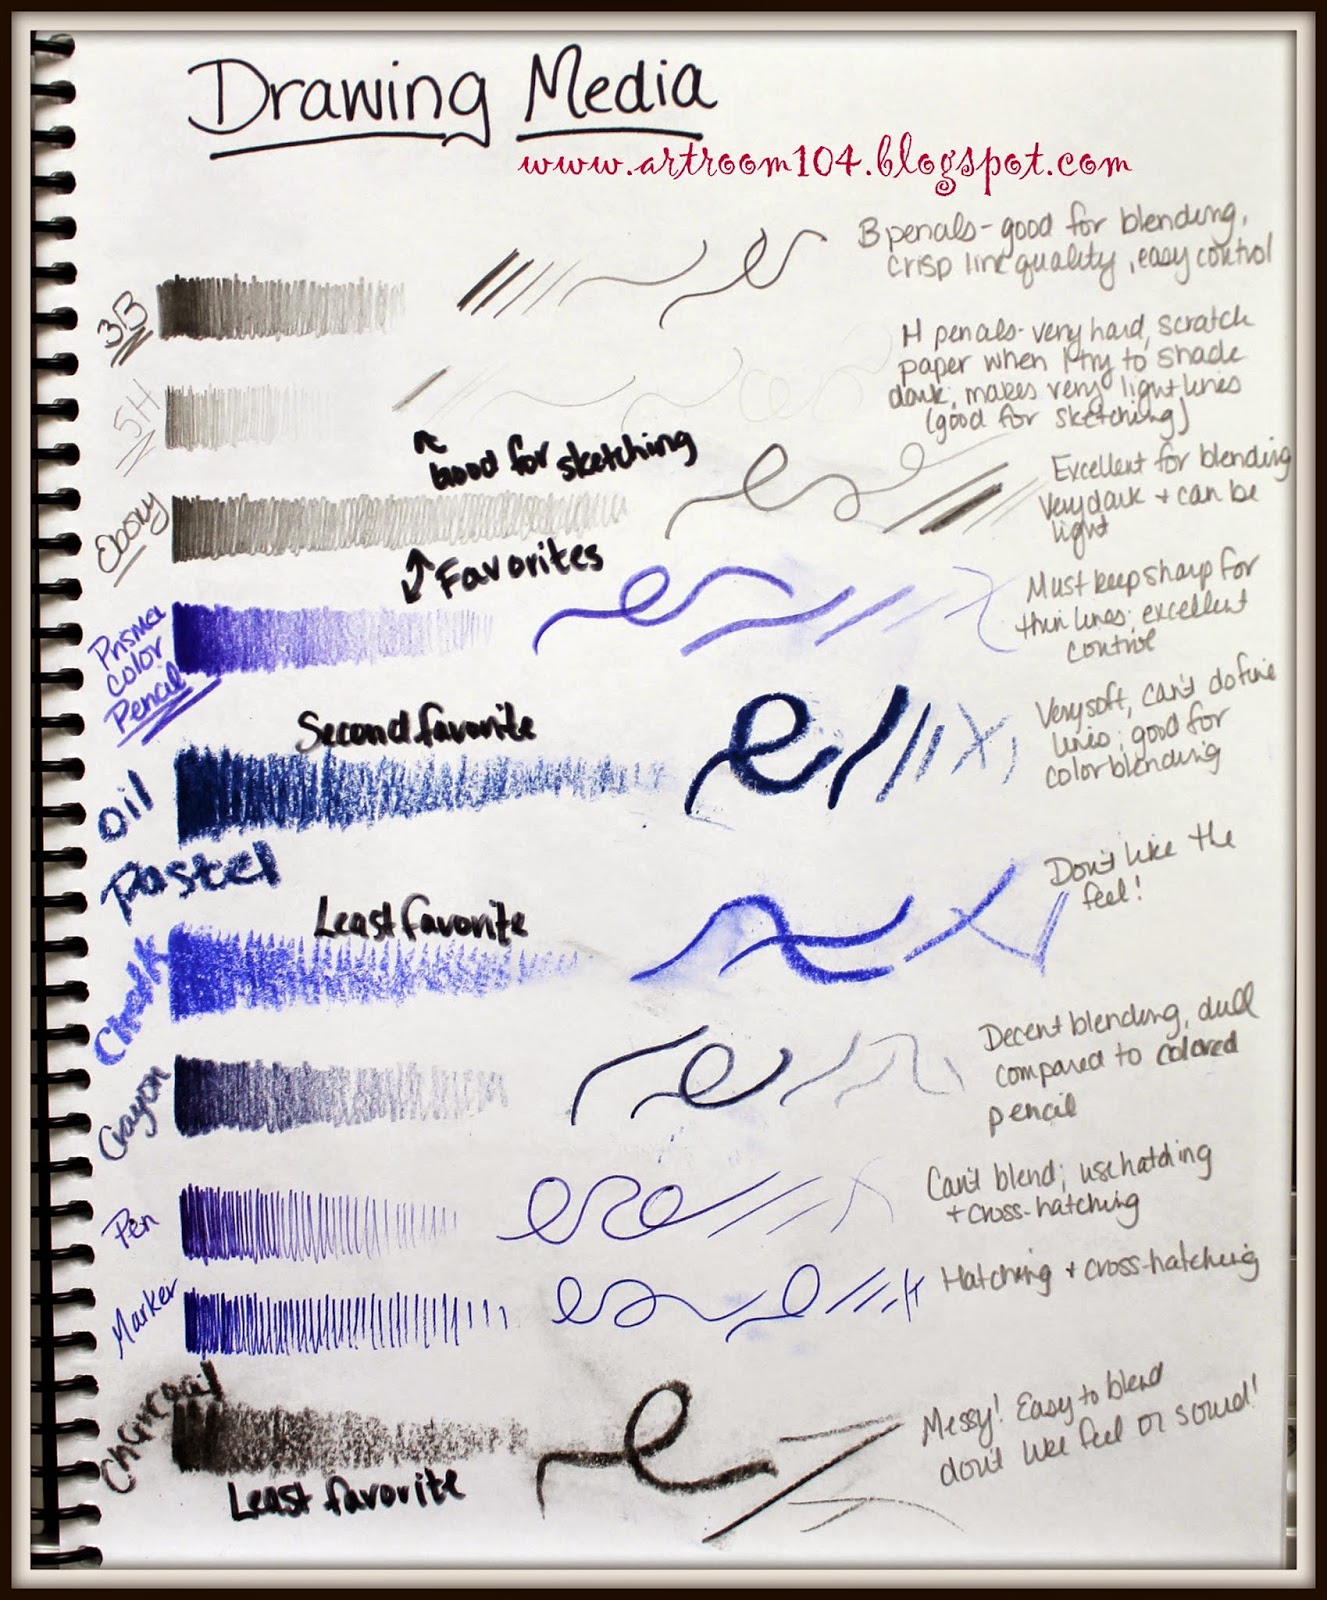
I've gone ahead and done the next classroom activity in my sketchbook...the students have not done this yet.  Our current project, which we are officially starting Monday, is going to be self-portraits done on a grid system using words as value (micography)...hence the value practice.  Our next project will be to practice doing observational drawings using the art mannequins.  Last year, I had students to their art mannequin drawing using only pencil or Sharpie, however this year I want to be more flexible.  Therefore, I will be having the students create a "Drawing Media" page in their sketchbook.  They will have to create a simple value scale, draw a variety of lines, label each medium, and make some notes (i.e. Do you like the medium? Which is your least favorite and most favorite and why?  Do you think a certain type of drawing medium is better for one type of drawing than another? etc.)

And finally, here are some artist bell ringer pages that we have completed.  I have decided that I am going to do a different artist every other week so that I can use bell ringers to review other material.    We already did Piet Mondrian, and next came Joan Miro.  I have decided on this set "schedule" for these weekly artist bell ringers:

Day 1: Students copy down some brief biographical information and paste a picture of the artist and one artwork by the artist into their sketchbook.
Day 2: Students paste two more artworks with the credit lines.
Day 3: Students paste one artwork with credit line and then must make a list of characteristics that they observe about that artist's work.  I always go over this to make sure we are on the same page once everyone has it completed.
Day 4: Students receive two paintings to paste into their books.  They must tell me which one is by the artist and two reasons why.
Day 5:  I ask students to do a quick, 2-minute sketch of design that is inspired by the artist.


This week's artist is Chuck Close.  We have one more day of bell ringers for him.  I choose to do Chuck Close right before we do our self-portrait project because we are going to be using a grid system to do our initial drawing.

The students are slowly getting better and better with these bell ringers.  I'm finding that I am teaching them note-taking and organizational skills at the same time.  I know a lot of these students must take notes on their own in other classes, but I am unsure if they actually know the proper way to keep an organized note page or if they just aren't connecting that knowledge from other areas to what I am doing with these bell ringers in art.  Either way, I hope by the end of the year, each student will be able to have nice, neat, concise note pages for each artist!

Friday, September 19, 2014

Studio Art: Unit 1, What is Art?

Over the summer, I did manage to do a little revamping to my Studio Art units.  Last year I had them categorized as the following:
Unit 1: What is art?
Unit 2: 2-D Art
Unit 3: 3-D Art
Unit 4: Ceramics
Unit 5: Zentangles

This year, I have shortened the units in order to break up the information a little more.  I have also rearranged a few of my projects.  This is what my unit order will look like this year:
Unit 1: What is art?
Unit 2: 2-D Art: Drawing
Unit 3: 2-D Art: Painting
Unit 4: 2-D Art: Printmaking
Unit 5: 3-D Art: Sculpture
Unit 6: 3-D Art: Ceramics


This post is basically a quick recap of what we have accomplished for the first unit in the first two full weeks of school.  Much of my original unit is still the same...I use the Art Talk text book (ugh!) to do the first half of the note packet, which is about why artists create art (to be functional, for express oneself, for religious purposes, etc.) and where artists find inspiration from (the person paying them, their culture, world events, past artists, art media and styles, etc.).  Once this was accomplished, I assigned a sketchbook assignment for the weekend.  A fellow art teacher in my county suggested this book at one of our last staff developments.  It has some awesome ideas!  

Unfortunately, this was assigned after two days of school...a time period when a lot of students didn't have their sketchbooks yet (even though it was on their supply list...sigh).  Quite a few were completed on lined paper or computer paper and have already been lost. :(  Here are two though...sorry for the bad pictures!
Mine is the unfinished one on top. :(  The weekend I gave this assignment, my mom's dog was hit by a car and I wasn't thinking...I ran out to the road to scoop her up and she bit me.  I was out of commission from being able to really do any drawing or typing for about a week until it started to heal up.

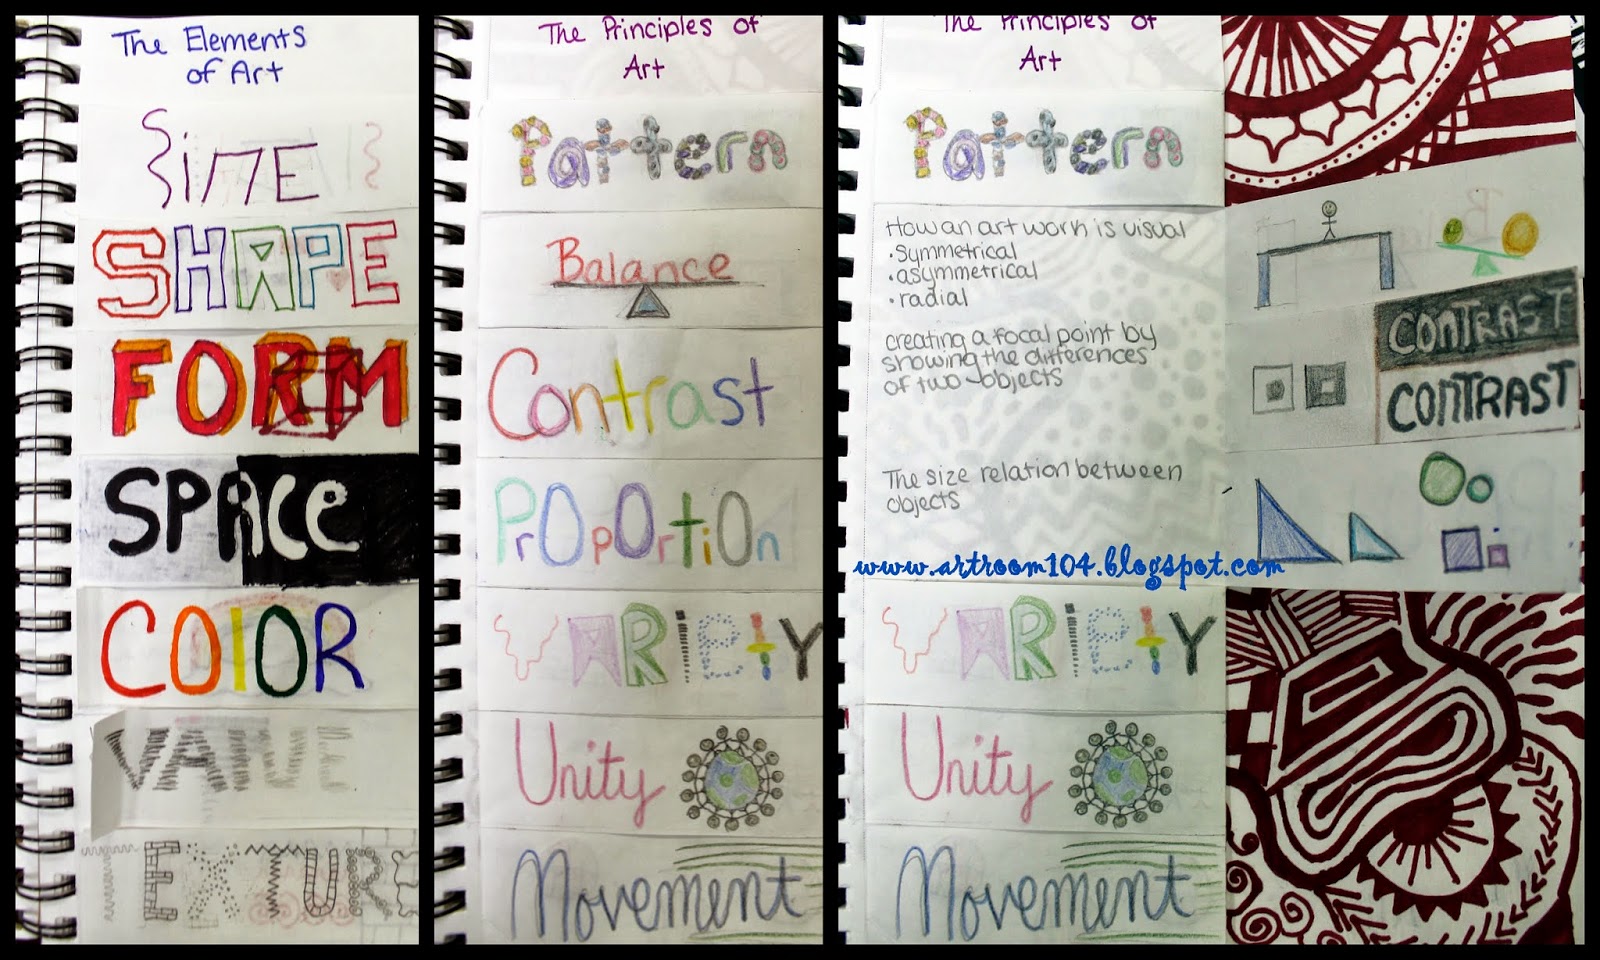
For the last week and a half, the students have been working on infographics...one for the elements and one for the principles.  I am really trying hard to use sketchbooks EVERY DAY in Studio Art.  Last year I dwindled off on assignments in them and it was virtually pointless to ask students to use them.  (Stay tuned for future posts about how I am using sketchbooks every day!)  If you've been following me for a while, you'll remember the elements of art infographic I had students do last year.  They did these on a separate piece of drawing paper and eventually lost them of threw them out.

This year, I required the students to build them right into their sketchbooks so that they would always have them!  I also required them to make one for the principles of art.  Last year my students did not know these and when we tried to do critiques, it was very difficult to talk about the art.  Here are a few examples, including my own!
My examples of the two infographics.


The second sketch assignment I had students do was a non-representational line design.  This was assigned after their introduction to the elements and principles infographic project.  Again, this is a repeat assignment from last year.  Students were asked to use only one color and line to create an interesting design.  Some students strayed outside the project parameters and used more than one color, but in all honesty, their designs ended up being more successful than some of the single colored ones, so I didn't dock them on the rubric.  This sketch assignment then opened the door for the final project of the unit...zentangled master's paintings!

 I use a standard rubric for sketch assignments that is worth 16 points.  Students are assessed on following assignment criteria, using the elements and principles, creativity/originality, and craftsmanship.  I try to write a comment on all rubrics before passing them back...another one of those things I can check off my Marzano checklist!

The zentangled paintings is something I did last year at the end of the year, sort of as a wrap up.  I decided that this project was an awesome way to reiterate the elements and principles so I moved it!  I expect that it will take the students about a week and perhaps a few days to complete these drawings, making unit 1 a total of about three weeks.  We started off the zentangles by making one 3 1/2" tile during a single class.  I always find it amazing that the students who rush everything else complain when you tell them that this should take less than 20 minutes!


Check back again this weekend and I'll share how I'm using sketchbooks to perform bell ringers EVERY DAY!  Also, if I have time, I'll delve into some Common Core unit plan writing that my district is enforcing this year to replace our lesson plans.  It's a good thing, and a pain in the butt thing all at the same time...  Give me another week and I will be able to start sharing some finished elementary projects too!

Tuesday, May 13, 2014

Studio Art: Masters Paintings

On the tail feathers of our zentangled masters project in Studio Art, I decided to follow-up with a master's painting project.  I figured that this was probably going to be our last big project before the end of the year.  This week ends the 5 week marking period of the last quarter.  For high school in our district, they technically only really attend school for 8 weeks of the 10 week quarter, as the last two weeks are for exams.  So, the rest of the school year will be for review (per student request) and for my exam and post-assessment drawing.  

My students wanted to do a sculpture project and a painting project, so I tried to find something that would fit both interests.  Before the spring break, some of my studio students had a little bit of free time to create art while others finished up, and one student created a sculpture using cardboard and paper towel rolls.  I thought that this was something we could all do so I did a little searching on Pinterest.  I found this pin, which showed how to make a 3-D letter out of cardboard, paper cups and masking tape.  I altered it a bit and used the paper towel rolls (which ironically depleted my stock!  Never in my almost four years of teaching now have I ever depleted my paper towel/TP roll stock!) instead of cups.  I then found this pin, which completed my idea for this project.

Students covered the sculptures with masking tape (which, much like the packing tape people sculptures we made, took a lot more tape than I thought it would).  Some did a really neat job doing it, which gave them a nice smooth painting surface, while others just slapped the tape on their however they wanted.  One thing I found that we had to do was put two layers on the outside edge, one layer horizontally across and then another layer vertically down to cover any gaps in the tape.

After the letters were taped up, I had students paint two coats of gesso over the cardboard and tape to create a good painting surface.

Here are some in-progress pictures of this project.  It is currently due this Friday, however I know I will have some stragglers who won't finish until later next week.  It's ironic...all the students ever do is want to copy other things in their art but when you ask them to copy a master's painting, suddenly "copying sucks!".  I almost think that this kind of project would be good to use with a group of students who are constantly plagiarizing others in their artwork...
A Monet...turning out amazing!

We have quite a few VanGogh's and Renoir's.

I allowed one person to do a Jackson Pollock in each class, as well as one Mondrian.  I tried to steer the lower students towards those artists.

I also think that this project is a great one to use for impressionism.  I have to say that impressionism is probably my favorite art movement and the style of painting is one that I favor myself.  The students who are doing impressionist paintings are actually enjoying themselves and finding that it isn't that difficult to get the same effect that the artist did!


Thursday, May 1, 2014

Studio Art: Value Practice

This project was purely taken from the following pin on Pinterest.  Mrs. Hahn over at Mini Matisse did this with her 8th graders and I stole the idea for my Studio students!  Since part of my SLO at the end of the year is an observational drawing project, I figured this was a perfect mid-year review of value and observational drawing, as well as an easy thing to start with the students and then leave for them to finish with my substitute.

While students were finishing up their coil pot projects, they had some free time, so they started this.  They had to create a word with at least five letters.  It had to be 3-D on a piece of computer paper using paper strips and tape.  They then had to draw it on a piece of drawing paper, doing their best to use value to make 
it look like it "pops" off the paper.

This particular student is very gifted at the arts.  She always does fabulous work and I often find it difficult to challenge her.  On the plus side, she has said that a few things I have thrown at her have been difficult mainly because of the style I have asked the project to be completed in...such as the cubist superheroes.  


This student spelled his word wrong and didn't realize it until after it was all glued down...he just reordered the letters in his drawing instead of starting over.

The "Selfie" one was kind of creative when it came to the word and the added little icon she made.


I graded these on the observational drawing rubric that I use to grade their pre- and post-assessment drawings.  The rubric can be found here.