Showing posts with label art club. Show all posts

Tuesday, November 10, 2015

We're at it again...mural painting with art club!

I'm super excited to say that we painting another mural this year...and it's HUGE!!  We are painting the entire wall in our cafeteria to look like a Paris city street.  I have a high school art club this year (with a few 7th and 8th graders mixed in) and we meet after school on Wednesdays for about an hour.  It's a super short period of time and I  feel like our progress is crawling, but I'm just excited to get to paint on a wall!!  Here's our progress so far!
We made sure to tape everything off so we didn't get in trouble for painting on the kick boards or the ceiling. ;)


The fountain is a work in progress...and the students decided that the sky needs some work.  They aren't happy with the clouds, and I fully support their decision.  I'm trying to be as hands off as possible for this, showing students some basic techniques to paint and letting them do most of the work.


Thursday, May 9, 2013

Art Club: Glass Plates

For the last few weeks, my art club has been working on lots of glass plates to sell at our art show.  This is going to be our major fundraising event for our field trip.  We will also be selling our boondoggle as well.  The art show is slowly creeping up on us...this year it will be on May 21st, budget vote night.

This particular student wanted to do a version of Starry Night...


The top two plates are my creations...

It's been a slow process getting them all fused and slumped...I can only do one large plate at a time with a few small plates.


One of our experiments are coral bowls.  I found this pin on Pinterest and I decided to experiment with the students.  My finished bowl is on the right, and one of the bowls that has not been fused is on the left.  We didn't quite follow the steps exactly from the pin, but pretty closely.  I have a box of Wasser glass (I think that's the brand) that I tried using with the Amaco glass last year, but with bad results.  The COE for both types of glass was the same, but I think because the brands were different, they didn't fuse very well together.  My test plate had a lot of holes and air bubbles in it.  I decided to try using the Wasser glass for these coral bowls...if it didn't work, it wouldn't feel like as much of a waste as if we used the Amaco glass, which I always have positive results with.

Basically all we did was cut up a 6"x6" piece of glass into strips and then layer them on top of each other.  Some students added some extra color using noodles and stringers.  It's been a slow process firing these, but they're looking pretty cool!


Wednesday, February 20, 2013

Art Club Fundraising

Now that we are done with our mural, it's time for my art club to start working on making some money for their field trip at the end of the year!  When I was growing up, I was fascinated with boondoggle.  Don't know what boondoggle is?  How about plastic lacing...or gimp?  My dad and my grandma taught me how to make key chains and I used to make them and sell them on the bus when I was in elementary school!

When I started my art club, I knew that the previous teacher used to do bake sales to raise money for a field trip.  To me, that's not very artistic (especially since parents made the stuff to sell!), plus it's so hard to have a bake sale in NYS now because of health code stuff.  If it's not prepared in a school kitchen, you can't sell it anymore!  We charge anywhere from 25 cents (for the short, zipper pulls...the Kinders like buying these and can afford them) to $2.50 for the bracelets below.

If you don't know about boondoggle, or you need brushing up on it, check out the Boondoggle Man website.  His site is AWESOME.  He has videos as well as step-by-step pictures for just about EVERY boondoggle stitch possible.

Here are the items I'll be teaching my kids how to make on Wednesday when we get back from break.  They've been hounding me to learn how to do this, but it takes a bit to teach these and we needed to finish the mural.

The bottle tab bracelets are really popular bracelets.  They're so fun to make because you can change up the color of the laces and/or the color of the tabs if you have enough!  One of the teachers at my school brought me TWO gallon coffee cans filled with tabs of all sorts of different colors!

There are lots of different ways to make these bracelets.  I based my pattern off of a bracelet my brother got from a friend.  A lot of times people make a single layer of tabs, but these can actually hurt to wear because the rough side of the tab is against the skin.  I use two layers of tabs, back to back and off set just a bit.  When school starts back up and I have access to my tabs and boondoggle, I post a tutorial!

These are the other types of bracelets that are pretty popular.  These cuff bracelets use a thin piece of metal, usually aluminum strips.  You can find lots of tutorials on how to make these in boondoggle books from Michaels or JoAnns (that's where I got all these patterns from).


For my last share of this post, I will share my boondoggle cheat sheet that I have made to send home with my students.  Once they get the basic stitches down (box, brick wall, spiral and zig zag), I send them home with sheet.  These all came from the Boondoggle Man website.  I simplified the directions and added a picture so that the students can do the fancy key chains at home without me.  The fishy/ribbon is a very popular key chain.  Last year we made about 30 of these, charged $2 for them and then donated the money to one of the caner walks that a teacher was participating in.

Saturday, February 16, 2013

Finished Mural! (6 days and then some...)

That's right!  Our mural is finished!  We spent a total of 6 after school days on it, and I spent about three of my free periods as well.  I'm extremely happy with the results!  We finished it this last Wednesday (however I went in the next day to touch up the pink/red fish and paint a top coat of acrylic glaze over the top).  I'm not extremely happy with the red/pink fish, but I knew it was going to come to a point where I would have to release the reins a little, especially since we needed to get it done before the February break...our nurse is supposed to come back to school after the break!


Wednesday, December 12, 2012

Art Club Mural: Nurse's Office

Riding off the shirt tails of the Christmas program mural, I decided to jump right in and start a second mural today with art club.  Every year I would like to start painting a mural in the school somewhere until we run out of room! ;)

Currently, our nurse is out of school.  She underwent treatment for breast cancer and is doing well now...only one more chemo treatment I believe!  Two years ago when I started teaching, she asked me if I would do a mural for her in her office, but I never got around to it...didn't feel I was ready. Since she is out, I figured this would be the perfect opportunity to paint one for her and surprise her when she gets back!  I can't wait!

I decided to go with an underwater theme.  A few art clubs ago, I had the kids sketch out some ideas of what they wanted to go in it.  I took their ideas and then drew this mural on the wall.  I love the look of the "View From a Submarine" project so much that I decided we were going to paint a similar one on the wall!

I probably won't have any more photos of our progress on this until after Christmas break...next Wednesday I have to cancel art club because I am a chaperon for a field trip to a nursing home with the Extended Day Program...oh the suspense will kill me!  I may have to sneak in there and do some painting myself, just for therapy!

I drew out the mural during my free period.  These three girls started us out...painting the water.

Next, these three students painted the water higher up where the shorter students couldn't reach... ;)


A few had a hard time brushing horizontally...they all wanted to do brush strokes parallel to whatever they were painting next to...even though they weren't as perfectly straight strokes as I would have liked, it still looks great!

While everyone painted, the others sat in the hallway working on homework and making Christmas cards for next Wednesday's field trip to pass out to the old folks. 

Just a shot inside the office door...the mural is being painted in the "waiting area".


The water is finished!

Next, these three students did the sand at the bottom...they painted is brownish-gold and then another student used a sponge-brush and sponged in white paint.


The last three students did the rocks.  These two painted them black...

And this student added some white to give them dimension.

Ta-da!  Day 1 progress!

Previously my school did not have any murals on the walls.  Last fall, the high school teacher had a visiting artist on Trout Lake (where she lives) and invited her to school to paint a mural with the high school students.  They did a large mural on canvas, which is in the lower cafeteria in our school.  At the time, the school was hesitant to allow her to paint directly on the walls.

Over the summer, I was able to get approval for this mural.  I'm not sure why I was able to get approval (I went to the board, had a plan written up, etc.), but I was able to paint directly on a wall!  So exciting!  A true mural!  Instead of using regular acrylic, I purchased Chroma Mural Paint from eNasco.  I don't really notice a difference between it and regular acrylic...only that the consistency is a little more watery.

For this mural, I didn't even have to go to the board!  I just went to my superintendent and she approved it!  That's progress!

Christmas Program Mural: Art Club

Tomorrow is our annual PreK-4th grade Christmas program.  A few gung-ho teachers get together each year and coordinate a cute little Christmas program with a little bit of acting from the 4th graders and singing by the other grades.  I haven't had much to do with the acting part, but the scenery is another story!  I drew out the scene and had my art club kids paint the backdrop.  It took us two after school days (of about one hour) to paint this, and then I did some touch up and added the black lines to the house today.  Here's our backdrop!  More pictures to come from the performance!


 From the first day of painting...we painted the sky blue with some violet...and started the house...

Somewhere along the way, I lost the pictures I took on the second day...so these are from today!

On the second day, we finished the house, the snow and added the trees.


Today I added the black lines on the house and touched up a few spots here and there...

Wednesday, November 7, 2012

After School Program Projects

Well, this week marks the end of the first 10 weeks of school.  I have been in a scramble to try and correct artwork that I am behind on correcting because of being out of school sick...I've also had to try and start new projects with about half my students.  It never seems to fail...even though I try to stagger projects, I usually end up finishing and starting new projects with numerous grade levels, no matter how hard I try not to.  Oh well.

Here are some projects that we have been doing after school the last few days.

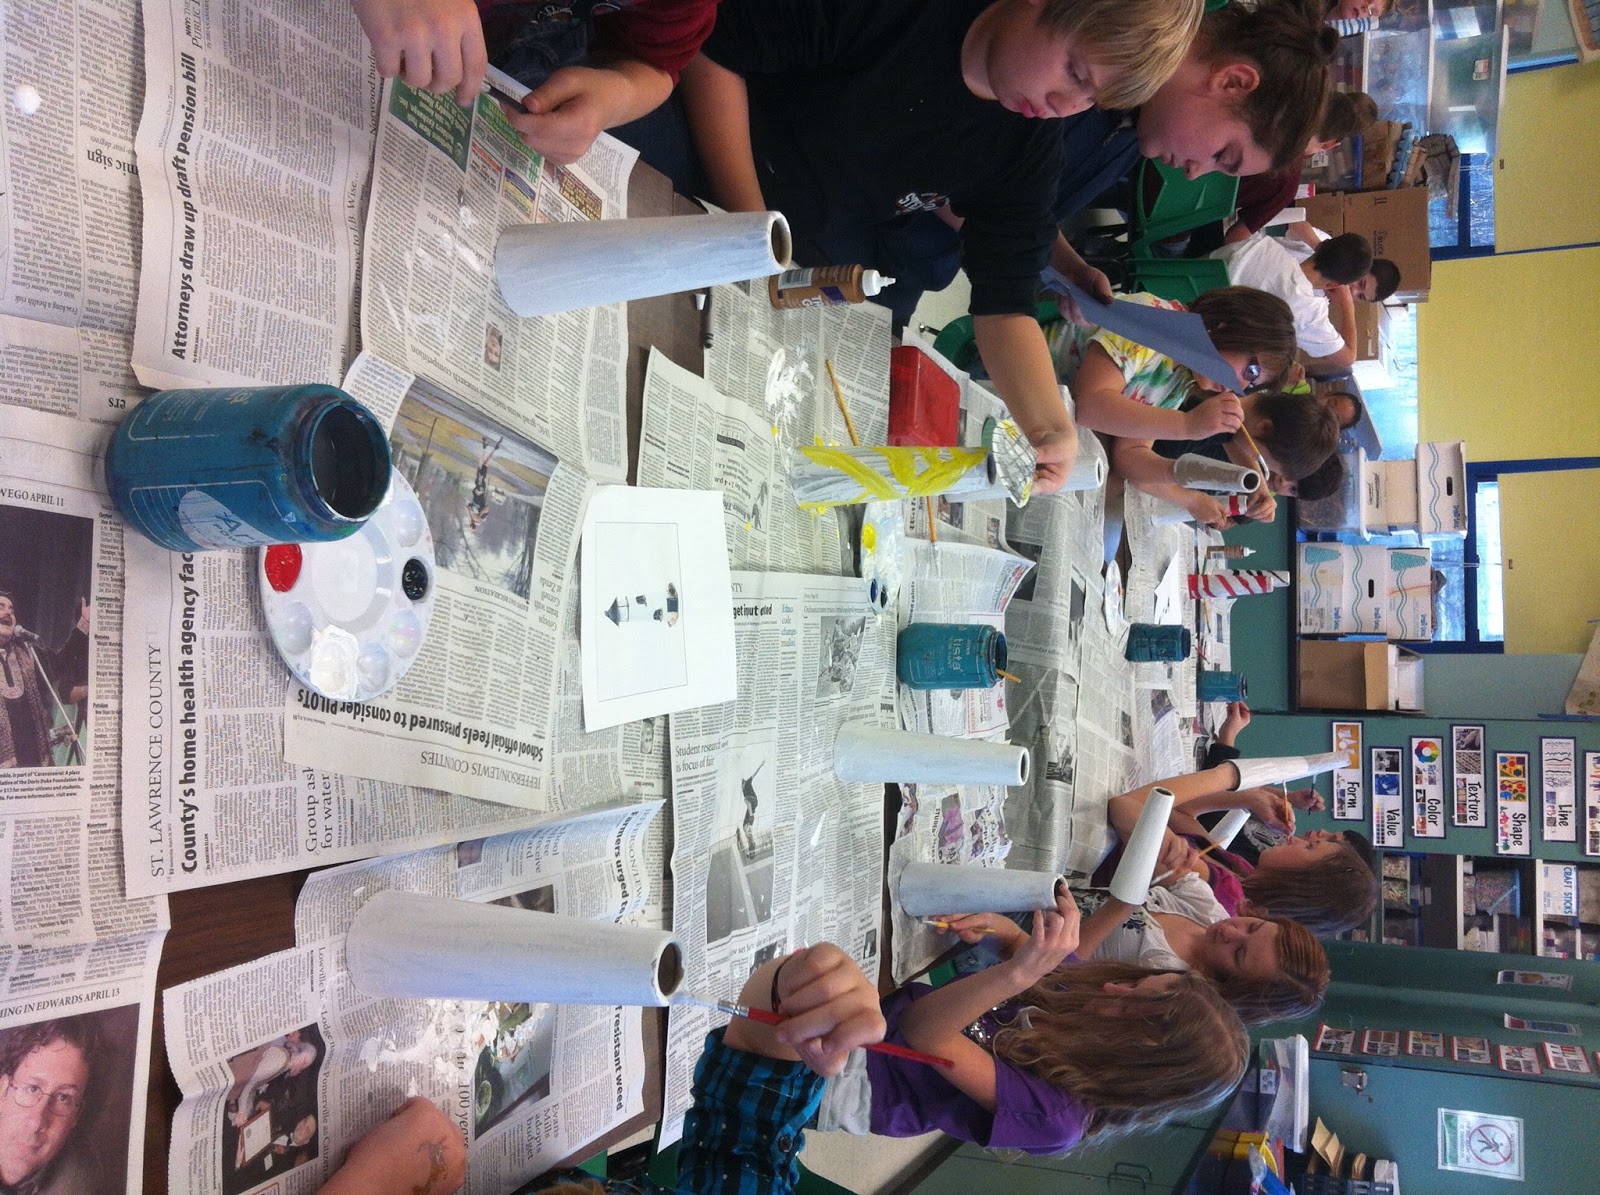
On Tuesday during the Extended Day program, we made lighthouse sculptures.  I bought this kit through S&S Worldwide, but you could definitely do it with materials you probably already have in your room. 

To make one lighthouse you need:
-cardboard cone (from yarn)
-paint
-colored tagboard or construction paper
-brown/tan sand
-seashells
-tacky glue
-hot glue

Basically, first we painted our lighthouses white, and then added a stripe.  While that dried, we cut out windows, a door, and a roof.  To make the roof, we cut out a 3" circle and then cut a slit in it to the middle.  Then we pulled it around and glued the ends together to make the pitched roof.  We glued all of those on using tacky glue, as it holds faster for this quick after school projects.  We lined the bottom of the lighthouses with tacky glue and then dipped them in a plate of sand.  For the final step, I let the kids glue sea shells on using a glue gun.

Some got smart and glued paper to the bottom of their lighthouses to make it easier to glue the seashells on!  If I would have had more time with them, I would have turned this into a 2-day project and had them do more details, but I had 28 students in my room working on this in 45 minutes, and another 4 students working with another teacher making Thanksgiving wreaths!  Whew!


-------------------------------------------------------------------------------------

Today was also my first day of After School Art Club.  Today I only had about 8 kids out of 16 show up...go figure.  However, most had a reasonable excuse for not coming today.  And, it was great only having 8 kids to work with.

For our first art club project, we are going to paint a mural in the nurse's office.  Our nurse is currently out of school recovering from major surgery, so I thought it would be nice to surprise her when she comes back with a mural!  She asked me to paint her one with my art club the first year I started, but I didn't feel I was ready to tackle something like that, but this year we're going to do it!  

In preparation for that, I started my art club kids off today by painting fish today.  I bought these little fish shaped canvases from Nasco so I figured it would be the perfect opportunity to use them since we are going to paint an underwater mural.  The goal of our painting these today was to get a feel for acrylic paint and to start to learn how to mix colors on the canvas.  I tried to get the kids to use a pointillism technique so they could see how acrylic paint will actually create a real texture and emulate fish scales.  

Here are our results!


My fish is the one at the very bottom of this picture.

I had five 6th graders and three 5th graders today for these.  I think, for the most part, they did a great job!  First we did our fins, then the body.  We let them dry before adding the rest of the details, like the eye, the fin on the side of the fish, and some metallic scales with metallic acrylic paint.  The 6th graders did a really great job on theirs and really understood the concept of how to mix the paint.  The 5th graders struggled a bit, but they still did pretty well!  I should point out that we did not use a picture for reference to see how light reflects off of a fish...I didn't have enough time to get any references ready.  

Next Wednesday, we will surf the internet to find what each student wants to paint on the mural.  They will draw it and then create a template to trace on the wall.  While we paint the background of the mural, I will have the students do a practice painting of their own mural item before they get to do it on the wall.