Showing posts with label darkroom. Show all posts

Wednesday, October 5, 2016

Photography: Pinhole Cameras & My First Experience Back in the Darkroom since 2006!

This year, I have TWO sections of Photography, and each section has 10 students in it.  Sooooo exciting!  Also exciting, is that the students are pumped to use the darkroom!  Needless to say, it's been about 10 years since I've actually worked in a darkroom at college, so I'm a bit rusty and the chemical mixing, developing times, and in general, the entire process.  The nice thing, is that it's coming back to me slowly, but even nicer, is that I'm feeling like it makes my students feel a bit better about now getting it right the first time, if I'm showing them that learning dark room photography tends to be a lot of trial and error in the beginning.
Lesson #1: Make sure you rinse out the photo chemical storage jugs BEFORE mixing new chemicals.  Any dry developer junks up in the bottle and turns it dark brown.  Lesson learned!

This is also the first class that I am really using a textbook in.  My district purchased me 25 of Davis Productions "Focus on Photography" textbooks, and I'm really loving them!  If you want a quality textbook that you'll actually use, this is it!  Over the end of the last school year, I was starting to plan my curriculum for the school year, knowing that I wanted to start more with digital and move into film photography as students learned more about composition and their photos became less "snap shot-y" and more artistic so as not to waste the dark room materials.  I asked my Davis representative that I met at a NYSATA Conference to send me a copy of their textbook so I could check it out, and I realized that much of my anticipated curriculum, aligned with what was in the textbook, and in the same order it was in the textbook.
Just as a disclosure, I am not being paid by Davis to add this to my blog...this is free advertising for them because I really am loving this textbook!

The first chapter in the textbook gives a little history behind the camera and talks about how a camera works.  Naturally, pin hole cameras come to mind, and so I made my FIRST pin hole camera!  Yep.  I've NEVER made one before. In the textbook, they give you directions to making a pinhole camera using a shoe box that is just for viewing images on a screen inside the camera.  I altered mine, and had the students alter theirs, to have a shutter over the pin hole lens as well as a cover over the viewfinder, to make the camera light tight for putting photo paper inside.

The directions in the textbook have you make a lens with a paper punch.  What I (and my students) discovered through trial and error is that outside, this size lens lets in way too much light for longer exposure times (thus the dark image on the lower right corner).  Inside, this lens size works relatively well.

Next, I made a different size lens, using a larger safety pin to poke a hole through the black paper.  Outside, this size pin hole was perfect when taking a photo in indirect sunlight on a pretty bright day.  Inside, however, in the fluorescent lighting, this size pin hole was not good at all, no matter how long I kept the pin hole open for.
I took a shot of the bench that I had my pin hole camera sitting on so that you can see the view myself and many students used for their cameras.

The Davis textbook also gives you rubrics for their projects, so I used it for this project, but altered it a bit since we technically changed the format of the pin hole camera.  I asked students to turn in 3 developed photographs with their pin hole camera with a brief reflection on the back of each image, telling me how long they kept their shutter open for, the size of their pin hole, and if there was too much or too little light.

We also used these images as a way to talk about the dark room chemicals.  I am currently in the process of trying to figure out a better way to store the chemicals when not in use.  As our chemicals stayed out over time, they didn't work as well, and the students noticed that.  They also got some weird drips and sticky parts on their images, which meant they didn't fully submerge the image in the chemicals fast enough, or they didn't keep them in the stop bath / fixer long enough.  Some have marks because they got stuck together while wet.  Here are some of the cameras and the images students captured, as well as what their cameras look like:

She got the hang of it by her third photo (the middle one).

The bottom image was her last one and it's awesome! Not quite sure how the tape mark got on her image though...I had the students put a tape curl on the back of the photo paper and had them tape it to the screen inside their camera to hold the paper up.  I think she may have taped it behind the screen (which was made out of tracing paper), but I'm not sure.

This student bought a picture box from Walmart.  It made it really easy to make a shutter for her lens using the little metal label holder! Her images turned out awesome, as well, and she learned that she needs to properly rinse the photo in each chemical so as not to get the chemical drips and such.

This student had AMAZING images!  They are literally perfect!  I love how she made her shutter, too.  She attached a popsicle stick to the shutter so she could slide it horizontally instead of vertically.  She is the only student who did that!

Another great turn out of images!

She lost her third image, and even though I asked them to hand in three image, I accepted two as long as they could explain to me why their image was black, white, had drip marks, etc.

This was from one of my exchange students.  We have a bit of a language barrier but he is doing great and understanding things quickly!

All in all, this experience was a really awesome one for learning the dark room through trial and error.  Students really learned how important it was to have a light-tight box and how the tiniest bit of light getting in through a crack could screw up their image.  I assessed students on if their camera was light tight, had a viewfinder with a cover, lens with a cover, and a screen inside, as well as their three images and if they were able to develop at least one good, clear image.  I had students write on the back of their images how long they exposed the camera lens for and then reflect on whether there was too much light, not enough, too small of a pin hole, too big, bad chemicals, etc.

Because of this simple project and experimentation, we have come up with a routine for the darkroom, figuring that we will have to alternate who gets to use the darkroom each class (five in, and five either developing film, taking photographs, or working on digital images on the computer).  I only have three enlargers (two of which work, and one I have to look at and fix), and a shoddy set-up for developing, so not many people can work in there at once.

Tuesday, September 13, 2016

Welcome to My {NEW} Classroom!


Welcome back NY!  Today was officially my sixth day back with students...we had two days of staff development on Thursday and Friday before Labor Day, and then students on Tuesday.  I can tell already that I am going to absolutely LOVE this school year!

First, have a look at my new darkroom!  Well, it's not new...not at all...but this is the first time in AT LEAST four years that you can actually walk into this room and see the counters!  Don't even ask me about the mess of chemicals I found spilled inside of those cabinets from incorrect storage methods... ;)  Hopefully I'll be good to go with dark room photography for a few years!  The chemicals are all pretty much expired, but the stop bath all seems fine, and I have powder developer and fixer in there, so hopefully that will all work.  More on my first adventure in the dark room in my next blog post!

Here's a look at my room...before children arrived!  I was allowed to purchase new stools, so I picked out these awesome art benches.  They are a bit low and I was nervous my taller students would hate them, but everyone, and I mean EVERYONE, loves them!  The students can't get over how comfortable they are AND no one is tipping over in them or pinching fingers off!  Seriously!  Those stools you see stacked up in the top right photo were all splitting in the seats and I had a kid pinch off the pad of his finger last year!  We are now going to turn those stools into an art club project. ;)

'
In my elementary room, the shelving behind my chalkboards was for storing class projects.  Each teacher had an individual box.  In this room, I'm blessed to be able to use these shelves for resources.  I even had TONS of fabulous art books donated to my room by my past superintendent! My goal this year is to make students use books more for research and inspiration than the internet.  If the last three years have taught me anything about high school, it's that they think if it's on the internet, it's fair game for copying!


My side wall bulletin boards have now been split into six classes instead of 3 or 4...because I officially teacher six different classes this year! (Well, actually I teach 8, but I'll get to that in a minute...)  I am using the bins as Visual Journal storage so that the students don't have to drag sketchbooks back and forth.  So far, they seem pretty excited about their homework assignments for their classes and the bins haven't been too full after each class, but it is only the second week of school! 

I used to have exit slip posters hanging on this cupboard next to the door.  Last year, I kind of got lazy and didn't really use the exit slip, so I nixed those.  Now, homework will be listed here, as well as on the Google Classroom.  Each student in our district has a Gmail account.  As I have learned, high school students don't like to write things down in planners to remember them, and they tend to be glued to their technology, so I'm going to hone in on that this year and utilize the digital classroom.  So far, everyone has been very receptive to it and I think it's going to be successful!

Let's get down to the nitty gritty.  Here is my schedule.  I am sooooo happy with it!  Not only am I down from 13 different preps to 8, but for once, I'm not overloaded every day!  In my union, the contract specifies that teachers will have 6 teaching preps daily, one duty (study hall or ISS duty), one planning period, and one lunch...UNLESS they are a special area teacher or a teacher who has a lab that connects to their class (a.k.a. science and math).  So, in the past, I've always had 7 teaching preps a day, a prep period, ISS duty, and a lunch.  Now, I only have 7 classes two days a week, and the rest are all 6, and GASP!  One day with 5!
My new cohort in my district is K-6 and special education.  She sees Pre-K - 6th grade once a cycle still, and then works in the resource room for parts of her day.  I still receive two classes from the elementary, both of which are the upper elementary special education classes.  Generally, the students are anywhere from 3rd-6th grade in those two classes, and they are some of my favorite students!!  

Other exciting news?  I actually have a common lunch period with other teachers FOR THE FIRST TIME IN 7 YEARS...and I actually have the common study hall time this year too!

I've already got my next two post, well, actually three posts, planned, so be on the look out!  My fashion design class is jumping right into making our own mannequins for sewing and pinning clothes to, and my Studio, Art 7, and Drawing & Painting classes are ALL loving the visual journal assignments that they have received as homework assignments.  Yes, that's right.  They are ENJOYING homework!  More on that to come!

Tuesday, August 5, 2014

Dabbling in Light Painting

Wow!  I have forgotten what it's like to have a computer!  Let me tell you...the month of July was not friendly to my family....I think we broke a mirror somewhere and didn't know it!  Luckily, Camille is growing like a weed and my hubby still appears to be in the cancer free zone, however a month after he returned to work, the new management that was hired while he was out for his treatments decided that he just wasn't working out anymore anymore with the new direction they are taking the company and released him from his job.  Big :( . 

Meanwhile, we had purchased a pool from Walmart and after setting up and paying the fire company to fill it, a seam burst and we lost all of the water.  Only just this week did we finally get the replacement liner in and the pool filled again.  The A/C went in our new vehicle, I dropped my new Kindle after buying a $60 case for it and shattered the screen (though when I mentioned that I was also an iPhone user after Amazon wanted to charge me $150 for a new Kindle, they were kind enough to send me a new one for free...)...need I go on?  

Needless to say, I'm very sorry that I haven't been able to post for a while!  I have SO MUCH to share...not only do I still have posts from the end of the last school year to share, but I also have projects from the extended day program that I worked in the month of July.

First post....light painting!  After my elective class finished their Modern Mona Lisa paintings, we didn't really have much time to do anything super in depth, so I turned to light painting.  First, we experimented with glow sticks in the dark room for a few days...

These are glow sticks attached to a fan.  The students took the wire encasement off the blades, taped the glow sticks on, and then let 'er spin!  The picture in the top left is when the sticks were put in rainbow order of course (pink, yellow, green, blue and purple).

Next, we tried doing some drawing with the glow sticks.  Despite the darkroom being pitch black, the glow sticks still lit the room up enough to show the students a bit.  We finally got smart enough to hide the glow sticks when a color wasn't being used.
The landscape light painting took some experimentation to get it just right.  They tried doing it all at once, doing the sky first, then last, then first again...The order we did things for the final, "good" landscape, which is the bigger picture in the collage, was the green grass, blue sky, yellow sun, the flower and then the butterfly.  All the students stood in a group in the same spot and one person at a time did their color.  It was easier to get things lined up with them all standing together.

Remember to do your letters backwards if you're using glow sticks, so that they can be read in the picture!

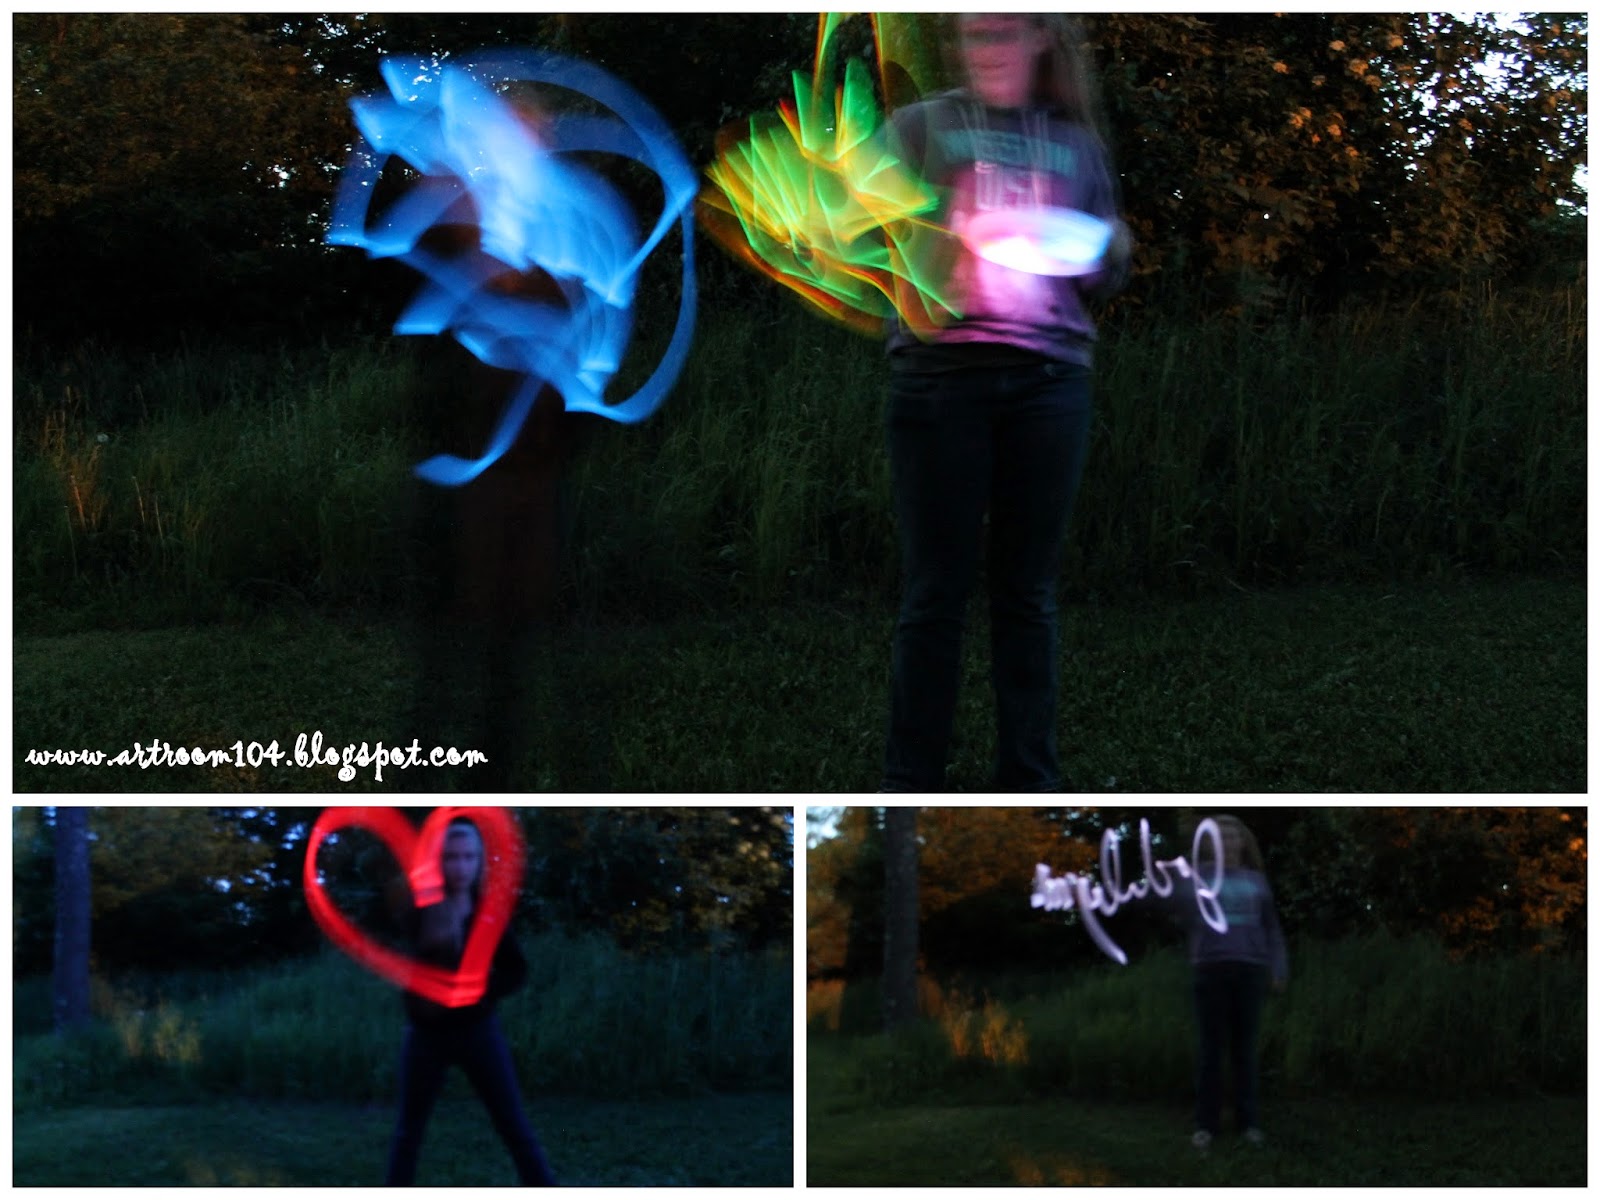
For our last bit of experimentation, we got permission from the superintendent to come back on school grounds to do this at night outside.  We got to school around 9:00, but couldn't really do much of this until about 9:30.  For these photos, I had light-up Frisbees that the ladies used.
These two photos were of the girls tossing the Frisbees back and forth, and running through the playground.  I really like the playground ones!  When they got to the end of the playground, the took the Frisbee and tossed it towards the camera.

And more glow stick fun...In the bottom right picture, one student wrote her name but it's backwards to the viewer because she wrote it the write way from how she was standing.

I really enjoyed fooling around with these.  I used my tripod and my DSLR camera.  I put it on manual, opened up the shutter for anywhere from 10 seconds to 25 seconds.  I also had to turn off the automatic focus.  Even though the night pictures outside look like it was dusk, it was actually very dark outside.

It is my goal this year to get multiple colored laser pointers.  I have a red one, but I want to see if I can find laser pointers in an assortment of colors.  I think there is a lot more that could be done inside in the darkroom on the wall with the laser pointers.