Showing posts with label value. Show all posts

Monday, March 23, 2015

Studio Art: White Charcoal Sketch

On the bulletin board in front of my computer, I have some art works hanging that I did when I was in high school.  I've been noticing that my supply of mat board scraps has been on the rise since we've been mating more artwork this year, and I hate to waste them. They're usually too small to use to frame an artwork but I hate throwing them out.  So, I decided to give students a bit of a challenging assignment for a sketchbook assignment...reverse value drawings, or highlight drawings, as some call them!  


I have two drawings on display that I did in high school and the students have always complimented them, so I decided to give them the assignment for homework.  I gave each student a piece of scrap black mat board and a charcoal pencil.  I told them that they could use a black and white photograph to help them do the drawing, but the photo could not be a logo.  Since this concept is sometimes hard for people to grasp, I eased up on my normal "no copying" rule.

These two students created these images without copying!  I was so excited to get these two!  The first one that says "Camden", was done all on her own, and the second artist drew his own guitar.  Such a great perception of depth with his!


This student didn't exactly follow the "no logo" rule...but she did have amazing gradation.


I'm actually thinking that next year, I may incorporate this project as one of the drawing unit projects instead of a sketchbook assignment.  Most of the students really enjoyed the challenge of having to think backwards!

Thursday, January 8, 2015

3rd Grade: Wayne Thiebaud Cake Drawings

Hopefully I'm going to be playing catch-up these next few days!  I've got SO MANY projects to share from before the winter break, it's not even funny!  Things have been insanely hectic with the holidays, conferences, and committees at school.  I also recently became a consultant for Jamberry in order to help pay medical bills from last year.  My blog has unfortunately taken a back seat to all of these things, but it's my goal to make sure that stops happening!

This next project I'm going to share is probably one you've seen on Pinterest.  My students in 3rd grade LOVED making these oil pastel Wayne Thiebaud cakes!  (Did you know his last name is pronounced "tee-bow"?  Like the football player?  I didn't until I presented this project!).  This is the first time I've used this artist as a reference in my classes, and the students just loved it.  I find that they always love oil pastels anyways, because it's so easy for them to be successful with color blending and value, but the added fact that they were designing cakes like the Cake Boss just made it even cooler!
I am in LOVE with this one!  There is a local, elementary art show coming up and I wasn't sure if I'd have four pieces to send to it, but I do believe that this one may be going! :)

This project even correlates with Common Core math, as students were turning basic shapes into 3-D forms.  We used vocabulary such as cylinders and cubes to describe the shapes of our cake tiers.  Students practiced drawing their cakes on a worksheet for the first day.  Then, they drew them on 12"x18" black paper the second day, and I demonstrated how to blend the colors together on the cake tiers, adding in a little black for shadows.  On the third day, students finished their tiers and colored the background, finishing them up!


Thursday, November 13, 2014

Studio Art: Micography Portraits

I am one of those art teachers that normally HATES doing self-portraits.  I have never liked drawing people.  Very rarely do I do more than one self-portrait lesson over a expanse of grade levels, yet here I am this year and I have already done two self-portrait projects, with a third one in the makings!  My Studio Art classes started their drawing unit a while back and we kicked off the unit with self-portraits. (Currently, they are finishing up mannequin drawings and we will be starting our last project for the unit tomorrow!)

Since my last bell ringer artist in Studio Art was Chuck Close, it seemed appropriate to do a self-portrait using the grid method.  We had a modeling day in class where students had to pose for three portraits.  I printed them out in black and white, they chose their favorite, and taped it into their sketchbooks.  I had them tape a piece of transparency paper over the top to draw the grid.  Doing it this way is an awesome way to ensure their picture doesn't get ruined if they mess up the grid!  A few students measured wrong and all they had to do was remove the transparency paper, tape a new one down, and start over.
Our pictures were 5"x7" and the drawing paper was 10"x14".  Makes for a good discussion about proportion as well!  (Ahem, math anyone??)

As a sketchbook assignment, I asked students to create a list of words about themselves on a page in their sketchbook.  They could simply list the words (though that got less points for creativity on my homework rubric), write a poem, illustrate them, etc.  The words from that homework assignment became the words they used on their projects.  This also, unknowlingly, integrated their current ELA Common Core module.  In Module 1, students in 9th grade just finished reading "St. Lucy's Home for Girls Raised by Wolves," by Karen Russell.  As part of the unit, students had to analyze characters from the book, using descriptive words.  Essentially, I was asking students to analyze themselves in this project, and many of the words they used to describe themselves were academic vocabulary words from their ELA unit!

The following collages are some progress shots with the finished product.


Thursday, October 9, 2014

More Artist Bell Ringers & Sketchbook Use

A week or so ago, I posted about how I am using sketchbooks this year in my Studio class.  I am going to add to that article by posting the latest things we've added to our sketchbooks IN CLASS via bell ringers and classwork.

First off, students did have a sketchbook assignment over the weekend a few weeks ago...but only because it pertained to what they were doing in class.  Students were completing the zentangled master's project (I will be sharing the completed ones from this year in the next few days), so I had them practice zentangles by zentangling a random object.  (Mine is the camera!)

Along with the zentangle project, students had to create a page in their sketchbook to doodle, practice and make notes about their main project.  I printed out a copy of each person's original painting.  Some students decided to grid it, so I had them tape transparency paper over the original.  I encouraged students to try out different zentangles on that page before putting them on their final drawing.
Eventually, I want to start photographing student progress periodically throughout the project and have students past the photograph into their sketchbook.  I'll then have them reflect via bell ringer on what they want to accomplish during the week on the project, what they might be wanting to change, what they are having a hard time on, etc.

We are currently onto our next unit, which is 2-D media, focusing on drawing.  In an effort to cut down on the notes I had students take last year in their note packets, I'm trying to transfer a lot of these notes into class activities in the sketchbook.  The first one we've done is this value page.  Students had to create a value scale, a shaded cube, and write the name and definition for each of the four shading techniques (blending, hatching, cross-hatching, and stippling).  What's great about this being in the sketchbook is that it's less paper I have to copy and waste and it's always in their sketchbook as a reminder of what value is for homework sketch assignments.

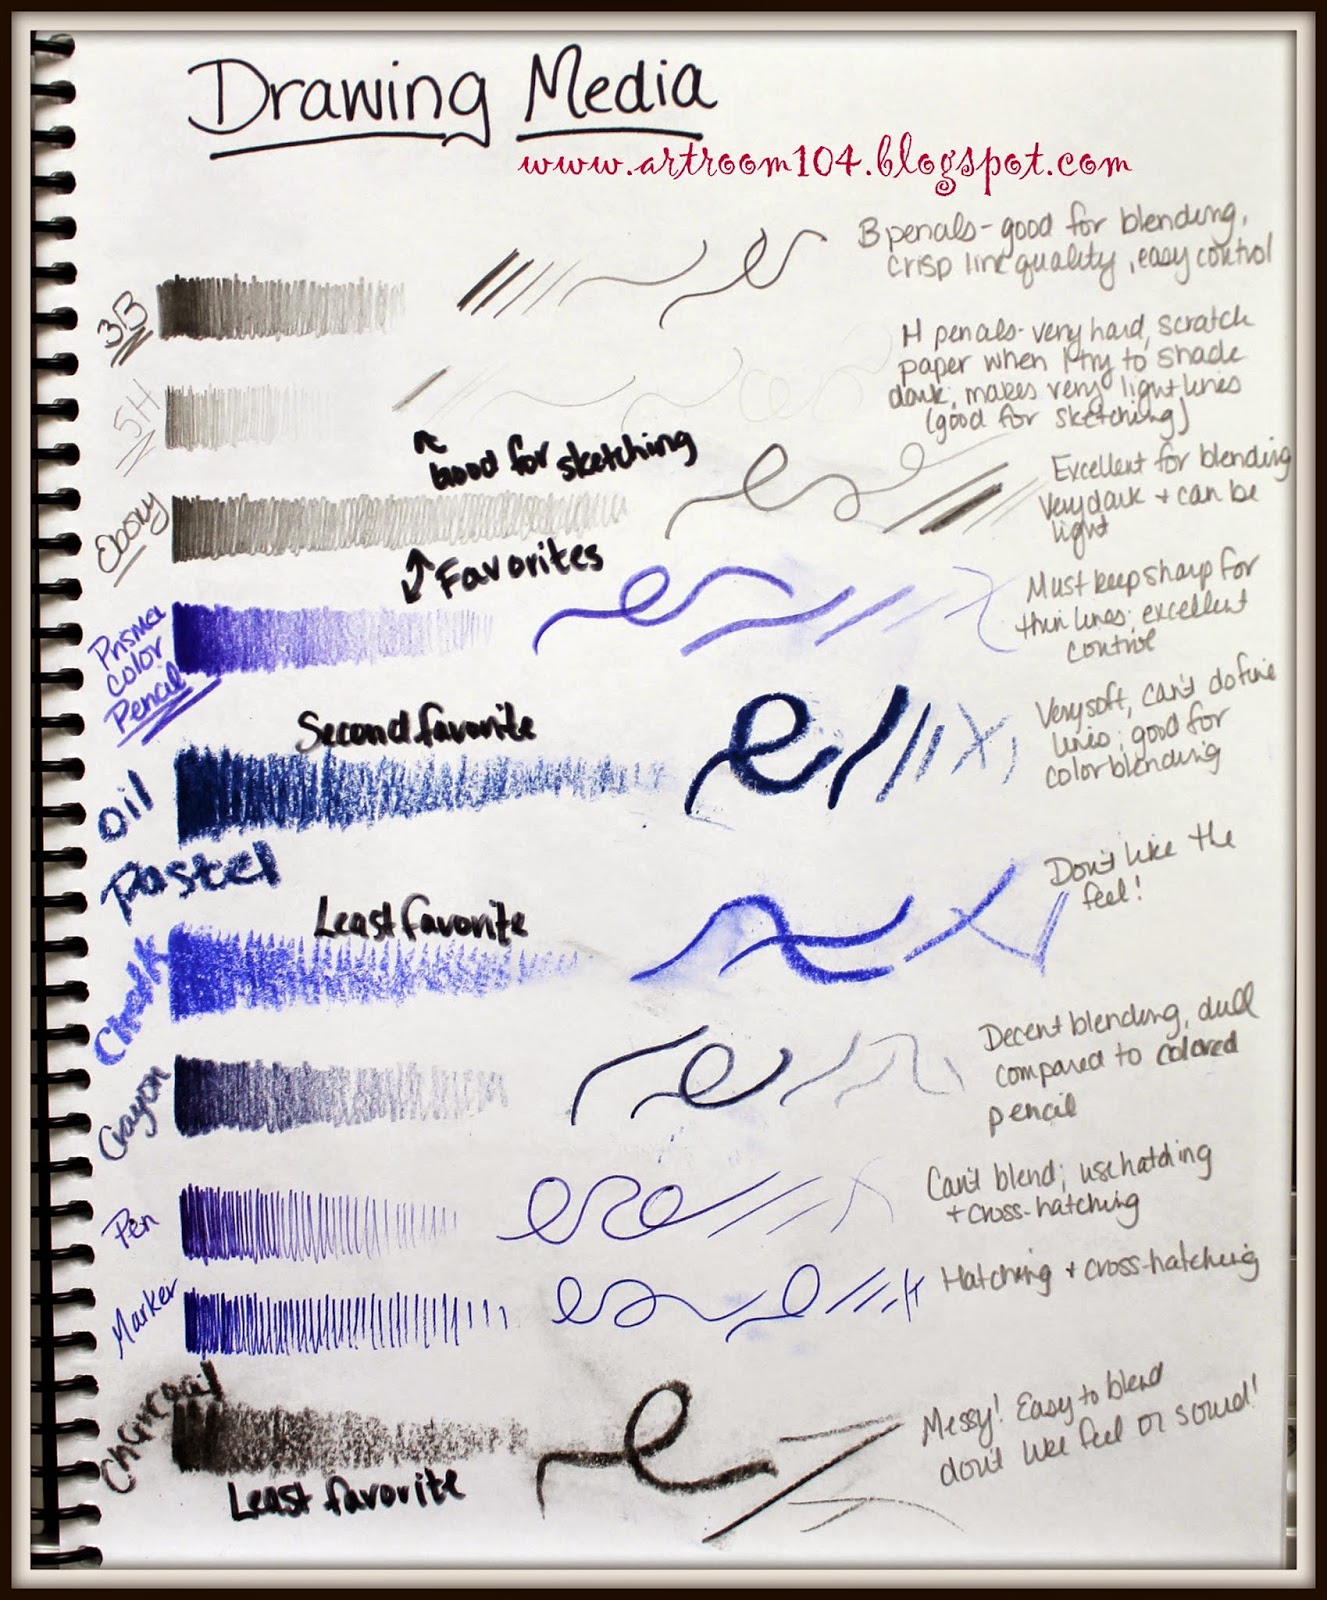
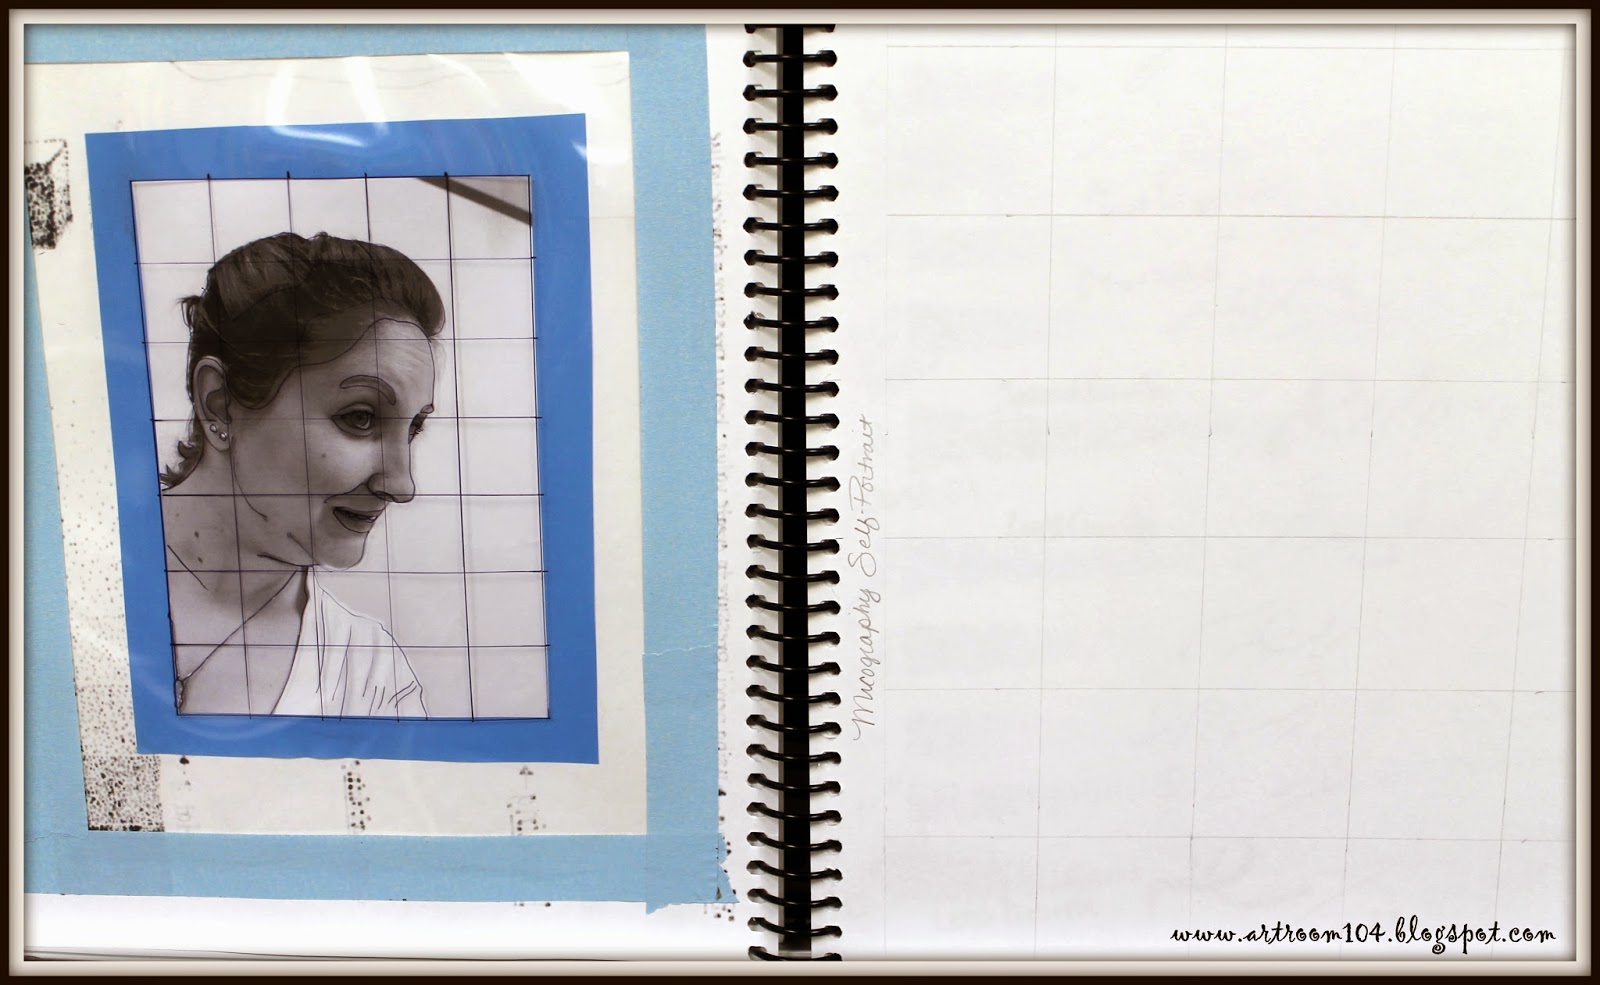
I've gone ahead and done the next classroom activity in my sketchbook...the students have not done this yet.  Our current project, which we are officially starting Monday, is going to be self-portraits done on a grid system using words as value (micography)...hence the value practice.  Our next project will be to practice doing observational drawings using the art mannequins.  Last year, I had students to their art mannequin drawing using only pencil or Sharpie, however this year I want to be more flexible.  Therefore, I will be having the students create a "Drawing Media" page in their sketchbook.  They will have to create a simple value scale, draw a variety of lines, label each medium, and make some notes (i.e. Do you like the medium? Which is your least favorite and most favorite and why?  Do you think a certain type of drawing medium is better for one type of drawing than another? etc.)

And finally, here are some artist bell ringer pages that we have completed.  I have decided that I am going to do a different artist every other week so that I can use bell ringers to review other material.    We already did Piet Mondrian, and next came Joan Miro.  I have decided on this set "schedule" for these weekly artist bell ringers:

Day 1: Students copy down some brief biographical information and paste a picture of the artist and one artwork by the artist into their sketchbook.
Day 2: Students paste two more artworks with the credit lines.
Day 3: Students paste one artwork with credit line and then must make a list of characteristics that they observe about that artist's work.  I always go over this to make sure we are on the same page once everyone has it completed.
Day 4: Students receive two paintings to paste into their books.  They must tell me which one is by the artist and two reasons why.
Day 5:  I ask students to do a quick, 2-minute sketch of design that is inspired by the artist.


This week's artist is Chuck Close.  We have one more day of bell ringers for him.  I choose to do Chuck Close right before we do our self-portrait project because we are going to be using a grid system to do our initial drawing.

The students are slowly getting better and better with these bell ringers.  I'm finding that I am teaching them note-taking and organizational skills at the same time.  I know a lot of these students must take notes on their own in other classes, but I am unsure if they actually know the proper way to keep an organized note page or if they just aren't connecting that knowledge from other areas to what I am doing with these bell ringers in art.  Either way, I hope by the end of the year, each student will be able to have nice, neat, concise note pages for each artist!

Thursday, May 1, 2014

Studio Art: Value Practice

This project was purely taken from the following pin on Pinterest.  Mrs. Hahn over at Mini Matisse did this with her 8th graders and I stole the idea for my Studio students!  Since part of my SLO at the end of the year is an observational drawing project, I figured this was a perfect mid-year review of value and observational drawing, as well as an easy thing to start with the students and then leave for them to finish with my substitute.

While students were finishing up their coil pot projects, they had some free time, so they started this.  They had to create a word with at least five letters.  It had to be 3-D on a piece of computer paper using paper strips and tape.  They then had to draw it on a piece of drawing paper, doing their best to use value to make 
it look like it "pops" off the paper.

This particular student is very gifted at the arts.  She always does fabulous work and I often find it difficult to challenge her.  On the plus side, she has said that a few things I have thrown at her have been difficult mainly because of the style I have asked the project to be completed in...such as the cubist superheroes.  


This student spelled his word wrong and didn't realize it until after it was all glued down...he just reordered the letters in his drawing instead of starting over.

The "Selfie" one was kind of creative when it came to the word and the added little icon she made.


I graded these on the observational drawing rubric that I use to grade their pre- and post-assessment drawings.  The rubric can be found here.

Saturday, April 12, 2014

More Zentangles: Zentangle Parodies (PICTURE HEAVY POST!)

Three weeks ago I had to take an entire week off of school to take my husband and help him through his first week of chemotherapy.  As of today, he has completed his first three-week cycle and on Monday, begins the second cycle of three...and so far he's doing well.  Students were finishing up their ceramic projects and would be finished while I was gone, so I had to come up with a project that would be easy for a non-art substitute to handle.  I decided on zentangles, so I pulled out my zentangle packet from my elective class and I edited it a little to include a project outline and rubric for this project...something I'd like to call Zentangled Masters Parodies.

Students started the brief unit in the note packet I had left for them by practicing value scales, taking the notes on what all of the parts of a zentangle were, and then had to look through art books to choose a famous artwork to recreate in zentangles.  Essentially, the frame of the zentangle came from the border of the drawing.  The "string" of the zentangle was the drawing of the famous painting itself.  For the most part, the students actually really liked this project.  I have to say that it's a good way to review the elements and principles of art, so I think that I may revamp my first unit packet and take out some of the "boring" "What is Art?" notes and replace them with the zentangle notes.  

In the future, I will use this project to help reiterate to students the principles of art...mostly unity/harmony, variety and movement in their drawings.  Many students noted in their reflections that the zentangles made the original paintings seem more alive and fun.  

This example is my zentangled parody.


I wish these two students would have incorporated a little more of the original colors into their zentangles.  I do think the one on the left, despite how simple, was pretty successful with their zentangle choices!


This one is amazing!  I really had almost no constructive criticism...and the few points that I was going to point out, the student had already reflected upon in her evaluation of her artwork! 


These two students both used Van Gogh's Bedroom as their inspiration.  I'm not sure why they didn't each use the entire painting in their drawing, but after I came back from being out of school for a week and realized what they had done, I tried to convince them to use similar zentangles and colors in their drawings...but they didn't go for it!

 
And of course, a Kandinsky recreation...

I wanted to also note that I have received a lot of e-mail requests for my zentangle packets and projects.  I have shared my original zentangle packet, the packet I used for this project, and the other two zentangle projects (the found object and the font project), together in one place on the SmARTteacher website.