Showing posts with label 3rd Grade. Show all posts

Sunday, January 27, 2013

Finished Winter Birch Trees

Here are some of the finished watercolor birch trees.  As I'm grading them, I'm doing some reflecting on this particular version of my project.

1. I need to do some more practice painting with the watered-down watercolor paint for painting snow.  I don't want to "baby" the students by giving them already watered down paint...I want them to learn how to do the technique themselves, therefore it appears I need to give them more practice to master the technique.

2. I need to get my classroom some watercolor pencils!  I figured out what it is that I don't like about the coloring...it's the crayons!  I think these would look so much better with some watercolor pencils instead.

3. I noticed quite a few more students being successful with the depth aspect in this project compared to the fall birch trees...hoorah!

4.  We need to work a little more on shadows from a light source...some of the shadows are on the wrong side of their trees...

P.S. DOES ANYONE KNOW WHERE I GET THE CODE TO EMBED MY ARTSONIA GALLERY ONTO MY BLOG?  I've seen other blogs with the little button that says "check us out on Artsonia" but I can't figure out how to add it to my own blog!

We'll do one more version of these come spring time...


 I hate to say it but these two boys are my star art students in 3rd grade...they have a really great grasp on how to use watercolor paint! 


I wish the artist on the left had used less birch tree lines and the artist on the right had used more birch tree lines!

Friday, January 4, 2013

In Progress: 3rd Grade Birch Trees

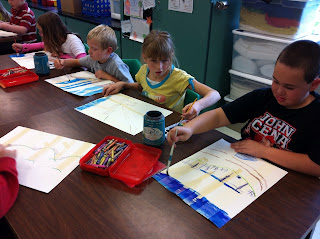
The next few posts will be about what we've started and finished this short week after break.  Just before break, my 3rd graders began their second birch tree painting.  This time, we are doing winter birch trees.  On the first day, we reviewed how to create depth using this power point. In the same class, students taped out their birch trees.  

During the second class, which was also before break, they drew in their details and horizon line.

 For the first class back from break, I created a power point about how to paint a winter scene. It encourages students to look beyond the white snow and to "see" the other colors snow can look like from shadows and the reflection of light.  One class really seems to understand, the other not quite as much, so they will take a little more work.

I don't have photographs of their artwork yet to share, but this was my demonstration piece that I did to show students how to blend colors in the sky (to make a Northern Lights sky at night) and how to water down the black and blue paints to create the shadows on the snow.  I did a day sky demo for the other class but forgot to take a picture of it.

I plan on giving them two more class periods for this.  Most students only got the sky painted, if that because they needed to finish their details.  We need to pull the tape off our trees next class and add the birch tree lines, and then paint the shadows on the trees themselves.


Tuesday, December 11, 2012

Wire Dog/Cat Sculptures

Here are some of our finished dog and cat hanger sculptures!  This batch is going to the humane society to "liven" things up a bit!  I plan to send the photo of all the students with their sculptures to the local newspapers...maybe people will go to check out their artwork and end up adopting a pet!


Saturday, October 6, 2012

3rd Grade Fall Birch Trees


The birch tree project is one of my all time favorite projects to do!  I've done this with my 3rd graders each year I've taught so far, and each time I do it a little bit differently.  The first year, we did winter birch trees, using masking tape to mask off the trees before painting and markers to add the tree lines.  Last year, we did winter birch trees, using salt in the sky to make snow flakes and marker again for the tree lines.  This year, thanks to Pinterest, I think I've made this project even more exciting for the kids!  This year, my 3rd graders will be doing this project two more times so that they can master depth using a horizon line, placement and size.  Here are the steps we took to make this project!

1. On the first day, we looked at various photographs of trees and discussed depth.  We talked about placement of the trees in the foreground, middle-ground and background, as well as how skinny or thick they were in relation to their distance from the viewer.  Then we taped off our trees and drew our horizon line in.  The tree placement was a struggle to understand for some students, so it required some assistance from me.  I had the students who really understood the concept go around and help othersStudents were allowed to color any details they wanted to add with crayons, such as a path, pond, house, etc. but were not allowed to color the sky or grass.
\
2.  On the 2nd day, we finished coloring our details and painted our drawings with watercolor paint.  I did a demonstration on how to blend watercolor paints before they dry to alter their colors a little bit.


3.  On the third day, we peeled off the tape very carefully.  I demonstrated to the students how to use the flat side of a scraper to add the birch tree lines with black tempera paint.  The last step was to add fall colored leaves to our paintings with Q-tips!  I LOVE the way these turned out!  They are always one of my favorite projects to do because no matter what the skill level, it's pretty easy get all the students to succeed!  Plus, this year I plan to do a winter version and a spring/summer version with all the students so they should be able to plan their tree placement and horizon lines on their own without my help by the end of the year!


The first two paintings are student's and the one on the bottom is mine that I did to demo all the techniques.  More pictures to come!  These were all stacked on the drying rack when I left school Friday so I couldn't take many pictures!


Tuesday, August 14, 2012

A.P.P.R.: Pre and Post Assessments

I've had a few people commenting on these assessments so I decided I would share what I've come up with so far.  I've already shared my rubrics for the self-portraits but here I will share what I've decided to do for my pre and post assessments at every grade level.

In St. Lawrence county, we had one staff development day in March that we all got together at and tried to come up with regional assessments.  We had a really difficult time and never really finished, nor got back together to finish.  I wasn't really happy with what we came up with either as it was way to specific and for most of the grade levels, didn't match what I taught.  I really don't like the idea of repeating an exact project at the beginning and end of the year, and that's what they wanted to do.  I feel like the following assessments I made allow for students to create something different as their end product so they won't be taking home two identical projects (aside from the test assessments!).


Before I share these though, please understand the following:

         1.  I won't have to use all of these each year...this year I have figured that I will need to do assessments for 5th, 6th, Kindergarten and 1st grade as these are my largest grade levels that will give me my 51% student population.

         2.  I may have to change my assessments at the beginning of the year a bit, depending on whether or not my superintendent approves of them as rigorous assessments.  (I'm guessing that I will have to take the time management aspect out of my rubrics as it will be difficult for the other teacher to assess this since she won't be in my room...unless of course I would be allowed to assess that part of the rubric.)

Kindergarten

I've shared the worksheet that goes with this assessment here.  For this assessment, students will be asked to cut out various shapes (simple to advanced) and to glue them onto construction paper.  I plan to assess their scissor skills and their gluing skills.  I am a little unsure as to if this particular assessment can be done by the other teacher as I am assessing their scissor and gluing skills here and most of the cutting rubric in particular will need to be filled out from observations...


1st Grade

For my 1st grade assessment, I will have student split their paper into 6 sections.  They will receive 6 minutes to draw each item as I call it out to the best of their ability.  Those include a fuzzy dog, a rainbow, a flower, a tree, their family, and anything they want.  The following rubric is what I created for that assessment:

2nd Grade

My 2nd grade assessment will be treated partly as a type of test and partly as a drawing.  (To deal with students with IEPs, I will probably read the scavenger hunt part out loud.)  We start to get into critiques and talking about art in 2nd grade, so their assessment will reflect that.  They will receive three paintings (Picasso's Crying Woman, American Gothic, and the Arnolfini Wedding Portrait).  For the last part of the assessment, they will receive the remainder of the first period to start and one other complete class to finish half of Vittore Carpaccio's painting called Two Venetian Ladies on a Balcony.  Here is the grading rubric for this assessment:


3rd Grade

In 3rd grade, we will focus on depth and landscapes, so their assessment will be for landscapes.  For the pre-assessment, I will read them the story of Little Red Riding Hood without showing them any of the pictures.  They will then have two class periods to draw what they think the path looked like to grandmothers house from the story.  At the end  of the year, they will do the same thing, but I will read them the story of Hanzel and Gretel.  I will look for details in their drawing that they remembered from the story, as well as the characteristics of a good landscape.  Here is that rubric:


4th Grade

In 4th grade, they will start to do more drawings from real life and learn some basic shading techniques so their assessment will be to draw a still life and shade it in black and white.  Here is that rubric:


5th Grade

In 5th grade we will focus on color theory so they will receive a color theory test in worksheet form where they have to color in the color wheel using colored pencil and answer a series of questions by coloring.  I haven't decided if I will give them one or two days for this...I'm leaning towards one day unless they have an IEP for longer.  Here is that worksheet (I plan to score it out of 100):


6th Grade

Sixth graders will also receive a test.  The first part of the test will consist of the students seeing seven different slides.  The second part will consist of 11 vocabulary words that they must define and tell me which culture they come from (Porcelain, capital, altar, cartouche, pictograph, Dreamtime, hieroglyphics, candy skull, animal spirit, Ionic order, nomad).  I am thinking that I will split this test into two days, part 1 and part 2.  Below is what the 1st page of that test looks like:

Name:  _____________________________    Date:  _______________
Class:  ______________________________
Be sure to read ALL the directions carefully in each section carefully.  Answer each question to the best of your ability.  You may not ask another student for help.
     A.   
Prehistoric                Egyptian                    Greek             Asian
Aboriginal                 Mexican                    Native American
 
 For the first section, you will see seven slides.  Each slide will remain on the board for three minutes.  For each slide, you must tell me what culture it comes from and 1-2 sentences explaining why that artwork represents that culture (5 pts. each)


1.    Culture:  _________________________________
Facts:  ________________________________________________________________________________________________________________________________________________________________________________________________________________