Showing posts with label Common Core. Show all posts

Tuesday, December 16, 2014

2nd Grade: Fairy Tale Self-Portraits

And here's the second self-portrait project for the year!  The first Common Core listening and learning strand in 2nd grade is Fairy Tales and Tall Tales.  Last year, we created a collage of Beast's Castle from Beauty and the Beast.  This year I decided to take the self-portrait approach and have students paint themselves as kings, queens, princes, and princesses from a fairy tale.

This project took a total of three days.  On the first day, students used a mirror to draw their portrait in pencil.  On the first day and second day, they used a skinny brush to paint their outlines with black paint.  The second and third day was devoted to painting their portraits.  I told students to paint their backgrounds a single color, for the sake of time, but you'll notice that a few students had enough time to get a little more creative with their backgrounds.  :)  This project proved to be a great one for teaching students how to make smart choices with the type of paint brush they pick for a painting.


Thursday, October 9, 2014

More Artist Bell Ringers & Sketchbook Use

A week or so ago, I posted about how I am using sketchbooks this year in my Studio class.  I am going to add to that article by posting the latest things we've added to our sketchbooks IN CLASS via bell ringers and classwork.

First off, students did have a sketchbook assignment over the weekend a few weeks ago...but only because it pertained to what they were doing in class.  Students were completing the zentangled master's project (I will be sharing the completed ones from this year in the next few days), so I had them practice zentangles by zentangling a random object.  (Mine is the camera!)

Along with the zentangle project, students had to create a page in their sketchbook to doodle, practice and make notes about their main project.  I printed out a copy of each person's original painting.  Some students decided to grid it, so I had them tape transparency paper over the original.  I encouraged students to try out different zentangles on that page before putting them on their final drawing.
Eventually, I want to start photographing student progress periodically throughout the project and have students past the photograph into their sketchbook.  I'll then have them reflect via bell ringer on what they want to accomplish during the week on the project, what they might be wanting to change, what they are having a hard time on, etc.

We are currently onto our next unit, which is 2-D media, focusing on drawing.  In an effort to cut down on the notes I had students take last year in their note packets, I'm trying to transfer a lot of these notes into class activities in the sketchbook.  The first one we've done is this value page.  Students had to create a value scale, a shaded cube, and write the name and definition for each of the four shading techniques (blending, hatching, cross-hatching, and stippling).  What's great about this being in the sketchbook is that it's less paper I have to copy and waste and it's always in their sketchbook as a reminder of what value is for homework sketch assignments.

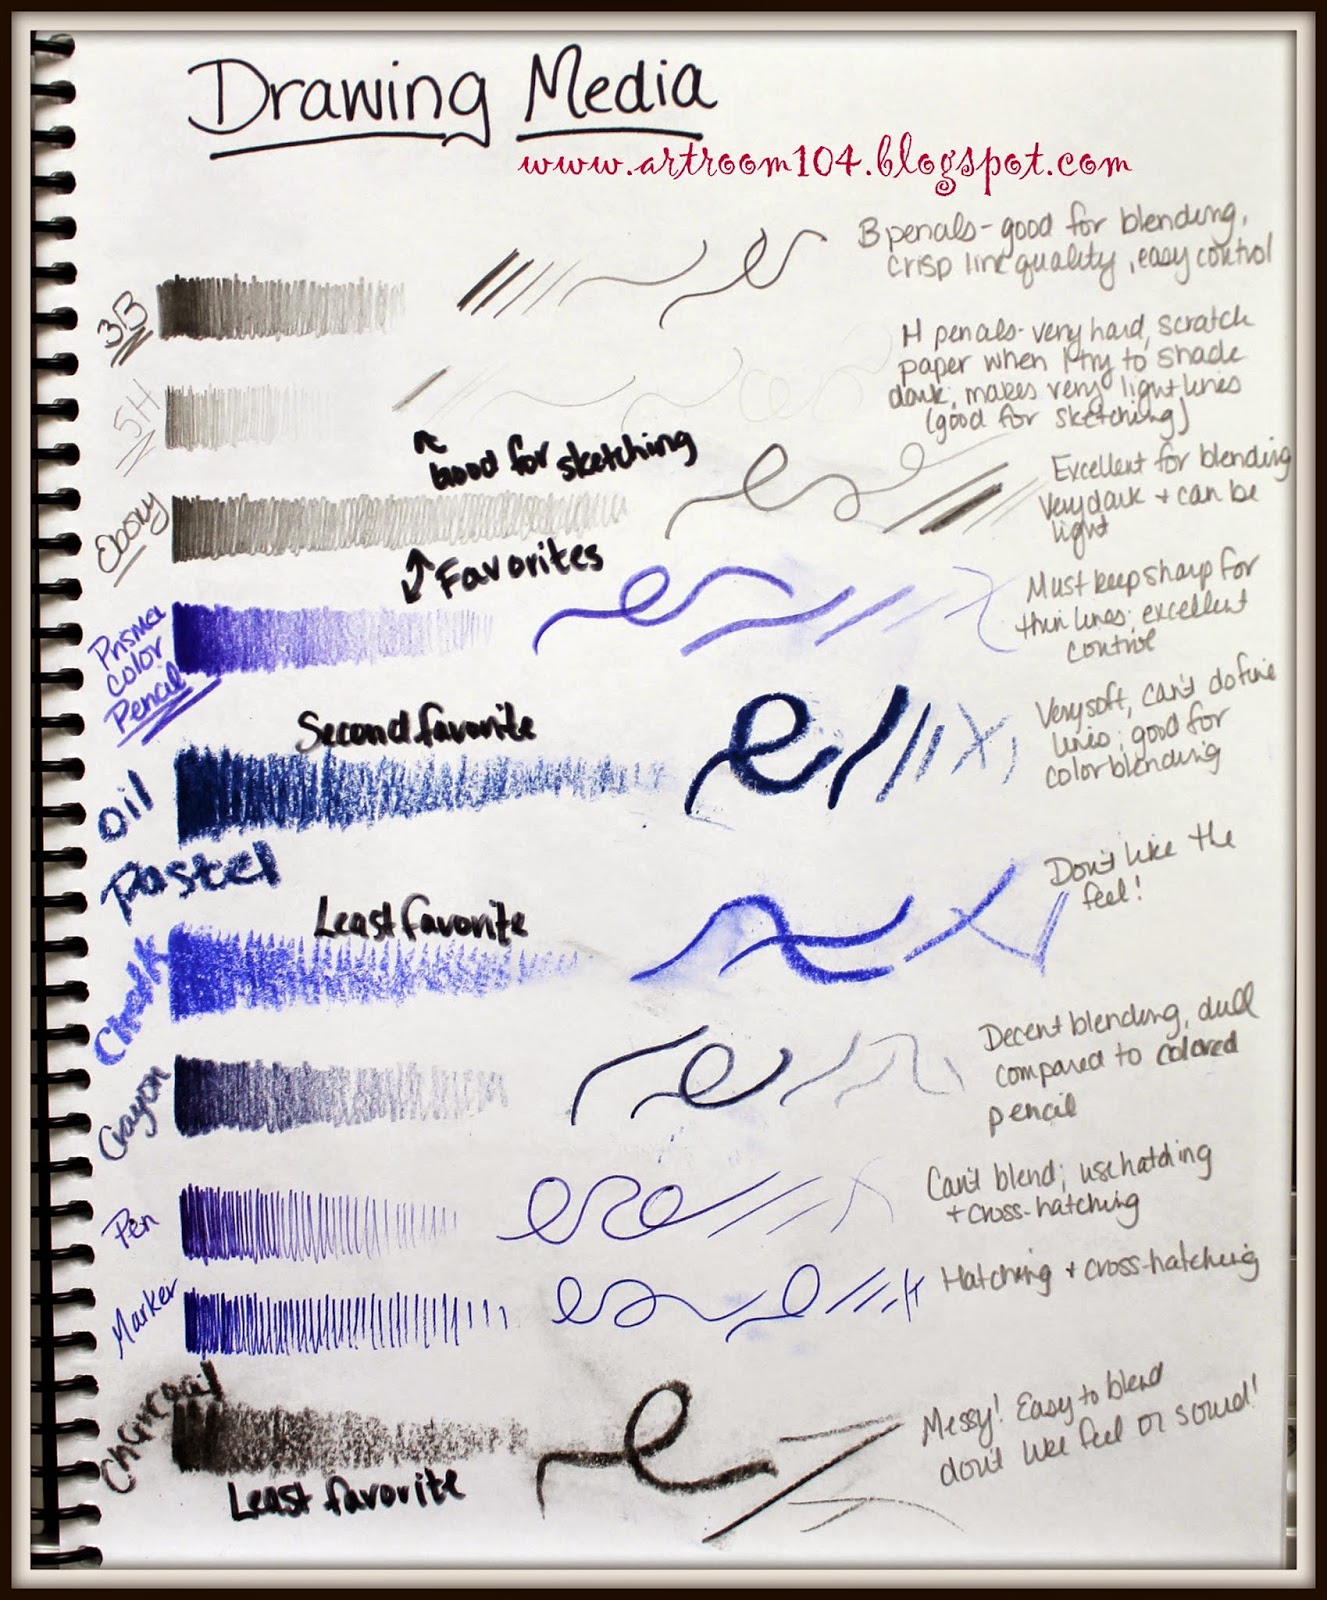
I've gone ahead and done the next classroom activity in my sketchbook...the students have not done this yet.  Our current project, which we are officially starting Monday, is going to be self-portraits done on a grid system using words as value (micography)...hence the value practice.  Our next project will be to practice doing observational drawings using the art mannequins.  Last year, I had students to their art mannequin drawing using only pencil or Sharpie, however this year I want to be more flexible.  Therefore, I will be having the students create a "Drawing Media" page in their sketchbook.  They will have to create a simple value scale, draw a variety of lines, label each medium, and make some notes (i.e. Do you like the medium? Which is your least favorite and most favorite and why?  Do you think a certain type of drawing medium is better for one type of drawing than another? etc.)

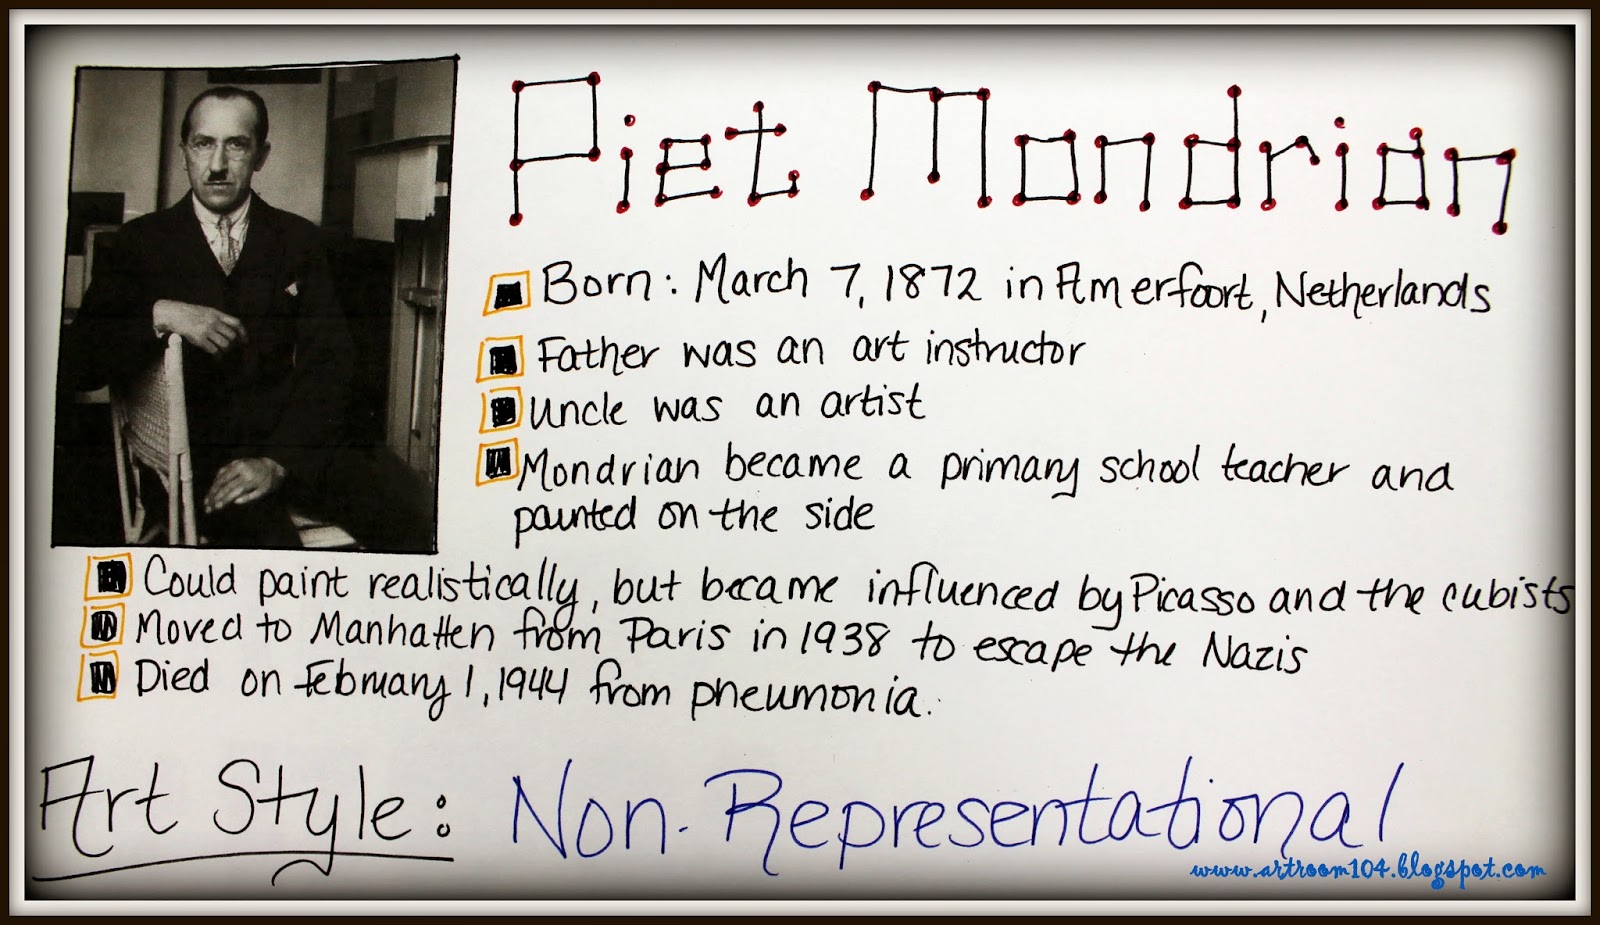
And finally, here are some artist bell ringer pages that we have completed.  I have decided that I am going to do a different artist every other week so that I can use bell ringers to review other material.    We already did Piet Mondrian, and next came Joan Miro.  I have decided on this set "schedule" for these weekly artist bell ringers:

Day 1: Students copy down some brief biographical information and paste a picture of the artist and one artwork by the artist into their sketchbook.
Day 2: Students paste two more artworks with the credit lines.
Day 3: Students paste one artwork with credit line and then must make a list of characteristics that they observe about that artist's work.  I always go over this to make sure we are on the same page once everyone has it completed.
Day 4: Students receive two paintings to paste into their books.  They must tell me which one is by the artist and two reasons why.
Day 5:  I ask students to do a quick, 2-minute sketch of design that is inspired by the artist.


This week's artist is Chuck Close.  We have one more day of bell ringers for him.  I choose to do Chuck Close right before we do our self-portrait project because we are going to be using a grid system to do our initial drawing.

The students are slowly getting better and better with these bell ringers.  I'm finding that I am teaching them note-taking and organizational skills at the same time.  I know a lot of these students must take notes on their own in other classes, but I am unsure if they actually know the proper way to keep an organized note page or if they just aren't connecting that knowledge from other areas to what I am doing with these bell ringers in art.  Either way, I hope by the end of the year, each student will be able to have nice, neat, concise note pages for each artist!

Sunday, September 21, 2014

Bell Ringers in Studio Art

Last year I really struggled with making the sketchbook a meaningful learning tool in my high school classroom.  Granted, I had quite a few obstacles in my way, including maternity leave and sick time leave for my husband's chemo treatments, however after I was back from all of that, I had the hardest time getting back into using the sketchbook.

I attended a staff development at the end of the year last year that was put on by our Boces.  About 10 art teachers from our county got together and just spent a day brainstorming ideas, discussing APPR, pre- and post-assessments, and basically venting.  It was great!  One of the middle school art teachers from another district shared how he uses bell ringers every day to introduce students to art history.  He uses the first 5 minutes of class every day to introduce, review and expand upon a famous artist from history, spending 1-2 weeks on an artist.

Another high school teacher shared how she calls her sketchbooks "source books" instead of sketchbooks.  She doesn't assign sketchbook assignments on a weekly basis because the students would never do them.  Instead, the source book is used as a place to plan and practice before starting and finishing a final project...(duh!  Isn't that what we teach students the sketchbooks should be used for???)  She had students who completed miniature versions of a large scale project, done perfectly, in oil pastel or colored pencil.  The students then made notes in the margins about their experience with the medium, how the practice product turned out, what they might change or do differently on the final project, and much more.  I thought it was a really cool way to make the sketchbook more of a meaningful tool.

When I stepped away from that professional development meeting, I had tons of new ideas.  I used the summer to figure out how I was going to use those techniques to fit my teaching style, my students, and my classroom.  Bring on the bell ringers!

Because we are using Marzano, bell ringers are one of the big things that the administrators are looking to us to use to show that we are constantly assessing our student's understanding of the material we are teaching. Since I am also an art history major, I decided to use my bell ringers to teach students about famous artists in history and the various art styles (non-representational, abstract, impressionism, realism, etc.).  Last year, I tried to incorporate the styles into my second unit and I failed miserably at teaching the students those concepts.  They did not know them very well at the end of the year and could not describe the styles very well.

So far we have had two complete weeks of school.  I used the first week to introduce Mondrian in bell ringers.  The second week was used to review all of the art concepts we talked about in the unit 1 note packet.  Next week, I will introduce the next artist, which I am planning on being Miro.  The great thing about these bell ringers is that it's a sneaky way to incorporate writing...ahem, common core, ahem...without the students being too suspicious about it!  Once I introduce Miro, we will compare the two artists and their styles, via bell ringers, to discuss why abstract/surrealism is different from non-representational art.


We did 5 day so of bell ringers for Mondrian.  Here is what we did and the order that we did them:
1. On the first day, I had some biographical information on the board for students to copy down.  They also had to paste in a picture of Mondrian as well as "Broadway Boogie Woogie" and its credit line. (This one took about 10 minutes.)
2. On the second day, students inserted "Composition A" and "Self-Portrait".  I gave them both to show them that Mondrian could actually paint quite realistically if he chose to. (5 minutes)
3. On the third day, I asked students to make a list of the characteristics of Mondrian's famous work ("Broadway" and "Composition A"). (5 minutes)
4. On the fourth day, students were asked to compare two paintings I gave them.  They had to tell me which one was a Mondrian and why. (5 minutes)
5. On the fifth day, I asked students to do a quick, 2-minute drawing on their page of a Mondrian inspired design. (5 minutes)


Some students managed to fit everything on one page and those who had smaller sketchbooks did them on two pages.  What I love about this is that they now have a little study guide / note page for a single artist.  

Now that we have done this once, I'm hoping that it will take less time to get them to complete the rest.  The biographical day of bell ringers will probably always take more time, which is ok.  Now, I really just need to hammer into their heads that they actually need to look on the board and do the bell ringer on their own every day...I shouldn't have to remind them!

Wednesday, August 13, 2014

Kindergarten: Rainy Day Self-Portraits

Well, it's a dreary day of rain in Northern New York today, accompanied by Day 2 of DDI Camp.  That's Data Driven Instruction for those of you who may have not been forced to use it yet!  The concept behind it is understandable, but try to get two art teachers from different schools to meet for the first time and to agree on content to cover in their classes by the 10 week, 20 week and 30 week mark?  Ha, yeah right!

So, since it's a rainy day today, I'll leave you with my kinder's last project of the school year.  In alignment with their NYS Listening & Learning strand of "Seasons and Weather", we did these spring time portraits.  We discussed what the weather is like in spring (lots of rain!), what happens with the trees and flowers (they start to get leaves and bud!), and what a self-portrait is.

I took a different route with the kinder's for this project when demonstrating how to draw their body.  Usually, like with my pattern cow project, I would demonstrate one step at a time and have the kids do the step on their own paper before moving to the next.  This time, I demonstrated how to draw the umbrella and then had them do the umbrella.  Next, I showed them how to draw their entire body, starting with their head, the neck, their shoulders and arms, torso, legs and feet.  Then, I let them go to town!

We put in a horizon line (always important and something I stress!) and added good details for spring time.  This all happened in one class period.  The only thing I didn't allow them to do was color the sky, which is usually against the rules!

On the second day of the project, I gave each student a straw and we went over proper straw etiquette (no spitting at others, if you drop it on the floor get a new one, etc.).  I had the students turn their papers upside down and I then went around to the best "Mona Lisas" and gave them a few drops of blue ink on their paper.  Students blew through the straw to make the ink run and look like rain!  Once they were done with the blue, they received a few drops of turquoise, rinse, repeat and done!


Friday, June 20, 2014

2nd Grade: Scratch Art Greek Pottery

It seems like NYS really like the Ancient Greeks!  Maybe it's because we "borrowed" a lot of ideas from them to create our government and architecture.  Either way, the 2nd graders actually have two listening and learning strands based on the Greeks, and the second one was Greek Mythology.

When I returned from my maternity leave, the students were right in the middle of their mythology unit, so I decided to do some scratch art with them.  Second graders always LOVE to do scratch art!  This project took about two days, which is a really great time frame for a project when you only see a class once every six days.

On the first day, we made our scratch boards.  If you haven't seen it already, or you don't know how to make your own scratch board, you can see my tutorial here.

On the second day, we looked at some examples of Greek pots on the smartboard and I passed out a sheet that had different examples of Greek pottery types.  The students had to pick one type to draw.  They then were required to fill their pottery with images from a Greek myth they learned about in class.  Oh yes, they also had to draw a border with a pattern in it before they created their pottery.

I did this project last year with 6th graders, and I have to say that I think the 2nd graders did just as well on it as the 6th graders did.  Knock this off the list of 6th grade projects and move it to 2nd grade!


2nd Grade: Greek Mosaics

Well, I missed "throwback Thursday" but I'll post these today anyhow.  These mosaics were from way back when I had a substitute for my maternity leave.  I asked her to do it in conjunction with the 2nd grade NYS Listening & Learning strand about Ancient Greek civilizations.  This project wasn't exactly executed the way that I would have handled it, but a few of the projects did turn out decent.

I had my substitute use Roylco's Mosaic Squares, something I had purchased a few years back through the Extended Day grant and have never used.  I can't find the link to the sticky ones, but those are actually the ones that were used for this, not the paper squares.  Anyways, I have decided that if I do this project again, I will have the students cut up construction paper into random geometric shapes to fill in their spaces.  I had encouraged her to have the students cut the stickers in half to fit into smaller spaces, but no one did.  In other words, I plan on essentially combining this project with the geometric and organic shape collages that my 2nd graders did the year before.


Friday, May 2, 2014

1st Grade: Northern Lights

One of the NYS Listening & Learning strands for 1st grade is Astronomy, so I wanted to find a cool art project that I could do with my 1st graders.  I thought about doing a Starry Night-esque painting using constellations, but I thought that would be a little above my students, no matter how much I simplified it.  Despite the simple steps I broke this project down into, it literally took us almost four complete classes to do this...i.e. an entire month!  Needless to say, my 1st grade classes this year are rambunctious!  

Anyways, I found the idea for this project floating around on Pinterest...the link took me to the blog Fun Art 4 Kids, where I pretty much used the process there word for word.  The original poster used this with 6th graders whereas I used it with 1st graders.  I think the project was still successful and probably would have been even more successful if they listened to directions a little better.

On the first day, we drew our mountains on manila tag board and then cut them out.  Unbelievably, this took an ENTIRE class period because students weren't listening.  I had to approve of their mountain line before I let them cut, and they had to cut them out in one piece (so they essentially ended up with two sets of mountains). Students started cutting before I was able to get to them to approve their design...and cut their mountains into four pieces, or did it vertically instead of horizontally, or made them really small...the list is endless.

After we passed that mountain (haha!), we talked about analogous colors on the color wheel and painted our watercolor paper.  Again, many students didn't follow directions when told they had to choose three analogous colors to paint their paper.  During the painting process, I asked them to sprinkle the salt onto their paper.  This was a disaster.  I learned real quick it was better for me to sprinkle the salt as they painted their paper.  They either painted too slow and the paint dried before they sprinkled the salt, or they painted, sprinkled salt, and painted over the top of the salt.  Eventually, I decided to sprinkle the salt and once I did, they weren't allowed to paint in that spot again.

On the third day, we did the lights in the sky.  We took the mountain patterns that we made and choose the biggest (tallest) mountain and laid it on the black paper.  Students had to take three different colors of chalk pastels and draw lines from the mountains up to the top of their paper. Then, we took a tissue and wiped the chalk in the same direction to blend the colors (without making too much of a mess on our hands).  I found that it was a little difficult for the younger students to hold the pattern in place while coloring, so I went around and put paper clips on theirs to help them hold it in place.


On the last day, we traced our mountain patterns on the watercolor paper that was painted on day 2.  Again, they had to cut the mountains out in one piece.  Students took the biggest mountain and glued it in place on their background.  I then asked students to trade their small mountain range with another student.  You WOULD NOT BELIEVE the number of students who were unhappy about this!!!  Usually, they are always giving each other their free draws and swapping, trying to help each other out and draw on each other's work.  When I asked them to switch, I had one boy who almost had a complete break down!

The last step on day 4 was to add the constellations.  This was my addition to the original project and was the big connection to their listening and learning strand.  I handed out a constellation sheet that I found on the internet and we quickly went over what each constellation represented (big dipper, little dipper, Orion, etc.) and how they could tell which constellation was what.  Students simply used white chalk to add the constellations.

So, after all of that, here are our finished projects!