Showing posts with label linocut. Show all posts

Wednesday, November 6, 2013

Studio Art: 2-D Media, Printmaking

Now that we have finished up the cubist superhero paintings, the last and final aspect of my 2nd unit in Studio Art is the printmaking portion.  For this unit, we are covering Andy Warhol, pop art, and reduction printing with linoblocks (I don't have all of the materials to do screen printing, nor am I as familiar with screen printing, otherwise I had considered doing screen printing like Andy Warhol).  This will probably be the last project I get completed with this class before my maternity leave.
My Studio Art bulletin board in the classroom.  

My example of a reduction print.  I did this during my student teaching with a printmaking class.

For the first two days, we have been working on planning out our pop art object print.  Students were required to bring in an object or photograph of a person/character from pop culture today.  (Some of the items that have been used are baseball caps, the bear from the movie Ted, a rubics cube, Minions, etc.

After students draw out and plan what their finished print will look like, I have them plan out each step of the reduction print process using tissue paper layers.  The first step is to make a print of their entire linoblock.  If there is anything they want to keep white for every print, they must carve it out first.

The second step is to carve away the area around the object so that you just have the contour of it.  

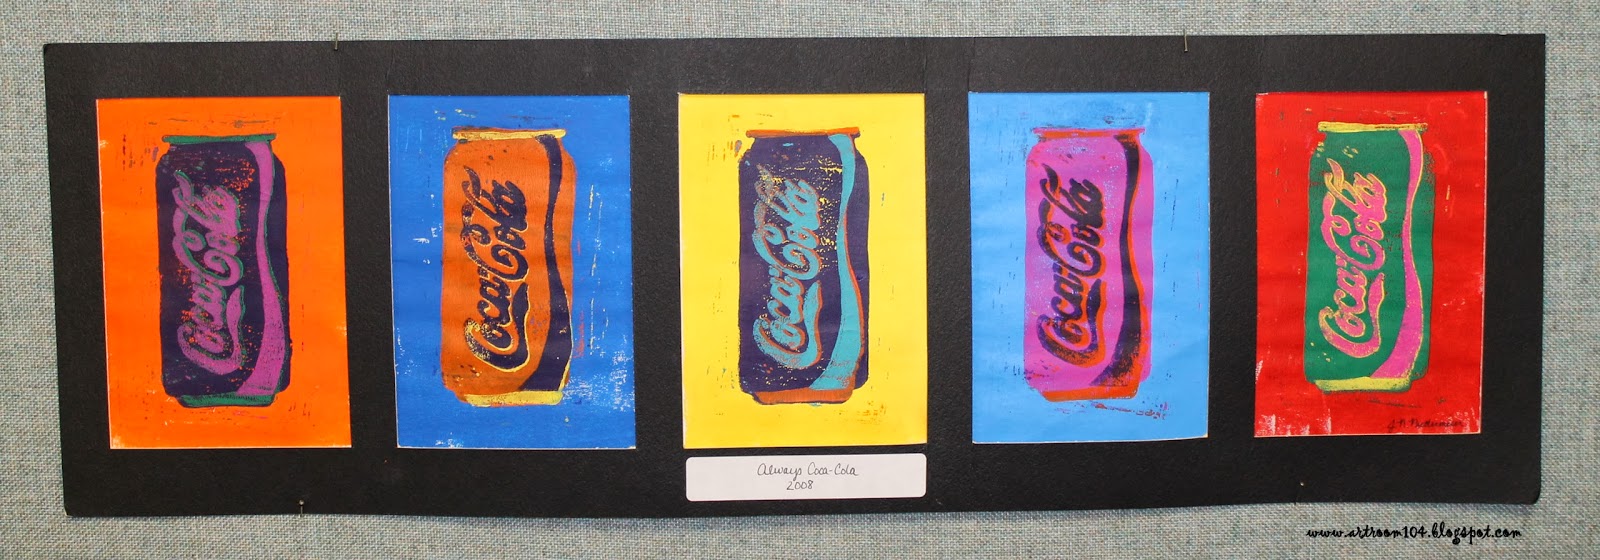
For this project, I am requiring that they have at least four colors/steps in their prints, like my Coca-Cola can.

Another example I did during my student teaching.  I created this and took a photo of every step to create a visual poster with directions.  This particular reduction print had six steps to it.

These are three student samples from my student teaching.  I did this with a printmaking class that had only 3 students.


Here are the close up shots of my visual poster that I had made.  Sorry for the bad photos...it was laminated and didn't photograph very well under the poor lighting at school.
Draw the design on the block, carve out anything that needs to stay white, and make your first print.

Carve out the area around your object...make your second print...


So, basically by the end, you have nothing left on your linoblock!

Currently the Studio classes are working on making their 10 background prints.  Those are due by the end of class today.  Tomorrow, we'll carve out the area around their object and I'll show them how to carefully line up their block with their first print to layer the second on top.  When finished, students will have to submit to me four of their best prints and eventually we will mat them (whether my maternity leave sub is comfortable teaching that or it waits until I return to school...)

Wednesday, May 29, 2013

6th Grade Native American Animal Spirit Prints

Here are a few of the 6th grade Native American Animal spirit prints.  Most of these were finished up just in time for the art show.  You can find my power point that I use on the SmARTteacher website.  Due to the shortened amount of time, I printed off the my powerpoint into 4 slide note pages.  I created a simple packet that students had to take quick notes in.  Next up?  The Aboriginal culture from Australia!


Tuesday, April 9, 2013

6th Grade: Native American & Aboriginal Art

Argh!  Where is the school year going?  This is the last week of the 3rd quarter...that means 10 weeks left!  And, I have approximately 6 weeks until my art show!  Eek!

If you haven't already checked out my pages from my first two art shows (2011 and 2012), please do so!  Every year I try to do a theme, and this year's theme is nature.  Generally what I do is keep all of the projects that fit under that theme.  We take one day to sign the fronts of our artworks and glue them onto black construction paper for a frame (if they need it).  Then, I pick 1-2 pieces from each student's stack that are their best works to hang.

I always end up having trouble with one grade level having enough artworks to fit my theme...and this year it is 6th grade!  Plus, it's taking a lot longer to get through my units than I thought it would...so I think I'm going to have to combine my Native American unit and my Aboriginal unit into one "natives" unit.  I think it might actually be a smart idea to do this because then we can compare and contrast the indigenous cultures of western and eastern world.

I've got to rework my note packets and create one that has simple notes (or maybe not do notes at all for this unit??)  I plan on doing my Native American animal spirit linocut project (which will incorporate a self-portrait in the form of an animal and the incorporation of line as texture) and I want to do fixed sand paintings based on the Aboriginal culture and symbolism.  (I did a sand painting project with a Studio Art class when I did my student teaching.)  Here are some of the past projects...once we finish up the Greek unit (hopefully by the end of the week!) I'll keep you updated on my indigenous cultures unit!


Last years linocut project was not specifically the Native American animal spirit one...but it was similar.  For these particular prints, I had asked students to depict something from nature.  They had to try and show 2-3 different types of texture using line.  


The following sand paintings were done by a Studio Art class.  We used Masonite board that was primed with gesso and sanded.  They drew their design on with pencil and Sharpie.  Then, one color at a time, they painted on Elmer's glue and sifted the colored sand onto the glue.  When I did this at the time, my cooperating teacher didn't have sand.  I went to a local pet store and asked for a donation of fish tank sand.  I used powdered tempera to color the sand, which worked really well (but also stained hands like paint).  This year, however, I have TONS of pre-colored sand so this process will be much easier!

Thursday, November 29, 2012

Fall Drawings and Prints-4th Grade

Hallelujah!  My 4th graders are done with their projects!  Between half days, assemblies and field trips, this has taken a little longer than I would have liked, but I'm not going to complain too much...most of the results are great!

For this project, students had to do a value drawing in colored pencil that included at least one realistic tree.  That part actually took them the longest, but I can see some major improvement in a lot of their use of value compared to the value cities project I had them do.  I think it was a combination of more practice and using the colored pencils instead of the drawing pencils.

Then, students had to draw a leaf and carve it out of a linoblock.  I use these SoftKut blocks (I believe that's what they are called...) which I order through Boces.


This student did an AMAZING job!  I think this is one of the best ones!  She really understands how value is used!


Another good ones...this student really understands about cast shadows...which is pretty impressive as I haven't specifically taught them about shadows yet...


Friday, November 2, 2012

Today's Featured Resources: The SmART Teacher

I recently started using the SmART Teacher website.  If any of you haven't heard of it, it a great resource for teachers to share lesson plans and participate in chats about various subjects in art.  You create a profile and from there you can create discussions, lessons and visuals to share with other teachers.  You can also win prizes for submitting your lessons!

They run two contests a month and each contest usually has 2-4 winners.  All you have to do is create a resource or two based on what the contest criteria is. Winners are chosen based on how in depth and helpful your resource is, as well as how many people on the site "like" or "keep" your resource.

I won one of the contests in October and today I have one of the featured resources! I'm so excited!  I was one of the winners for the printmaking resource project sponsered by Gelli Arts so of course, my prize is some Gelli plates!  I'M SO EXCITED!  I can't wait to get these!  Everyone has been raving about them! Hopefully I'll have them in the next few weeks!

The lesson I won the Gelli Plates for was my Celery Stamp Roses that I did last year with my 12:1:1 class.  I'm sure many of you have seen this before on Pinterest, that's where I saw how to make a celery look like a rose!

My lesson that is featured today is my Fall Leaf Prints.  I did this project my first year of teaching, two years ago.  I'm doing it again this year, but I changed the way I had them do their drawing for the center.  In the featured lesson I created, I had them draw "Y" trees in 4th grade.  This year, however, I showed them how to draw trees a little more realistically and I required them to use value in their drawings as a follow up to our value cities.  These drawings are much more advanced than the ones in my previous project, so I'm definitely happy with the changes I made!  This year, we are currently in the process of carving out our leaves in the lino blocks.  Hopefully I'll have more to share on this project at the end of the upcoming week!


 Drawing their leaves onto their lino blocks. 
Some of the finished leaves on the lino block.


These are some of the early finishers...despite only spending two class periods on these drawings, they're pretty good.  These particular students are already using better value than in their city drawings.


This one is really great!  This student really understands the concept of shadows!  Now I just have to work on getting him to have a better composition!

More pictures to come once we get a little farther into the project!