Showing posts with label bell ringer. Show all posts

Sunday, September 18, 2016

Visual Journals and Daily Bell Ringers

This year, I have focused our first two weeks on really enforcing Visual Journal procedures.  Yep, I said Visual Journals.  I'm really trying to go away form using "sketchbook" as the term for them.  From my three year experience teaching high school, I've noticed that my students really didn't seem to take the sketchbook seriously.  Homework assignments were not done by most students, even the ones who were serious about art.  They didn't feel an urgency to keep their sketchbooks in one piece, or even bring them to class daily (even when I allowed them to keep their sketchbooks in the room!).

So, this year, in my attempt to become more choice-based (a.k.a. T.A.B), I'm calling our sketchbooks "visual journals" and I'm trying to create more open ended, thought provoking assignments.  So far, I really do think they are enjoying them, too!

Our first order of business was to create a bell ringer calendar of some sort in our visual journals.  I have three classes I am using this bell ringer method with: Studio Art, Art 7 and Drawing & Painting.

Since Studio Art meets every day, I had the students create a monthly calendar that spreads across two pages.  Just about everything we are doing in our Visual Journals must be a two-page spread.  Why?  To save paper and conserve space, but also because they will have to find creative solutions when marker bleeds through the paper to the other side!!

Each month, our bell ringer calendars will have a theme.  I saw a post about this over the summer on the Art Teacher Facebook page and it's really what got this idea going in my head.  When I attempted bell ringers in the past, it was always an art question...what are the 7 elements of art?  Why do artists draw portraits?   That kind of thing.  With all of the interim testing and assessment we have to do, I've decided that I want to get as far away from "traditional" bell ringers and do something that is more fun and art based (thus moving towards choice based).  So, this month for Studio Art, our bell ringers are all going to be daily drawings of texture or patterns.  This coincides with our first unit, which is about doodling and zentangling.
My visual journal is the one on the right.  I used blue masking tape to create a border around the edges of mine.  I'm hoping as we progress through the year, my students will get a little more creative each month when we draw out our calendars!  The visual journal on the left is one of my students.  When we started this, it was the first full week of school.  I told the students at the end of each month, I would be grading their entire calendar as a whole, looking at creativity and problem solving they had to do to make sure each square was filled in with a completely different pattern.  I told them that they are welcome to fill in the weekend blocks and the blocks during the week from before we began bell ringers, and she came in on Wednesday that week with all of these amazing little pattern/texture drawings!

Here is the bell ringers looked like for the first week:
Monday: Create a pattern or texture that fills the entire square.
Tuesday: Create a different pattern or texture than the one you drew yesterday.
Wednesday: Create a fuzzy pattern or texture.
Thursday: Choose a zentangle card from my "Yoga for the Brain" card decks and draw it.
Friday: Draw a string to break up the box and then fill it with tangles.

On Tuesday and Wednesday, we looked at the artist Kerby Rosanes and his style of doodling, and then they learned about the zentangle process.  So, the Thursday bell ringer coincided with our zentangle practice on Thursday, and then Friday's was a review as to how to complete a zentangle tile.

These are my own bell ringer pages from the other two classes.  For Drawing & Painting, which is on the left, the students created a condensed calendar on one page of their visual journals.  I only see these students every other day.  Again, they were told that they can fill in the other squares on their own time.  Many students left the weekend off of their calendar so that they had bigger squares to draw in.  For Drawing & Painting, their monthly theme for September is "Fall".  On the first day, I told them to draw something that reminded them of fall.  On the second day (which should have been Thursday...I already messed up my days... ;), I told them to draw something that reminds them of fall using food.  I will do a post at the end of September with everyone's calendar pages when they are complete.  This group is doing amazing things...some or working in just pencil, some in Sharpie, and some are experimenting with other drawing media, like colored pencils and oil pastels!

The bell ringer page on the right, is my page from Art 7.  Again, I see these guys every other day.  So, I counted how many days we would see each other for the rest of the month, and then had them split their page up into that many spaces.  It just so happened that 7 was our lucky number, which is perfect because our first unit is the Elements of Art!  They haven't caught on yet, but each day, I am asking them to fill a space with as many lines....shapes...textures...forms...etc. as they can.  

For my Art 7 page, I sprayed it with Liquitex Spray Paint.  I learned about this stuff at the NYSATA conference and it is absolutely AMAZING!  You can use it indoors and you don't have to be well ventilated.  It doesn't have the aerosol chemicals and smells like traditional spray paint.  It's also an acrylic paint, so it dries very quickly.  I ordered two cans of each color this year for my graffiti unit for Art 7.  This was my way of trying to cover up the bleed through from the previous page.  You can see a little bit of bleed through from my Studio Art bell ringer calendar, but if I would have sprayed another layer, it would have been covered up completely. 

 Now, onto the Visual Journal assignments that are homework.  Yes, I am giving homework this year, and so far, they seem pretty excited about the assignments!  I have already mapped out the entire school year for all three classes.  They will have three assignments due every five weeks.  These assignments can be handed in early for a grade (so they have time to re-do, fix, adjust for a better grade), or handed in by the due date, but not late.  I did them every five weeks with a hard due date because (A) I get exhausted from hunting students down to hand in late assignments and (B), the students already have the document with the entire year mapped out on the Google Classroom, which means at anytime, they can do the next assignment if they wish.

In class, I plan on allowing students to work on these visual journal assignments on Fridays only.  I know that most students don't have the materials at home to do this.  They can come down to my room during Study Hall or after school, but for those who are in sports, this can be difficult, so I'm doing my best to give a little.  The first assignment, which we spent the first three days of class beginning was the cover design.  Over summer, my daughter helped me design my cover.  I collaged newspaper and white tissue paper over my cover.  Then, I dropped colored India Ink on it and we used straws to blow the ink.  I use black washi tape to "frame" the cover, and then pink washi tape to write "visual journal" on the front.  I also took a thin sharpie and added some value lines to the visual journal tape.

The second visual journal assignment is a name design.  This has to be on the inside of the front cover and on the front of the first page (two-page spread).  Here is mine so far...it's not quite finished, but I've used Sharpie and colored pencil.  I'll add ebony pencil shading to my name once I'm done zentangling it.

The third visual journal assignment that is due on the first five weeks is a Brain Illustration.  I am asking students to take a right brain / left brain quiz (there is also an app for this website that you can download to iPads) to determine how they think.  I really like doing this as a beginning assignment because I'm hoping it will help students see that if they struggle with creativity, it might be because they are more left brained, and that they need to think about completing art projects using what they know.  If they are really good at math, then maybe they need to take a more mathematical approach to the assignments, and as we progress through the school year, maybe they'll become more comfortable with art and a bit more creative as we go along.  Mine is not finished, but I created my brain using a Gelli Plate (acrylic paint and a round sponge) and Sharpie.  I had this awesome cork board scrapbook paper that I glued down (to cover up the bleed through), and then I framed the border with red masking tape and wrote the characteristics of each side of the brain on the corresponding border.  From here, I was thinking about making little sketches of the things I do to fill up each side according to my percentages (my quiz said I am 67% right brained and 33% left brained) and make them look like they are pinned to the cork board.

So, that's a lot, right?  It is, but I'm confident that if I give them their Friday's, they'll have plenty of time to succeed at this.  Quite a few of the students are already done with their cover, and a few have even told me that they asked their parents if they could go buy some art supplies for at home to do their assignments.  Score!

Here is what the visual journal document looks like to my students in their Google Classroom.  I created a rubric based on the Studio Habits of Mind and in my effort to move towards choice based art, I will be assessing all of their projects using these criteria.  All of their visual journal assignments must be two-page spreads and they must use mixed media.


Thursday, October 9, 2014

More Artist Bell Ringers & Sketchbook Use

A week or so ago, I posted about how I am using sketchbooks this year in my Studio class.  I am going to add to that article by posting the latest things we've added to our sketchbooks IN CLASS via bell ringers and classwork.

First off, students did have a sketchbook assignment over the weekend a few weeks ago...but only because it pertained to what they were doing in class.  Students were completing the zentangled master's project (I will be sharing the completed ones from this year in the next few days), so I had them practice zentangles by zentangling a random object.  (Mine is the camera!)

Along with the zentangle project, students had to create a page in their sketchbook to doodle, practice and make notes about their main project.  I printed out a copy of each person's original painting.  Some students decided to grid it, so I had them tape transparency paper over the original.  I encouraged students to try out different zentangles on that page before putting them on their final drawing.
Eventually, I want to start photographing student progress periodically throughout the project and have students past the photograph into their sketchbook.  I'll then have them reflect via bell ringer on what they want to accomplish during the week on the project, what they might be wanting to change, what they are having a hard time on, etc.

We are currently onto our next unit, which is 2-D media, focusing on drawing.  In an effort to cut down on the notes I had students take last year in their note packets, I'm trying to transfer a lot of these notes into class activities in the sketchbook.  The first one we've done is this value page.  Students had to create a value scale, a shaded cube, and write the name and definition for each of the four shading techniques (blending, hatching, cross-hatching, and stippling).  What's great about this being in the sketchbook is that it's less paper I have to copy and waste and it's always in their sketchbook as a reminder of what value is for homework sketch assignments.

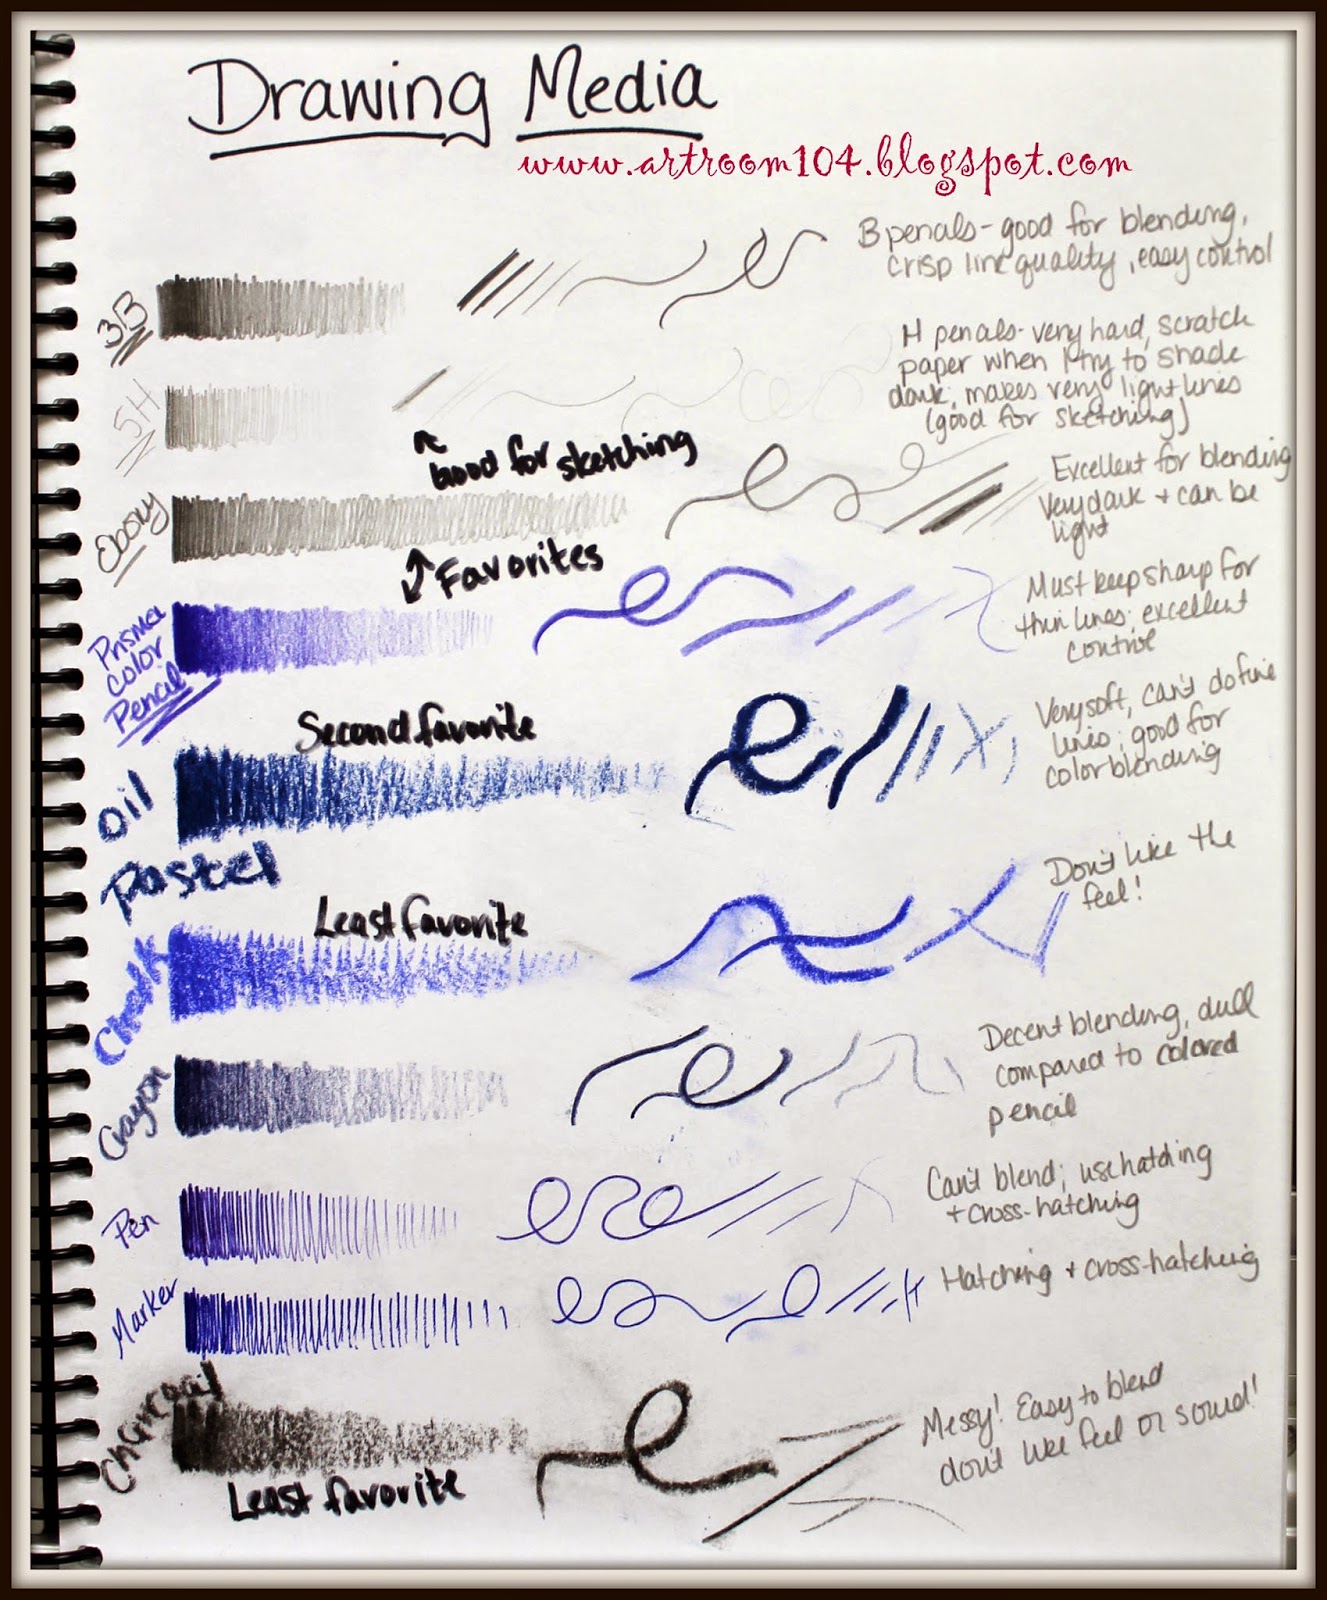
I've gone ahead and done the next classroom activity in my sketchbook...the students have not done this yet.  Our current project, which we are officially starting Monday, is going to be self-portraits done on a grid system using words as value (micography)...hence the value practice.  Our next project will be to practice doing observational drawings using the art mannequins.  Last year, I had students to their art mannequin drawing using only pencil or Sharpie, however this year I want to be more flexible.  Therefore, I will be having the students create a "Drawing Media" page in their sketchbook.  They will have to create a simple value scale, draw a variety of lines, label each medium, and make some notes (i.e. Do you like the medium? Which is your least favorite and most favorite and why?  Do you think a certain type of drawing medium is better for one type of drawing than another? etc.)

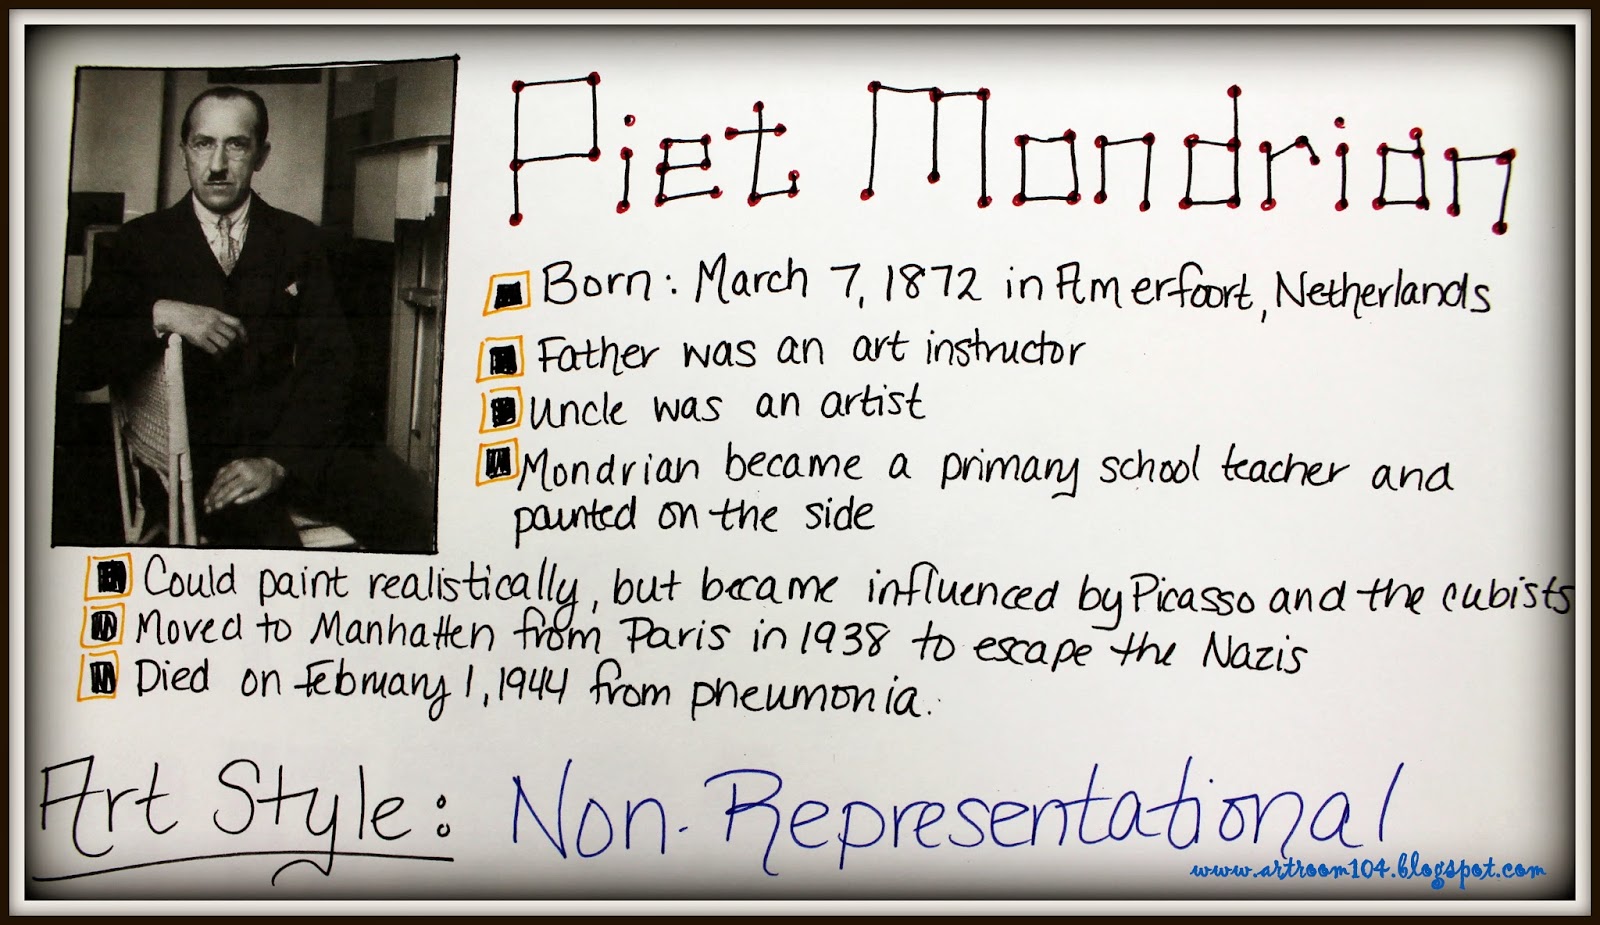
And finally, here are some artist bell ringer pages that we have completed.  I have decided that I am going to do a different artist every other week so that I can use bell ringers to review other material.    We already did Piet Mondrian, and next came Joan Miro.  I have decided on this set "schedule" for these weekly artist bell ringers:

Day 1: Students copy down some brief biographical information and paste a picture of the artist and one artwork by the artist into their sketchbook.
Day 2: Students paste two more artworks with the credit lines.
Day 3: Students paste one artwork with credit line and then must make a list of characteristics that they observe about that artist's work.  I always go over this to make sure we are on the same page once everyone has it completed.
Day 4: Students receive two paintings to paste into their books.  They must tell me which one is by the artist and two reasons why.
Day 5:  I ask students to do a quick, 2-minute sketch of design that is inspired by the artist.


This week's artist is Chuck Close.  We have one more day of bell ringers for him.  I choose to do Chuck Close right before we do our self-portrait project because we are going to be using a grid system to do our initial drawing.

The students are slowly getting better and better with these bell ringers.  I'm finding that I am teaching them note-taking and organizational skills at the same time.  I know a lot of these students must take notes on their own in other classes, but I am unsure if they actually know the proper way to keep an organized note page or if they just aren't connecting that knowledge from other areas to what I am doing with these bell ringers in art.  Either way, I hope by the end of the year, each student will be able to have nice, neat, concise note pages for each artist!

Sunday, September 21, 2014

Bell Ringers in Studio Art

Last year I really struggled with making the sketchbook a meaningful learning tool in my high school classroom.  Granted, I had quite a few obstacles in my way, including maternity leave and sick time leave for my husband's chemo treatments, however after I was back from all of that, I had the hardest time getting back into using the sketchbook.

I attended a staff development at the end of the year last year that was put on by our Boces.  About 10 art teachers from our county got together and just spent a day brainstorming ideas, discussing APPR, pre- and post-assessments, and basically venting.  It was great!  One of the middle school art teachers from another district shared how he uses bell ringers every day to introduce students to art history.  He uses the first 5 minutes of class every day to introduce, review and expand upon a famous artist from history, spending 1-2 weeks on an artist.

Another high school teacher shared how she calls her sketchbooks "source books" instead of sketchbooks.  She doesn't assign sketchbook assignments on a weekly basis because the students would never do them.  Instead, the source book is used as a place to plan and practice before starting and finishing a final project...(duh!  Isn't that what we teach students the sketchbooks should be used for???)  She had students who completed miniature versions of a large scale project, done perfectly, in oil pastel or colored pencil.  The students then made notes in the margins about their experience with the medium, how the practice product turned out, what they might change or do differently on the final project, and much more.  I thought it was a really cool way to make the sketchbook more of a meaningful tool.

When I stepped away from that professional development meeting, I had tons of new ideas.  I used the summer to figure out how I was going to use those techniques to fit my teaching style, my students, and my classroom.  Bring on the bell ringers!

Because we are using Marzano, bell ringers are one of the big things that the administrators are looking to us to use to show that we are constantly assessing our student's understanding of the material we are teaching. Since I am also an art history major, I decided to use my bell ringers to teach students about famous artists in history and the various art styles (non-representational, abstract, impressionism, realism, etc.).  Last year, I tried to incorporate the styles into my second unit and I failed miserably at teaching the students those concepts.  They did not know them very well at the end of the year and could not describe the styles very well.

So far we have had two complete weeks of school.  I used the first week to introduce Mondrian in bell ringers.  The second week was used to review all of the art concepts we talked about in the unit 1 note packet.  Next week, I will introduce the next artist, which I am planning on being Miro.  The great thing about these bell ringers is that it's a sneaky way to incorporate writing...ahem, common core, ahem...without the students being too suspicious about it!  Once I introduce Miro, we will compare the two artists and their styles, via bell ringers, to discuss why abstract/surrealism is different from non-representational art.


We did 5 day so of bell ringers for Mondrian.  Here is what we did and the order that we did them:
1. On the first day, I had some biographical information on the board for students to copy down.  They also had to paste in a picture of Mondrian as well as "Broadway Boogie Woogie" and its credit line. (This one took about 10 minutes.)
2. On the second day, students inserted "Composition A" and "Self-Portrait".  I gave them both to show them that Mondrian could actually paint quite realistically if he chose to. (5 minutes)
3. On the third day, I asked students to make a list of the characteristics of Mondrian's famous work ("Broadway" and "Composition A"). (5 minutes)
4. On the fourth day, students were asked to compare two paintings I gave them.  They had to tell me which one was a Mondrian and why. (5 minutes)
5. On the fifth day, I asked students to do a quick, 2-minute drawing on their page of a Mondrian inspired design. (5 minutes)


Some students managed to fit everything on one page and those who had smaller sketchbooks did them on two pages.  What I love about this is that they now have a little study guide / note page for a single artist.  

Now that we have done this once, I'm hoping that it will take less time to get them to complete the rest.  The biographical day of bell ringers will probably always take more time, which is ok.  Now, I really just need to hammer into their heads that they actually need to look on the board and do the bell ringer on their own every day...I shouldn't have to remind them!

Monday, August 19, 2013

Studio Art: Unit 1 (Common Core and Marzano Incorporation)

My previous post gave you a preview of a project for my Studio students.  Here I am going to share a bit more how I am going to work to incorporate some Common Core into this unit, as well as more details of what I hope to accomplish with this unit.

Now, I know some of you may think that this project I want them to do is a little elementary, and to an extent I agree, but let me explain why I am starting off a little "easy".  I have not had this group of students since 6th grade, which was my 1st year of teaching.  When I taught them, I did not really touch on the elements and principles very much.  Only recently, as I have gotten a good grasp on how the school year goes, have I really focused my elementary curriculum on incorporating those important art ideas.  I also know that the previous high school teacher may have slightly touched on these elements and principles in 7th grade, but the retention rate of this information is very low from 7th grade to 9th grade, particularly since interest in the art department in high school students has dropped the last few years and students don't receive art in 8th grade.  I also know that the previous teacher did not do much for writing/Common Core type assignments with the students, so I want to break them in easy...I'm hoping by starting out with a simple project for what is often viewed as "boring" subject matter will get me some positive results.  Ideally, as the next few years move on, the incoming 9th graders will hopefully be retaining more of the elements and principles from their years in the elementary room and I won't have to spend an entire unit on the topic, but we'll see how the next few years go!

-----------------------------------------------------------------------------
As I said in my previous post, I will be utilizing this Art Talk textbook for Studio Art.  I'm not extremely happy with how the content is laid out in this book, so I will most definitely not be following it from start to finish throughout the year, but I will be using it where it fits with my curriculum.  I plan to supplement using the Scholastic Art magazine and possibly with printouts from this awesome website that was shared on the Art Teachers Facebook page...This website is called Boundless and it is a free resource to print off excerpts from textbooks!  Now, it appears from what I've read that the art history textbook is definitely for high school.  The particular textbook they have online is actually one of the editions of a textbook I have from college, Gardner's Art Through the Ages.

Goals:  By the end of this unit, students will be able to…
·         Identify the purposes of art.
·         Identify sources and ideas that lead to artistic inspiration.
·         Name the six elements of art
·         Identify the principles of art
·         Explain how subject, composition, and content relate to works of art
·         Identify information presented in a credit line

In using Marzano, it is expected that students will know what their learning objectives/expectations are for each unit and/or project, so I have the learning objectives on the front of the unit note packet.

Chapter 1: Lesson 1: What is Art?
The first section of chapter one in the textbook deals with asking the question, "What is art?"  We will talk about what media constitute as being part of the visual arts, what it means to perceive, and what the purposes of art are.

Chapter 1: Lesson 2: Why Do Artists Create?
This section obviously deals with what inspires artists to create, whether it is for personal or commissioned purposes, influenced by the media, government, war, family, etc.

Chapter 1: Lesson 3:  The Language of Art
The final section of the first unit deals with the language of art...a.k.a. the elements and principles.  This is where the art project I showcased in my previous post will come into play.

This section also talks about the credit line in an artwork (name, title, medium, date, location, etc.).  This will lead to a good segue to teaching students how to properly maintain and display their artworks.  As students start to create 2-D artwork, I plan to teach them how to properly mat their artwork using a mat board cutter.  
Teaching Calendar
For each unit I create, I plan on creating an anticipated teaching calendar within the unit plan.  I still use a hand-written plan book, but having a plan of action for each unit will make it easier to plan around assemblies and such, especially when it's time to go on maternity leave.  I'm hoping that I can have enough of these units planned out in advance so that all I need to do is hand the entire unit over to my substitute and he or she will be able to handle my plans!
As part of Marzano, it's important that students reflect upon what they have learned, thus the bell ringer and exit slip.  I know many teachers probably already do this but it was something I struggled with doing at the elementary level.  I struggled with trying to figure out a quick way to accomplish a written review at the end of every class and have yet to really have something I'm happy with.  Until then, I'm confident the system I have chosen to use with the high school will work, and hopefully I can figure out how to alter it and use it at the elementary level.

The following are homework assignments that will be assigned to students to help learn the vocabulary.  I couldn't find a word search or crossword that included all the vocabulary I wanted, so I found two great websites that you can use for FREE to create your own!  I found this Word Search Generator on A to Z Teacher Stuff.  You type in the words you want to include, give it a title, and choose the shape and size of the word search space.  Click on "Create Puzzle" and it generates the word search!  You can either save the webpage to your computer, print it directly from the page that pops up (and then photo copy) or do like I did, copy and paste it into Microsoft Word to make it a document.

To create the crossword puzzle, I used Discovery Education's Puzzlemaker.  Again, you give it a title, decide the number of squares for the size, and then enter the information.  For this one, it's a little different.  You have to type the answer first (one word, or if you do two words, type them without the space) and then hit the space bar and type in the clue, all on the same line without any commas.  If your clue goes onto the second line, it's fine, you just hit return to go to the next clean line to enter the next word and clue.  Create the puzzle, and it's the same process as the word search to save.

I've seen various versions of a worksheet like this on Pinterest.  Currently, I do not have this worksheet planned into my unit, but I have it as a backup for many situations that could arise.  If I need to have a sub, this can be a sub plan...I may use this as a sketchbook assignment, an extra credit assignment for the first quarter, or as a review assignment for when I'm on maternity leave.

Again, this is the project the students will be completing that deals with the elements.  I have included the rubric here that I will be using to grade them as well.

Wednesday, July 31, 2013

Creative Juices are Flowing...

This week they are finally stripping and waxing the floors in my high school art room so I've spent a lot of time at home working on school stuff.  I started making my to-do list for the room and the first thing I'm checking off my list has to do with critiques. A while back on Pinterest, I found this link for ping pong ball critiques and I LOVE the idea!  My husband bought me a box of 36 ping pong balls and I spent the night writing critique prompts on each ball!


Some of the questions came directly off of the free PDF download above, others came from my head and some came from other random pins.  Here's what the balls have written on them:

If I were the artist, I would have...
Are there any symbols in this artwork?  Give an example.
What would you title this artwork?  Why?
Does this artwork make you think of something else?  What?
What style is this artwork completed in?
What kind of composition does this artwork have?
Would you hang/display this artwork in your home?
What culture and/or country do you think this artwork comes from?  Why?
Can you trace movement with finger?  Where?
In my opinion...
Do you see any repetition? Where?
What art principles do you see?  Where?
What elements of art do you see?  Where?
Where did the artist use contrast?
What art medium/media is this artwork created with?  How do you know?
Does this artwork have a color scheme?  What is it?
Do you think this artwork belongs in a museum or art gallery?  Why or why not?
Did the artist create space?  How?
Where is the emphasis/focal point?  How is it created?
Is this artwork realistic or abstract?  Explain.
What is the subject matter of this artwork?
The weaknesses of this artwork are...
The strengths of this artwork are...
If I could ask the artist one question, I would ask...
Is there rhythm in this artwork?  Where?
Are there patterns in this artwork?  Where?
Does this artwork have depth?  Explain.
What do you think the artist wants you to see.
Do you think the artist was more concerned with emotion or realism?  Why?
Do you like this artwork?  Why or why not?
What creates unity in this artwork?
Where do you see texture?
Does this artwork tell a story?  What is it?
Is the balance symmetrical, asymmetrical or radial? Explain.
What emotion or feeling did the artist create?
How was line used in this artwork?

I plan to use the ping pong ball critique during class for group critiques (of personal and famous artwork), as well as for an exit slip.  I saw this pin on Pinterest and I decided to make a post-it note exit slip poster.  I have made one for both Studios, both 7th grade art classes and electives, all of which will be laminated.  There will be times I will give students a specific question for an exit slip and other times we may use the ping pong ball critique questions.  Students will get a post-it note to write their answer on.  They'll use the same post-it note until it's filled up and then they'll get a new one.  Each student will be assigned a number for the year so they don't have to put names on their slips.  
This will help ensure that I am getting students to review content before leaving class (that was something my superintendent noted on my evaluation as something I needed to work on) as well as having a closure of some sort.  Since I made a poster for each class, I won't have to look at their answers until after school during our 2:45-3:15 teacher time, thus making sure I have my 3 minutes in between classes to get between the classrooms.

The ping pong ball critique questions will also be great to use as a bell ringer too.  I think I want to plan on having students use their sketchbooks as a place to write bell ringers, notes, project sketches and homework sketches.  I envision having a famous artwork on the board when students come in, ask them to grab a ball and answer the question in their sketchbook.  As students get settled, I'll ask for some volunteers to share their responses.  I feel this would be less of a waste of paper to have students do bell ringers in their sketchbooks instead of on copied slips of paper.  Plus, it will ensure that sketchbooks are brought to class every day and not wasted.

Since all of my SLO's will be coming from high school art classes this upcoming year, my gears are drastically switching.  I am going to be more concerned with getting classroom management routines down in a way that works (such as the bell ringer and exit slip...something I haven't used before).  I would eventually like to work a bell ringer/exit slip into the elementary art room, but I don't want to stretch my time too much now that I only get those kiddos once a cycle.

-----------------------------------------------------------------------------------

On a side note, I just figured I'd share some artwork I did today...for the first time in forever!  Very rarely do I sit down and do artwork for myself.  Two years ago I did similar up-close flower paintings for Christmas gifts for my family (we were on a tight budget that year ;) ).  I usually have to be in the right kind of mood to do any artwork, or even scrap booking for that matter.  Any time I'm creating something, it's usually a project example for school or posters/displays for my classrooms.

Acrylic on canvas...my preferred choice of painting medium!  It's actually kind of ironic because in college, I did not take a painting class.  I did sculpture, ceramics, printmaking, drawing, photography, digital design and the mandatory art design class.  I was never able to fit the painting class in my schedule (and to be honest, I was not very fond of the professor who taught it), so I've never been trained in oil painting, or painting for that matter.  Painting with acrylic was something I picked up and enjoyed in high school.

In this instance, my husband has been given a promotion to which he now has his own office.  He is a kitchen manager for Thatcher Kitchen at SUNY Potsdam.  Now that he has moved into his office, he's been begging me to come decorate!  I surprised him today with these paintings for his office.  Tomorrow I'll go pick out paint for him to paint his office with and decide where he needs to hang his artwork!