Showing posts with label portrait. Show all posts

Thursday, November 13, 2014

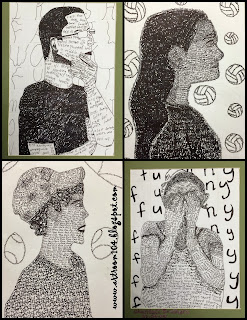
Studio Art: Micography Portraits

I am one of those art teachers that normally HATES doing self-portraits.  I have never liked drawing people.  Very rarely do I do more than one self-portrait lesson over a expanse of grade levels, yet here I am this year and I have already done two self-portrait projects, with a third one in the makings!  My Studio Art classes started their drawing unit a while back and we kicked off the unit with self-portraits. (Currently, they are finishing up mannequin drawings and we will be starting our last project for the unit tomorrow!)

Since my last bell ringer artist in Studio Art was Chuck Close, it seemed appropriate to do a self-portrait using the grid method.  We had a modeling day in class where students had to pose for three portraits.  I printed them out in black and white, they chose their favorite, and taped it into their sketchbooks.  I had them tape a piece of transparency paper over the top to draw the grid.  Doing it this way is an awesome way to ensure their picture doesn't get ruined if they mess up the grid!  A few students measured wrong and all they had to do was remove the transparency paper, tape a new one down, and start over.
Our pictures were 5"x7" and the drawing paper was 10"x14".  Makes for a good discussion about proportion as well!  (Ahem, math anyone??)

As a sketchbook assignment, I asked students to create a list of words about themselves on a page in their sketchbook.  They could simply list the words (though that got less points for creativity on my homework rubric), write a poem, illustrate them, etc.  The words from that homework assignment became the words they used on their projects.  This also, unknowlingly, integrated their current ELA Common Core module.  In Module 1, students in 9th grade just finished reading "St. Lucy's Home for Girls Raised by Wolves," by Karen Russell.  As part of the unit, students had to analyze characters from the book, using descriptive words.  Essentially, I was asking students to analyze themselves in this project, and many of the words they used to describe themselves were academic vocabulary words from their ELA unit!

The following collages are some progress shots with the finished product.


Wednesday, June 18, 2014

Product Review: Roylco Moving Eyes Portraits

All righty, let's get some blog articles written here!  Now that we are done to the last four full days, two half days, and one 1/4 day of school (I'm not counting or anything...), I finally have more free time on my hands now that my high school students are all taking their NYS Regents exams instead of being in class.

Back in February, a Roylco representative contacted me and asked if I would like to try out a product for free in return for a review of it on my blog.  Of course, I said yes!  Who doesn't like to get free products?  I decided to try their Remarkable Art: Moving Eye Portraits.  Unfortunately, I was unable to incorporate these into any regular classes this year, however I did try them out with some Extended Day kids as an after school project.  These students were mostly 4th and 5th grade, all girls.


The first thing I did was pull out the assortment of faces that come with the kit, and laid them out for the students to pick from.

Next, the students colored the eye balls their color, and we folded them and taped them to the back of the portrait as the directions told us to.

I pulled out all sorts of things for the girls to use.  Scrap paper, gems, pipe cleaners, buttons, etc. etc.

These are their finished products from the project.  The girls that participated did have fun and took a couple extras home.  They wanted to make portraits of their siblings!


So, here is my review.  I'll give you the positives, the negatives, and how I will use the rest of the product I have left next year.

Positives
There is an assortment of faces, both shape-wise and skin color-wise.

On each portrait, the cardboard has lines scored where the nose and mouth should go.  It's good having the face laid out like that for younger students, especially when you're trying to teach them proportions.  This might be a good introduction to self-portraits with younger students...something to get them to see where the nose goes compared to the ears before they try and draw their portrait themselves.

The eyes look cool!  I'm not exactly sure that they looked like they were following us, but having them recessed back a little in the eye sockets makes them look more interesting than drawn on the same surface.  

This kit gives your students the ability to be extremely creative with what they use to create hair and such.  My girls were a little more set on getting them done than really thinking about how they could have been more creative.  Though, I think if you were to incorporate this in class as an actually project, you can do a little more leading up to it to encourage the use of mixed media.

Negatives
The face shapes and colors are limiting.  Even though i was only working with about eight different girls when we tried these out, they were complaining that they couldn't find a head that really looked like theirs.  I almost feel that this project would be a little more beneficial to older students if the faces weren't colored in.  Bring it down to the very bare minimum.

The directions for the eyes are a little unclear.  The way the edges of the eye piece fold they would stick out from the frame if you placed the eyes in such a way as to leave a little gap between the top surface and the eye piece.  I think that's how it has to be put together in order to make it seem like they are "following you", but the folds don't quite match up right to do it properly...at least not without some cutting.

This is definitely something that is meant for younger students.  The age on the package says for 5+ yet the girl on the package looks like she is a 3rd grader.  I don't like to give my older students something that is already "half-done" for them to complete, at least in class.  (After school crafts are a different area where I will sometimes make considerations.) 

Next year, I plan on trying out the leftovers I have with my 1st grade students during a portrait unit.  In the past, I've done Roy G. Biv collages, so i think this might be a cool thing to incorporate with that project, just to see what they do with it.  

You can purchase these kits from eNasco for $18.30 a box, which has 32 portraits total, or directly from their website for $19.99.  For an extra curricular program, craft club or even a regular classroom teacher, this is something I could imagine them purchasing (especially if they aren't confident in the area of arts and crafts!), however I feel like this is not something art teachers would or should spend their budgets on.

If I were ever to do something like this with older students in class, they would not be using this kit.  Instead, they would make their own from scratch.  In all honesty, that's how I tend to use some Roylco products.  For example, my 6th graders designed stamps this year (post coming soon!) for countries they were researching in Social Studies.  Roylco has a stamp kit that you can buy.  I bought one a few years back and instead of having the students draw on the stamps (which is how they are meant to be used), I simply have them use the originals as a pattern to trace their stamp.  That way, they can alter the edging if they choose to.

Thursday, March 6, 2014

Roy G. Biv Collage Portraits

This is a project I did last year as part of my rainbow unit in 1st grade.  I liked it so much I decided to do it again with a few small tweeks.  You can view last year's project here.  This year, I split the project up into two days.  First, we reviewed the rainbow and colored some ROY G BIV bracelets.  After these were completed, I discussed portraiture with students.  We discussed what a portrait was versus a self-portrait.  I then asked them to close their eyes and envision Roy G. Biv living on his rainbow.  What would he look like?

For the rest of the period, students used markers to color Roy's head, minus the hair.  I put out four different skin colors of construction paper and allowed tables to get up, one at a time, to get their paper.  Last year, I ended up with all peach-toned Roys.  This year, I have a variety of skin tones, which is nice!

On the second day, we reviewed the rainbow and then added the hair to our Roys.  We glued everything onto a black background and voila!

It's always interesting to see the different face shapes...some use plain circles while others consciously recognize different face shapes!

Love the crazy hair and smile on the right one!

Love the crazy teeth and eyes on the right one!


Wednesday, March 27, 2013

Finished Staff Portraits

We're finally finishing up with our staff portraits, the last project in my 4th grade portrait unit..  (You can see our practice staff portraits here.  Our first project in the unit, pop art portraits, can be seen here.)  I must say, I'm pretty happy with the results!  Most of the students captured a pretty decent likeness of their chosen staff member.  The one thing I'm not too happy about is their lack of value.  Our next unit will be a pointillism unit so I can teach the students about painting with value (I LOVE pointillism, by the way!)


Thursday, February 28, 2013

Staff Practice Portraits

Whew!  Sorry about the lack of posts the last few days!  I've been running around like a mad woman trying to get our taxes done, get my last minute YAM preparations finished, and so on and so forth!

My 4th graders are finishing up their staff practice portraits, so I thought I'd share a few with you.  I've seen variations of these on Pinterest, and that is where I originally got the idea.  This was also going to be the final project for the portrait unit, but when I saw how well the students did with their self-portraits, I decided to make this practice for the final portrait.

 I decided to give the students the option of doing the final portrait in black and white or in colored pencil, so on the practice drawings, I asked them to draw and add value in pencil first, and then use colored pencil as well.  Some of these drawings are a little rough, but I actually think that this was harder for them than drawing the full portrait will actually be.

They are really excited to do the full portrait, but I will be taking a break from the portraits (to give a breather and regroup for those who are starting to get bored by it) to do some of the YAM activities I have planned.  Not sure if it will be a good break or a bad break from the project...some of them seem to be getting "lazy" and forgetful when it comes to adding value to their portraits.  We may have to come back around and do a value review project after this.