Showing posts with label Still life. Show all posts

Wednesday, February 4, 2015

Studio Art: Painting Unit, Tempera

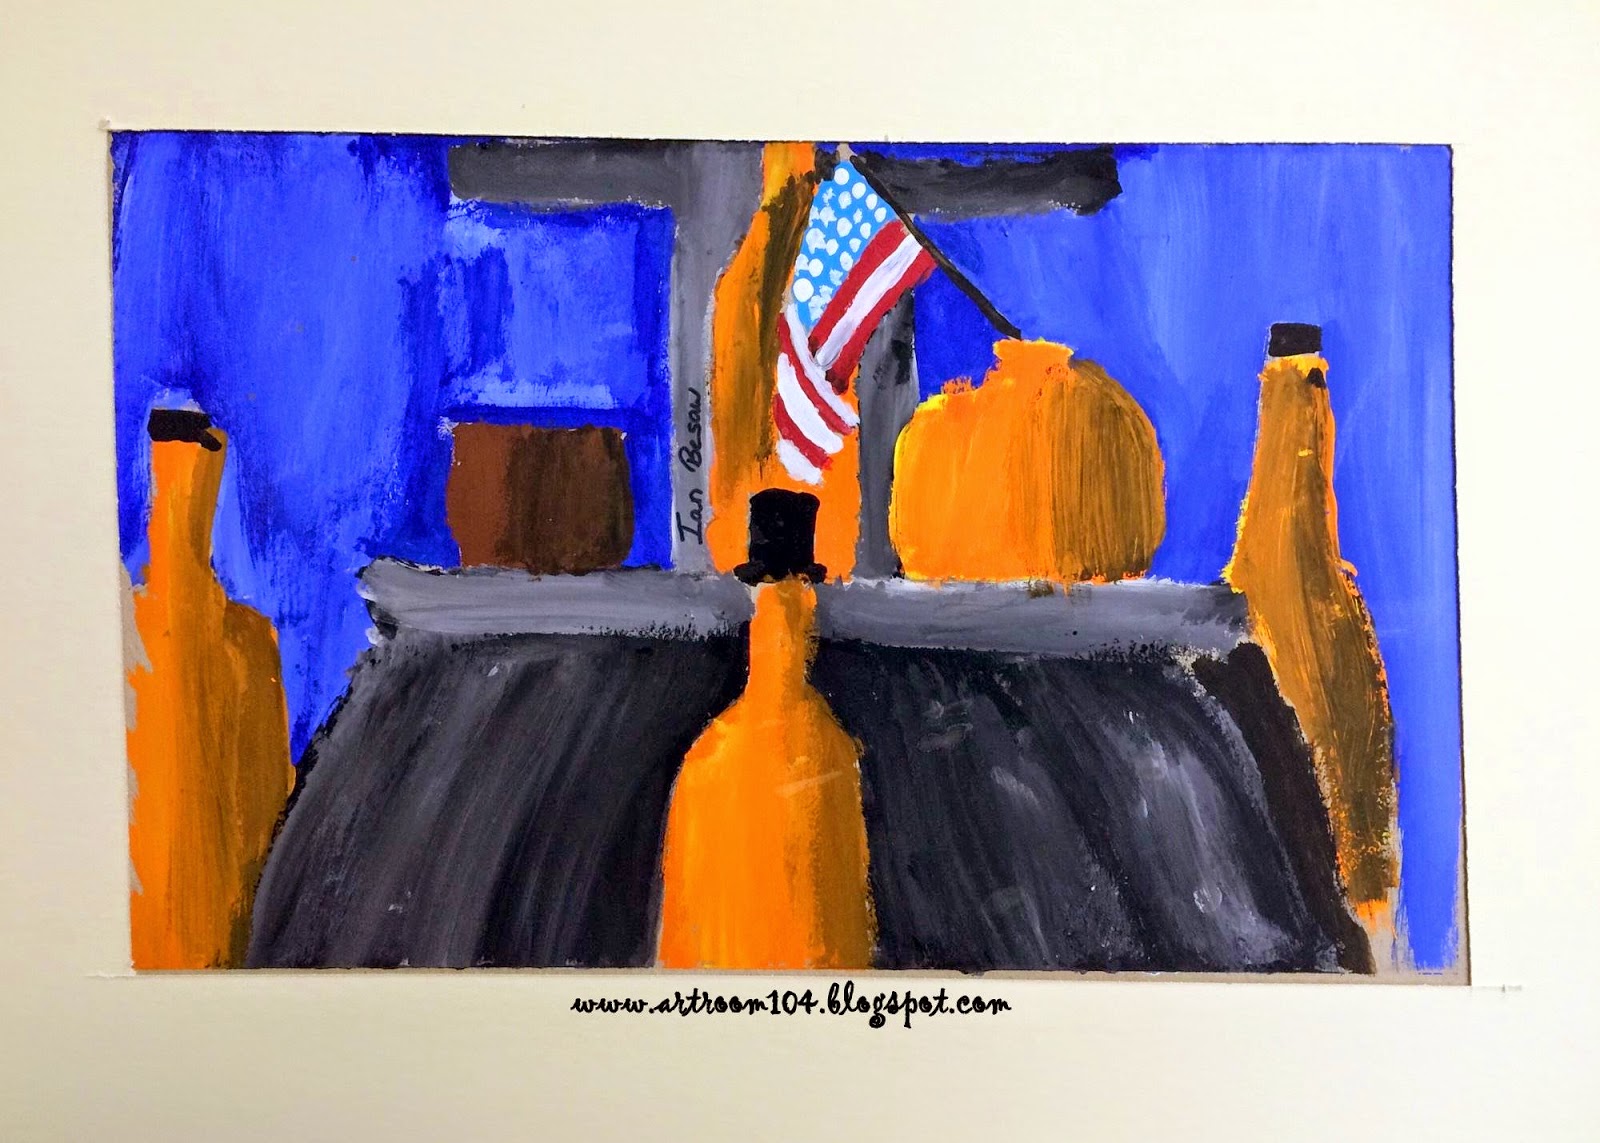
For our second painting in my Studio Art painting unit, students made their own egg-yolk tempera to do still life paintings.  I thought for sure that I would get complains about the subject matter, but they loved it!  Making their own paint really helped them to understand what a pigment, binder, and solvent is tool  We made our paint the same way I have my 6th graders do it for the cave art project.
Every day at the end of the day, i would put the paint in the refrigerator next door to make sure it didn't start smelling rancid from the eggs.

This project took us about a total of two weeks from start to finish.  Students chose an area of the still life below to draw.  It was set up in the middle of my room for the entire time...in that time period, I lost a fake banana and had two bottles break during clean up, of all times. :(

As we started the process of painting, we painted the background first, using cool colors because they recede.  Next, I had them choose a neutral color for the ground/cloth, and lastly they were encouraged to use warm colors for the bottles. 

This student did an AMAZING job, and it breaks my heart because she has such low self-esteem about it.  :(  It was a struggle to get her to do this all on her own, but she did it!  She totally has her own painting style, but I don't think she feels comfortable enough to embrace it yet.


This student has struggled all year but he did what I would consider a great job, based on his past projects!  I'm so proud of some of these guys...they really got into the painting!  This student is so psyched about our next project...I can't wait to see what he does then!


Again, I had students mat their own artworks too.  They are getting so much better at this!  It makes me proud, and them, to have their artwork framed in such a way.  I've decided that I must make it a priority to make sure I have enough mat board for a school year, at least on the high school end.  It's going to make my art show look that much more professional too. :)

What really surprised me about this project, is that the students asked why we didn't do a black and white drawing of the still life first!  Wait, what?  I figured they would get bored drawing and then painting the same thing...but now this idea is on my radar for next year!  I think they saw my projects from high school, which I have hanging above my computer, and liked the idea.


Our current and last project of the painting unit is the cubist superhero paintings in acrylic.  We have just started those so expect a post about them in a week or two. :)

Wednesday, November 13, 2013

2nd Grade: Imperial China Still Life Paintings

For 2nd grade's second project of the school year, they learned about Imperial China and the origins of blue glaze.  This corresponded with the NYS Common Core Listening & Learning Strand of Early Asian Civilizations, so it was a perfect lesson to use!

I did this project two years ago and pulled it out of storage for this group.  Unfortunately, I have yet to receive my clay that I ordered (it was never ordered by my business office over summer...luckily they were still able to get it for me though!), otherwise I would have actually done real pottery and blue glaze with the students.

This project essentially took us 2 1/2 days to complete.  Students received about 15 minutes to finish up their castle collages and then I showed them a power point about Imperial China.  Students went back to their tables, chose a vase to trace, and then drew their vase design on it.  During the power point, I stressed the importance of nature on their pottery, which the students were then able to connect to their religion, which was an A+ in my book on connecting to that Common Core!  Students were supposed to create a design that included nature and decorative patterns, just like the pictures of the vases we looked at in the power point.

On the second day, I taught students about tints and shades.  I gave each table an egg carton with blue, white and black paint and then let them go to town mixing colors to paint their vases.

On the last day, students cut out their vase.  They cut a piece of construction paper in half hot dog style and glued it to the bottom of colored tag board.  We talked about placement of the vase and glued that into place, leaving plenty of room to paint flowers.  I stressed that the vase should NOT sit directly on the horizon line, but also not directly on the bottom of their paper.  Finally, I gave students colored tempera to paint their flowers.


Now, here's my reflection on this project.  The original vase drawings and designs were very good.  They were all nature related, had some great dragons drawn, etc.  However, when it came to painting those finely drawn details, the students struggled.  That's something I'll keep in my for future painting projects to try and teach more in depth.

I just wanted to share these other two paintings...One 2nd grade class had the third day of the project taught to them by a non-art certified substitute teacher...a sub that is very on top of things with the students.  All of the other paintings above came from the other 2nd grade class, taught the last class by myself.  ALL of the still life paintings (except for maybe 4 of them) from the first 2nd grade class had flowers painted like these two...flowers painted around the vase instead of like they are in the vase.  I used the same examples when I taught the class as what I left the substitute.  It will be interesting to see if this trend of understanding continues as the year continues!

Wednesday, June 26, 2013

4th Grade LLO Results

For the local portion of my "grade", I used my 4th graders.  Again, as with the 1st grade, I will opt to give individual goals for each student rather than saying "80% will reach...".  It's easy to see that EVERYONE definitely improved but I ended up falling short with the number of students reaching the goal.  In a lot of case, students were only 1-3 points off from reaching my goal!  Oh well.

For this assessment, I had students do a still-life drawing from a white still life.  At the beginning of the year, I gave them two days.  Everyone finished well within that time frame.  At the end of the year, they received 3-4 days.  Even the early finishers needed at least 2 1/2 days to do theirs, so this made me happy that they weren't rushing!

For the final assessment, students could shade their still life with pencil or they could paint it with acrylic, depending on which they preferred.  All year long we did a variety of projects to reinforce using value, such as the value cities, pastel poinsettias, the fall drawings with leaf prints, and the still life practice just before our post-assessment.  We also did a lot of drawing from real life this year to reinforce observational skills.


Here are the results!  Pre-assessments on the left, post-assessments on the right!
(Please pardon the junky photos of the pre-assessments...those were done at the beginning of the year before I got my new camera!)

Drastic improvement, just in this student's willingness to participate!

Great improvement in shading skills...as well as this student's self-esteem in art.  It's always amazing once a student can do once they realize their confidence!


My private lesson student.  She lost some of her value in the foreground bottles, but none the less, did an AWESOME job mixing paint on the canvas.


Awesome value improvement.


Tuesday, June 11, 2013

4th Grade Pointillism Still Life Paintings

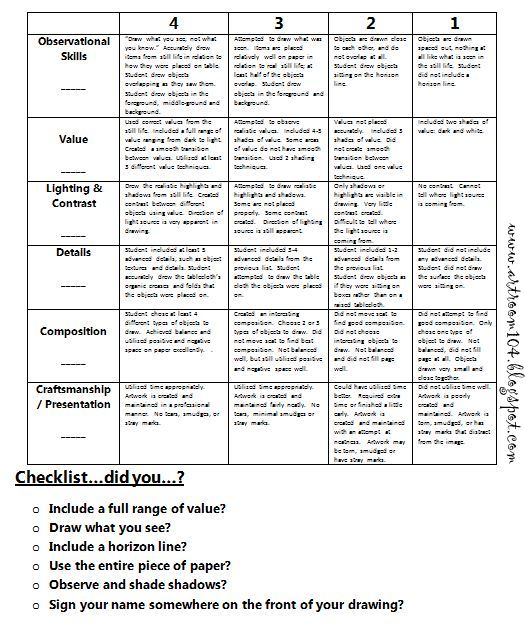
As you may or may not remember, my local assessment for APPR is happening within the 4th grade classroom.  At the beginning of the year, I set up a white still life and asked the kids to draw it as best they could, adding value where they saw it.  I gave very little instruction to get a baseline on what they already knew how to do.  We did talk a little bit about composition and what value was, as well as went over the rubric before they started.

Throughout the year, we did various art projects that dealt with value and drawing from real life in order to gear up and get ready for the post-assessment portion (nothing like teaching to the test, huh?).  Check out my 4th Grade Art Lessons page to check out these projects from the year.

I wanted to do a pointillism unit with the students because this particular group really liked the dot painting project we did last year, so I decided to do a pointillism still life painting with 3 bottles. I love the pointillism technique (and I think the kids do too) because it's very forgiving and very easy to blend color with the paint this way! The purpose of this project was to:
        1.  Teach students how to draw realistic bottles using ellipses.
        2.  Blend and create value using paint.
        3.  Review shadows and high lights in an artwork.

The students really enjoyed this project.  Normally I would have the students use q-tips for a pointillism project, but I knew it would take forever so we simply used paint brushes and acrylic paint (primary colors, black and white).  Students had to have at least one bottle that was a secondary color in their still life.

I did not set up a still life for this, but the students did draw their still life bottles from real bottles.  They had to have two real bottles in the painting and then they could opt to make up a bottle for the third one if they wanted.

Currently, the 4th graders are spending their last art classes doing their final still life artworks.  Since so many of the liked painting, I gave them the option of painting their still life or shading with drawing pencil, whichever they felt they were better at.  I can't wait to share and compare their results from the beginning to end of the year!  They're turning out great!  (Check out some of the post-assessment still life drawings here!)


I did want to share, also, that this particular project is a big revamp on a version I did my first year of teaching.  It was the FIRST project I did that year with 4th grade, and as I look back at it now, I'm SO HAPPY with the changes I've made!  I'm really finding it interesting to look back at my old Artsonia galleries from that first year because I can see my growth in how I approach teaching various subjects to the students!

The first year, I had students trace two vases, overlapping, on a piece of tag board.  We talked about how warm colors come forward and cool colors recede (which I did not talk about in this years project...I just told students that their ground had to be black and the sky/wall had to be blue).  You can totally see how drawing from a real life still life benefited the students this year!  Their artwork looks much more mature and advanced compared to the first year!