Showing posts with label colored pencil. Show all posts

Friday, October 25, 2013

Art 7: Initial Tags and Progress of Sketchbook Tags

Woohoo!  Check out what I finally got for my classroom!  My computers!  Just in time too because we're starting our next unit in my elective class, which is based on Ben Heine's Pencil vs. Camera series.

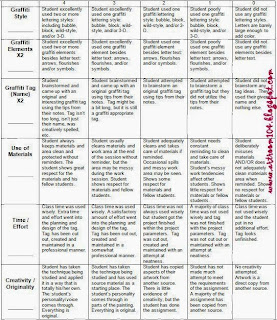
Here are the Art 7 student's initial tag designs and the rubric I used to grade them.  I saw a really great display on the Art Teacher Facebook page a while back where the teacher created a fake brick wall to attach the tags too.  Originally I thought I would have them tag their portfolio and their sketchbook, but after I saw that post on Facebook, I changed my mind.  I made a similar brick wall and had the students do their tag first on paper, cut it out and place it on the wall.  Students used markers, colored pencils and the Crayola Marker Airbrush pumps I purchased last year from Nasco with grant money.  (Unfortunately, between the constant use and students not taking care of them very well during this project, I think I am down two out of six air brush pumps...not sure if it's really because the students were rough on them or if it's the quality of the pumps themselves...)


I passed back the graded rubrics and asked students to reflect on their tags.  Their last homework assignment was to finalize and redraw their tags using my feedback from their rubric.  For example, some students used their first name and didn't brainstorm an actual tag nickname...others only used letter text and did not have any flourishes, symbols or arrows.  Here are the final sketchbook tags in progress (these are aiming to be more of a "piece" than just a tag) as well as the rubric I will be using to grade them...students have spent two days so far and as of today, I have four that are finished...they will all get one more day and then the unit test for graffiti.  Then we'll FINALLY be able to move onto the next unit, which will be perspective!


Just wanted to share my bulletin board display of fall artwork...I decided to display the fall birch trees and pastel pumpkin patch drawings together!


Sunday, October 6, 2013

Studio Art: Wrapped Food Drawing

For the final assignment of the drawing portion of the 2-D Media unit, students had to bring in a wrapped snack item to draw.  Similar to the shadow man project, I asked them to be creative with how they drew their object.  They could blow it up and draw a portion of it on the paper, draw it multiple times, etc.  Also, for this project, they were allowed to choose which 2-D medium they wanted to use for this.  Some elected to use regular pencil and ebony pencil, some chose colored pencils, some did a combination of all three.  The only medium no one decided to use was the oil pastels.  (You can see my note packet for this 2-D unit on the SmARTteacher.)

A few students still need a bit more time on Monday to finish these up, but after 3 1/2 days of working on this in class, here are some of the finished projects!


This particular student is full of natural talent.  Needless to say, her drawing was almost spot on, but I was a little disappointed!  On Thursday, she had asked me if she could rip a hole in the middle to make it look like a ripped wrapper, and then add crumbs inside the torn hole.  I simply told her I wouldn't every stop her from being creative like that and it sounded like it would be an awesome idea but then she never did it! :(

Now that we have finished up the first portion of the 2-D media unit, we're going to start on the next section which will be painting.  I was originally going to have the students paint their wrapped food item, but a lot of them ate their objects once they were done with their drawings! lol

So, Monday, the last few people will finish up their drawings and we'll talk about art styles.  In their notes, I created a section of 9 art styles and put examples of each style in the back.  We briefly started talking about art styles when we cut out the paintings and matched them with the correct style.  I was EXTREMELY happy to find that many of these 9th graders remembered some of the paintings that they had in the back of their packets.  (I had these students as 6th graders, my first year of teaching, and I had them do a group research project on an artist.)  We'll finish the notes on the art styles by giving each style a definition and discuss what style their wrapped food drawings fall into (hopefully they'll say pop art or realism, or both!).  We'll also frame these drawings too.

Tuesday I'll be giving them a brief quiz where they'll have to demonstrate they understand how to shade an object with a light source, they'll have to name the four shading techniques, and list some 2-D drawing media.

As we move onto the painting portion, I'm going to concentrate on acrylic paint, which is my favorite.  I've seen this particular pin on Pinterest and have LOVED the project idea, so I'll be incorporating it into this unit.  I plan on having the students draw out a simple still life of a book, bottle and fruit.  We'll shine the lights on them again, turn off the lights, and I'll teach the students how to paint with value directly on the canvas.  After that introductory project to the acrylic, we'll tackle Picasso's superheros.  I'm excited to do this project because I bought some acrylic modeling medium to use on the canvas boards to add texture, marbling and even, *gasp* glitter!  Depending on if they get bored or want to continue with painting, we'll also do some watercolor painting.

Monday, June 17, 2013

Photo Booth Frogs

I saw this photo circulating on Pinterest and it gave me an idea for our last 3rd grade project.  Their teachers asked if I could do a project about frogs with the students, so I thought this photo booth project would be a great way to review the life cycle of the frog!

This project took about three and a half days total.  At the end of our last project, students had to pair up and fill out this worksheet as best as possible (I found this through a google search).  I didn't grade it, only wanted to see what they could remember about the frog life cycle since they learned about it in 1st grade and had just started the unit in class.  I did alter this worksheet a tad bit by place plain white boxes over the words and printing it out for the students.  Then I made a version in the smart notebook program so I could just move the white box out of the way to show the answer when we reviewed the worksheet.


On the first full day, we measured out the boxes.  This was quite a challenge for some students, but very easy for others.  I took large drawing paper and cut it vertically into three strips.  First we measured a 1/2" border around the outside.  Then, we measured and marked at 3" and 3 1/2".  I showed students how to measure and mark on both sides and then connect the dots to make their perfect box.  Then, we relined up the ruler and marked again at 3" and 3 1/2".  If students measured correctly, they had five boxes at the finish.

On the 2nd and 3rd day, students drew and colored their frogs.  Students were allowed to make their frogs look realistic or cartoon-y, but most of which copied the frogs almost exactly from the worksheet.  At this point, we had just enough time to finish this project before the end of the year, so I didn't pull out examples of frogs for students to draw from. Students had to draw out each stage of the frog and then they were allowed to use either colored pencils or shade with drawing pencil.  I really like the black and white versions a lot.  I think if I do this next year, I will have the students do a value scale so they can get the feel of using different pressures on the pencil and then everyone will have to use drawing pencil.


Wednesday, March 27, 2013

Finished Staff Portraits

We're finally finishing up with our staff portraits, the last project in my 4th grade portrait unit..  (You can see our practice staff portraits here.  Our first project in the unit, pop art portraits, can be seen here.)  I must say, I'm pretty happy with the results!  Most of the students captured a pretty decent likeness of their chosen staff member.  The one thing I'm not too happy about is their lack of value.  Our next unit will be a pointillism unit so I can teach the students about painting with value (I LOVE pointillism, by the way!)