Showing posts with label Mondrian. Show all posts

Tuesday, December 16, 2014

Kindergarten Mondrian Collages

Reverting back to a good-ole staple in my Kindergarten curriculum!  We did these Mondrian collages as a review of cutting and gluing, but also of geometric shapes, with corresponds with the Common Core math standards in kindergarten (identifying shapes).  Another thing that corresponds with those math standards?  Vertical and horizontal lines!  Boy, if you could have seen the shock on my face when I presented Mondrian to the students.  I asked the question, "What do you notice about the lines that Mondrian uses?" and the first response I received was "They are vertical and horizontal!"  WOW!

I'm not going to get into how we created these because I've posted about it in the past.  You can also read up on how I've used Mondrian in previous projects here.


Sunday, September 21, 2014

Bell Ringers in Studio Art

Last year I really struggled with making the sketchbook a meaningful learning tool in my high school classroom.  Granted, I had quite a few obstacles in my way, including maternity leave and sick time leave for my husband's chemo treatments, however after I was back from all of that, I had the hardest time getting back into using the sketchbook.

I attended a staff development at the end of the year last year that was put on by our Boces.  About 10 art teachers from our county got together and just spent a day brainstorming ideas, discussing APPR, pre- and post-assessments, and basically venting.  It was great!  One of the middle school art teachers from another district shared how he uses bell ringers every day to introduce students to art history.  He uses the first 5 minutes of class every day to introduce, review and expand upon a famous artist from history, spending 1-2 weeks on an artist.

Another high school teacher shared how she calls her sketchbooks "source books" instead of sketchbooks.  She doesn't assign sketchbook assignments on a weekly basis because the students would never do them.  Instead, the source book is used as a place to plan and practice before starting and finishing a final project...(duh!  Isn't that what we teach students the sketchbooks should be used for???)  She had students who completed miniature versions of a large scale project, done perfectly, in oil pastel or colored pencil.  The students then made notes in the margins about their experience with the medium, how the practice product turned out, what they might change or do differently on the final project, and much more.  I thought it was a really cool way to make the sketchbook more of a meaningful tool.

When I stepped away from that professional development meeting, I had tons of new ideas.  I used the summer to figure out how I was going to use those techniques to fit my teaching style, my students, and my classroom.  Bring on the bell ringers!

Because we are using Marzano, bell ringers are one of the big things that the administrators are looking to us to use to show that we are constantly assessing our student's understanding of the material we are teaching. Since I am also an art history major, I decided to use my bell ringers to teach students about famous artists in history and the various art styles (non-representational, abstract, impressionism, realism, etc.).  Last year, I tried to incorporate the styles into my second unit and I failed miserably at teaching the students those concepts.  They did not know them very well at the end of the year and could not describe the styles very well.

So far we have had two complete weeks of school.  I used the first week to introduce Mondrian in bell ringers.  The second week was used to review all of the art concepts we talked about in the unit 1 note packet.  Next week, I will introduce the next artist, which I am planning on being Miro.  The great thing about these bell ringers is that it's a sneaky way to incorporate writing...ahem, common core, ahem...without the students being too suspicious about it!  Once I introduce Miro, we will compare the two artists and their styles, via bell ringers, to discuss why abstract/surrealism is different from non-representational art.


We did 5 day so of bell ringers for Mondrian.  Here is what we did and the order that we did them:
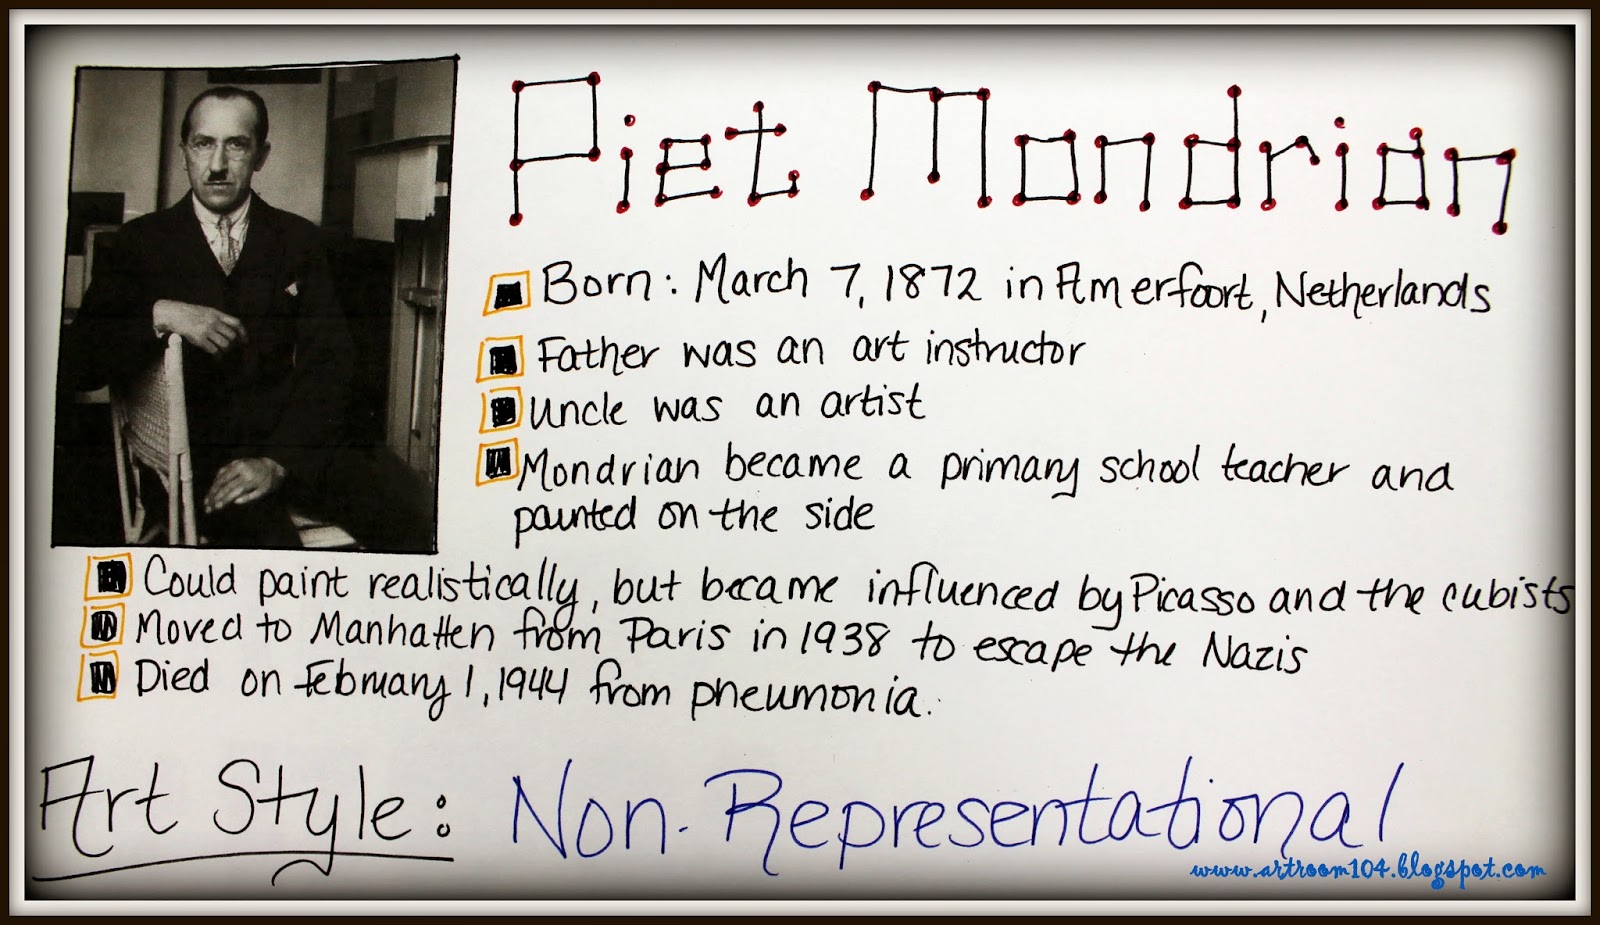
1. On the first day, I had some biographical information on the board for students to copy down.  They also had to paste in a picture of Mondrian as well as "Broadway Boogie Woogie" and its credit line. (This one took about 10 minutes.)
2. On the second day, students inserted "Composition A" and "Self-Portrait".  I gave them both to show them that Mondrian could actually paint quite realistically if he chose to. (5 minutes)
3. On the third day, I asked students to make a list of the characteristics of Mondrian's famous work ("Broadway" and "Composition A"). (5 minutes)
4. On the fourth day, students were asked to compare two paintings I gave them.  They had to tell me which one was a Mondrian and why. (5 minutes)
5. On the fifth day, I asked students to do a quick, 2-minute drawing on their page of a Mondrian inspired design. (5 minutes)


Some students managed to fit everything on one page and those who had smaller sketchbooks did them on two pages.  What I love about this is that they now have a little study guide / note page for a single artist.  

Now that we have done this once, I'm hoping that it will take less time to get them to complete the rest.  The biographical day of bell ringers will probably always take more time, which is ok.  Now, I really just need to hammer into their heads that they actually need to look on the board and do the bell ringer on their own every day...I shouldn't have to remind them!

Thursday, August 14, 2014

3rd Grade Mondrian Unit (Part 4): Our Finished, Glazed Cubes!

Sorry about the wait in sharing these!  Here are those glazed Mondrian Cubes my 3rd graders created at the end of the school year.  They look awesome!  This is definitely a project that I will be doing again.  It's an awesome way to incorporate Common Core Math (using a ruler, 3-D objects, horizontal and vertical lines, geometric shapes, etc.!).  Again, students could choose to glaze their cubes with primary colors like Mondrian, or secondary, warm, or cool.  Love these!

If you missed my past posts on this project, check them out below!  Part 1 is the introductory lesson, part 2 is how we built them, and part 3 is glazing!


Sunday, May 18, 2014

3rd Grade: Mondrian Unit (Part 3): Glazing Our Cubes

On Friday, my last class of 3rd graders glazed their cubes.  This process took a total of two class periods to complete.  I pulled out my tubes of Spectrum Raised Accent colors in black (of which I received when I ordered the Nasco Spectrum Tile kit last year).  I instructed students to paint over their carved lines with the black glaze, and then to paint in their squares.  When one side was finished, they rotated the cube and did the next side.  

If you remember from my first post in this series, students were able to choose from four different color families to design their cube...they didn't have to do just primary colors.  I set up four stations at my tables...one for each color family (primary, secondary, warm and cool), with two different glazes for each color.


One class's glazed cubes!  These were all loaded into the kiln and fired on Friday, just in the nick of time for art show set-up on Monday of next week!!!  I can't wait to get to school Monday morning to see them!  
And of course in my haste to get them loaded in the kiln 2nd period, I forgot to load my cube!!!

Part 4:  Finished Cubes Coming soon!

Wednesday, May 7, 2014

3rd Grade: Mondrian Unit (Part 2): Clay Cube Tutorial

So here is the clay cube tutorial.  Once again, I have resorted to using my slab roller to pre-roll the clay out for students.  In this case, we had to assemble our cubes in one class period because I wasn't sure that I would be able to keep the clay wet enough over a 8 day time-span in between classes.  In reality, I was able to keep the clay moist enough that we could have done this in two days, but I didn't want the students to drag it out either.

1. First, students had to cut out 6 squares from their clay slab.
2. Next, I had students bevel their edges.  That is, cut the edges (all 4) of each square at a 45 degree angle.  (This makes it easier to connect all of the pieces together.)
3. After the edges were beveled, students then had to score all four edges of each square.

4.  Next, students rubbed some slip onto the edges that they were connecting and pressed them together.  During this process, I went around and showed students how to use their fingers to simply press the clay together to get rid of the cracks from where they were connected.

5.  Lastly, the final piece was laid into place.  Students used whatever time they had left to start smoothing out their cube.
6.  Don't forget to add your initials AND poke a hole through at least one wall of clay to create an escape hatch for the air trapped inside during firing!

7.  This final step came during the second class period.  First, students smoothed out their surface and made sure their cube was shaped into as much of a cube as possible.  I showed the students how to gently drop their cube onto the table on each flat edge to help shape it back into a cube.

8.  Next, students simply laid their ruler parallel to the edges of their cube and drew in vertical and horizontal lines.  
9.  Students then made sure everything was still smooth, they picked off the "clay boogers" they made from carving their lines into their cubes, re-carved their initials and re-poked their hole on their cube for safe measures.

Part 3:  Glazing the Mondrian Cubes Coming soon!
Part 4:  Finished Cubes Coming soon!

Tuesday, May 6, 2014

3rd Grade: Mondrian Unit (Part 1)

Currently, my 3rd graders are in the middle of a Mondrian unit.  I've posted before how I've used Mondrian, and in this case, the final project is something new I'm trying out this year.  Before we get to that, however, here is how I opened up the unit.

This unit was started with a substitute as it was during one of the weeks I had to take my husband to his chemo treatments.  My substitute used my power point to introduce the works of Mondrian and to review the mathematical vocabulary that corresponds with Mondrian (i.e. horizontal line, vertical line, squares, rectangles, geometric shapes...COMMON CORE MATH!)

Students then created these Mondrian animals on white paper using markers and rulers.  This was great practice for them on how to hold a ruler. 


Students cut out their animals and glued them onto black paper to make them look nice and crisp.

After the Mondrian animal project, I was back to introduce students to the final project, which is a clay cube project (something students are currently working on in math...3-D forms).  

On the front of this worksheet is color theory review.  These students already knew what primary, secondary, warm and cool colors were.  The complementary colors were a new addition.

On the back of the worksheet, students once again used a ruler to draw in their lines.  This is where I pushed students to not just simply draw a grid, as many of them did on their animal above.  We looked again at Mondrian's work and students realized that he used a variety of sizes of squares and rectangles.  The final aspect of this worksheet was that students had to color their cube using the color scheme of choice.  Mondrian used primary colors, but I didn't want to hold students to that color scheme, thus the color theory review.

Part 3 of this post will show you how we glazed our cubes. Coming soon!
Part 4 of this post will be our finished, glaze-fired cubes! Coming soon!


Saturday, April 12, 2014

More Zentangles: Zentangle Parodies (PICTURE HEAVY POST!)

Three weeks ago I had to take an entire week off of school to take my husband and help him through his first week of chemotherapy.  As of today, he has completed his first three-week cycle and on Monday, begins the second cycle of three...and so far he's doing well.  Students were finishing up their ceramic projects and would be finished while I was gone, so I had to come up with a project that would be easy for a non-art substitute to handle.  I decided on zentangles, so I pulled out my zentangle packet from my elective class and I edited it a little to include a project outline and rubric for this project...something I'd like to call Zentangled Masters Parodies.

Students started the brief unit in the note packet I had left for them by practicing value scales, taking the notes on what all of the parts of a zentangle were, and then had to look through art books to choose a famous artwork to recreate in zentangles.  Essentially, the frame of the zentangle came from the border of the drawing.  The "string" of the zentangle was the drawing of the famous painting itself.  For the most part, the students actually really liked this project.  I have to say that it's a good way to review the elements and principles of art, so I think that I may revamp my first unit packet and take out some of the "boring" "What is Art?" notes and replace them with the zentangle notes.  

In the future, I will use this project to help reiterate to students the principles of art...mostly unity/harmony, variety and movement in their drawings.  Many students noted in their reflections that the zentangles made the original paintings seem more alive and fun.  

This example is my zentangled parody.


I wish these two students would have incorporated a little more of the original colors into their zentangles.  I do think the one on the left, despite how simple, was pretty successful with their zentangle choices!


This one is amazing!  I really had almost no constructive criticism...and the few points that I was going to point out, the student had already reflected upon in her evaluation of her artwork! 


These two students both used Van Gogh's Bedroom as their inspiration.  I'm not sure why they didn't each use the entire painting in their drawing, but after I came back from being out of school for a week and realized what they had done, I tried to convince them to use similar zentangles and colors in their drawings...but they didn't go for it!

 
And of course, a Kandinsky recreation...

I wanted to also note that I have received a lot of e-mail requests for my zentangle packets and projects.  I have shared my original zentangle packet, the packet I used for this project, and the other two zentangle projects (the found object and the font project), together in one place on the SmARTteacher website.