Showing posts with label Shading. Show all posts

Thursday, October 9, 2014

More Artist Bell Ringers & Sketchbook Use

A week or so ago, I posted about how I am using sketchbooks this year in my Studio class.  I am going to add to that article by posting the latest things we've added to our sketchbooks IN CLASS via bell ringers and classwork.

First off, students did have a sketchbook assignment over the weekend a few weeks ago...but only because it pertained to what they were doing in class.  Students were completing the zentangled master's project (I will be sharing the completed ones from this year in the next few days), so I had them practice zentangles by zentangling a random object.  (Mine is the camera!)

Along with the zentangle project, students had to create a page in their sketchbook to doodle, practice and make notes about their main project.  I printed out a copy of each person's original painting.  Some students decided to grid it, so I had them tape transparency paper over the original.  I encouraged students to try out different zentangles on that page before putting them on their final drawing.
Eventually, I want to start photographing student progress periodically throughout the project and have students past the photograph into their sketchbook.  I'll then have them reflect via bell ringer on what they want to accomplish during the week on the project, what they might be wanting to change, what they are having a hard time on, etc.

We are currently onto our next unit, which is 2-D media, focusing on drawing.  In an effort to cut down on the notes I had students take last year in their note packets, I'm trying to transfer a lot of these notes into class activities in the sketchbook.  The first one we've done is this value page.  Students had to create a value scale, a shaded cube, and write the name and definition for each of the four shading techniques (blending, hatching, cross-hatching, and stippling).  What's great about this being in the sketchbook is that it's less paper I have to copy and waste and it's always in their sketchbook as a reminder of what value is for homework sketch assignments.

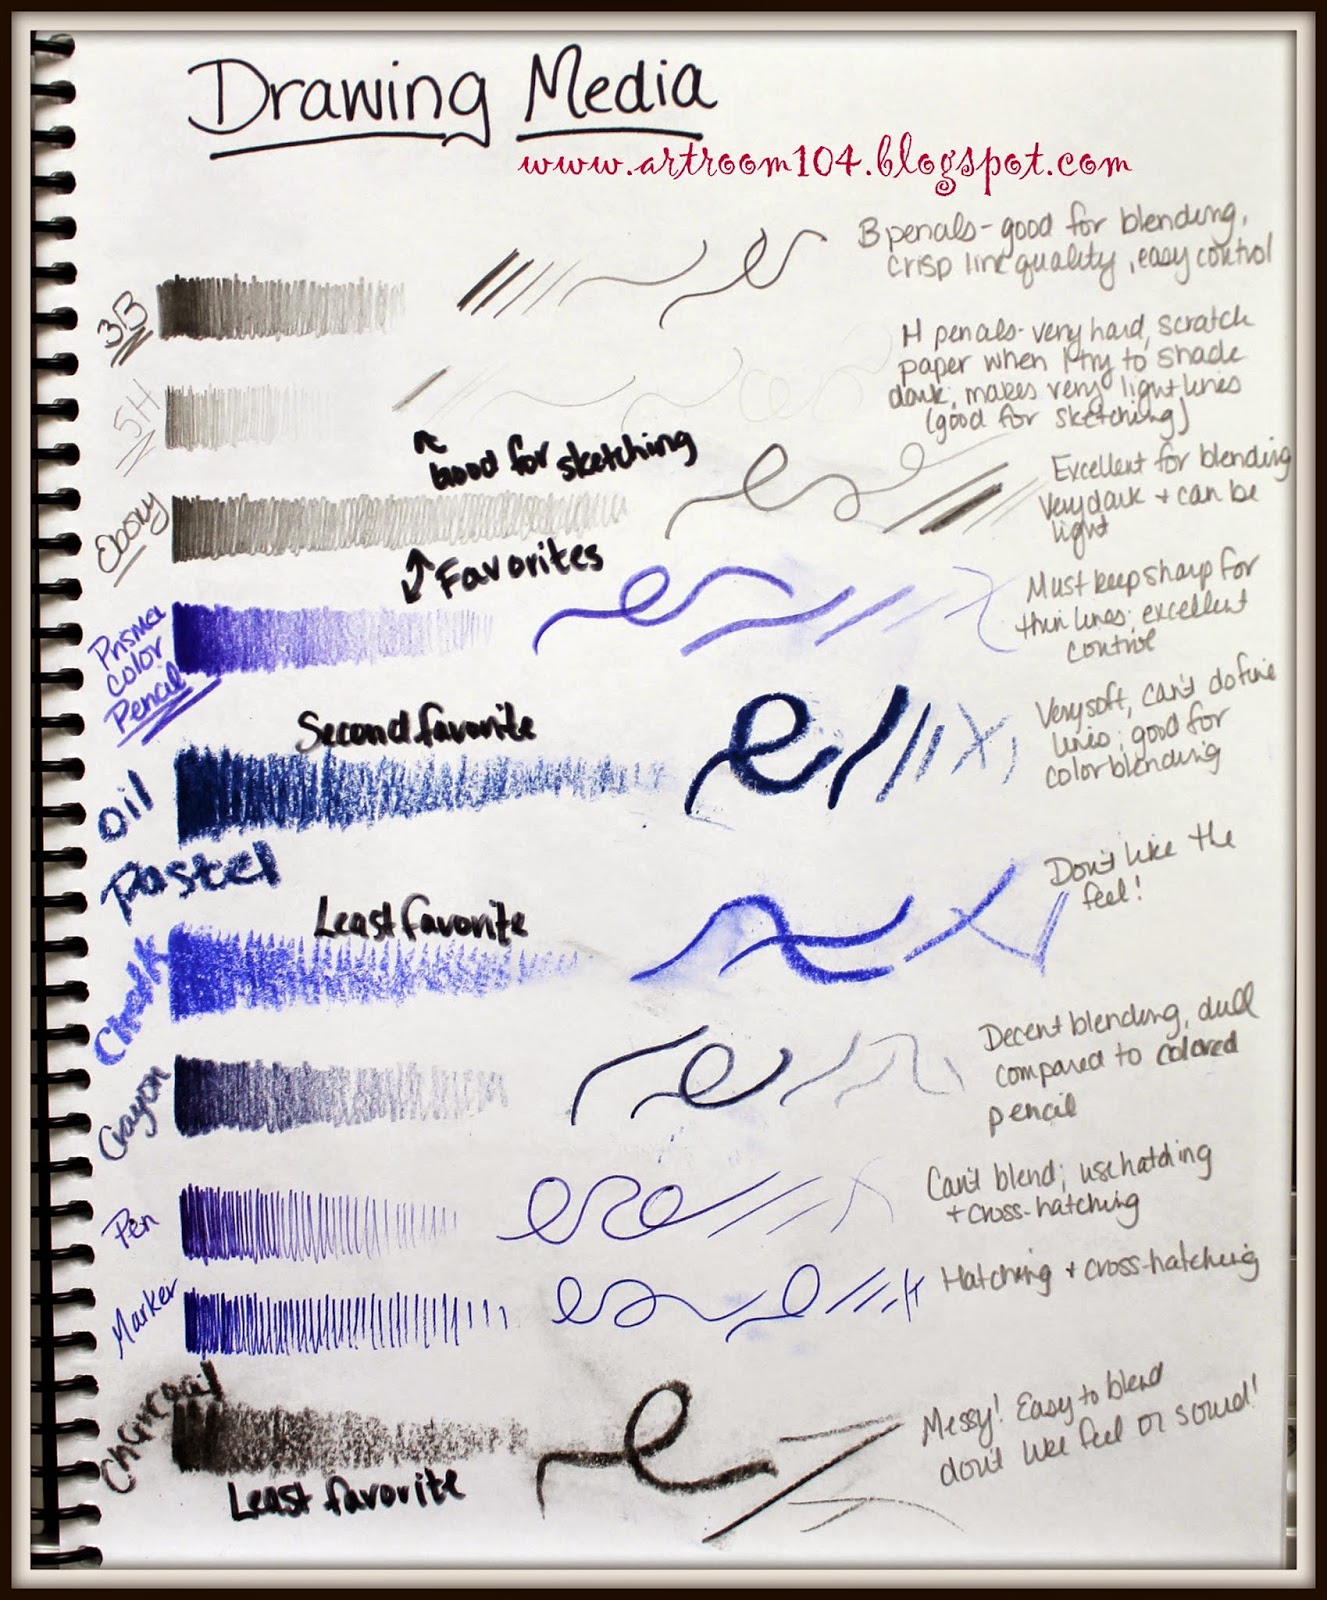
I've gone ahead and done the next classroom activity in my sketchbook...the students have not done this yet.  Our current project, which we are officially starting Monday, is going to be self-portraits done on a grid system using words as value (micography)...hence the value practice.  Our next project will be to practice doing observational drawings using the art mannequins.  Last year, I had students to their art mannequin drawing using only pencil or Sharpie, however this year I want to be more flexible.  Therefore, I will be having the students create a "Drawing Media" page in their sketchbook.  They will have to create a simple value scale, draw a variety of lines, label each medium, and make some notes (i.e. Do you like the medium? Which is your least favorite and most favorite and why?  Do you think a certain type of drawing medium is better for one type of drawing than another? etc.)
And finally, here are some artist bell ringer pages that we have completed.  I have decided that I am going to do a different artist every other week so that I can use bell ringers to review other material.    We already did Piet Mondrian, and next came Joan Miro.  I have decided on this set "schedule" for these weekly artist bell ringers:

Day 1: Students copy down some brief biographical information and paste a picture of the artist and one artwork by the artist into their sketchbook.
Day 2: Students paste two more artworks with the credit lines.
Day 3: Students paste one artwork with credit line and then must make a list of characteristics that they observe about that artist's work.  I always go over this to make sure we are on the same page once everyone has it completed.
Day 4: Students receive two paintings to paste into their books.  They must tell me which one is by the artist and two reasons why.
Day 5:  I ask students to do a quick, 2-minute sketch of design that is inspired by the artist.


This week's artist is Chuck Close.  We have one more day of bell ringers for him.  I choose to do Chuck Close right before we do our self-portrait project because we are going to be using a grid system to do our initial drawing.

The students are slowly getting better and better with these bell ringers.  I'm finding that I am teaching them note-taking and organizational skills at the same time.  I know a lot of these students must take notes on their own in other classes, but I am unsure if they actually know the proper way to keep an organized note page or if they just aren't connecting that knowledge from other areas to what I am doing with these bell ringers in art.  Either way, I hope by the end of the year, each student will be able to have nice, neat, concise note pages for each artist!

Sunday, October 6, 2013

Studio Art: Wrapped Food Drawing

For the final assignment of the drawing portion of the 2-D Media unit, students had to bring in a wrapped snack item to draw.  Similar to the shadow man project, I asked them to be creative with how they drew their object.  They could blow it up and draw a portion of it on the paper, draw it multiple times, etc.  Also, for this project, they were allowed to choose which 2-D medium they wanted to use for this.  Some elected to use regular pencil and ebony pencil, some chose colored pencils, some did a combination of all three.  The only medium no one decided to use was the oil pastels.  (You can see my note packet for this 2-D unit on the SmARTteacher.)

A few students still need a bit more time on Monday to finish these up, but after 3 1/2 days of working on this in class, here are some of the finished projects!


This particular student is full of natural talent.  Needless to say, her drawing was almost spot on, but I was a little disappointed!  On Thursday, she had asked me if she could rip a hole in the middle to make it look like a ripped wrapper, and then add crumbs inside the torn hole.  I simply told her I wouldn't every stop her from being creative like that and it sounded like it would be an awesome idea but then she never did it! :(

Now that we have finished up the first portion of the 2-D media unit, we're going to start on the next section which will be painting.  I was originally going to have the students paint their wrapped food item, but a lot of them ate their objects once they were done with their drawings! lol

So, Monday, the last few people will finish up their drawings and we'll talk about art styles.  In their notes, I created a section of 9 art styles and put examples of each style in the back.  We briefly started talking about art styles when we cut out the paintings and matched them with the correct style.  I was EXTREMELY happy to find that many of these 9th graders remembered some of the paintings that they had in the back of their packets.  (I had these students as 6th graders, my first year of teaching, and I had them do a group research project on an artist.)  We'll finish the notes on the art styles by giving each style a definition and discuss what style their wrapped food drawings fall into (hopefully they'll say pop art or realism, or both!).  We'll also frame these drawings too.

Tuesday I'll be giving them a brief quiz where they'll have to demonstrate they understand how to shade an object with a light source, they'll have to name the four shading techniques, and list some 2-D drawing media.

As we move onto the painting portion, I'm going to concentrate on acrylic paint, which is my favorite.  I've seen this particular pin on Pinterest and have LOVED the project idea, so I'll be incorporating it into this unit.  I plan on having the students draw out a simple still life of a book, bottle and fruit.  We'll shine the lights on them again, turn off the lights, and I'll teach the students how to paint with value directly on the canvas.  After that introductory project to the acrylic, we'll tackle Picasso's superheros.  I'm excited to do this project because I bought some acrylic modeling medium to use on the canvas boards to add texture, marbling and even, *gasp* glitter!  Depending on if they get bored or want to continue with painting, we'll also do some watercolor painting.

Saturday, October 5, 2013

Studio Art: Shadow Men (2-D Media Unit)

This drawing assignment was a total improvise, but it's definitely one I plan on keeping for this unit in the future!  It seems amazing to me that the students (both older and younger) enjoy drawing from these mannequins so much!  It must be because they are movable!

After I looked over the student's #2 sketch assignment (which was to create a 3-object still life, shine a light on it, and draw it with value), I realized that they really didn't know how to properly observe light and shadow, and they didn't know how to properly utilize value in their drawings.  On a whim, I brought down six of my mannequins from the elementary room and we spent a period sketching one of them in our sketchbooks.  They really enjoyed it and asked if we could work on these more the next day, which gave me the idea for this sketch project.

Believe it or not, Friday was the end of the 5 week marking period already!  Art projects are worth 40% of their grade, and they have technically only completed one project, the elements of art infographic.  This was a great thing to do not only to teach them more about value, but also to increase that portion of their grade for the 5 week report card.

I brought in a second light and set up 3 mannequins at one table, and 3 at the other.  Their directions were that they need to have five mannequins drawn on their paper in some way, shape or form.  I wanted to see big, up-close versions, small, full body versions and the in-between.  We reviewed the elements and principles a bit and I reminded them to think about their composition as they positioned their figures. Students had three class periods to complete these drawings.


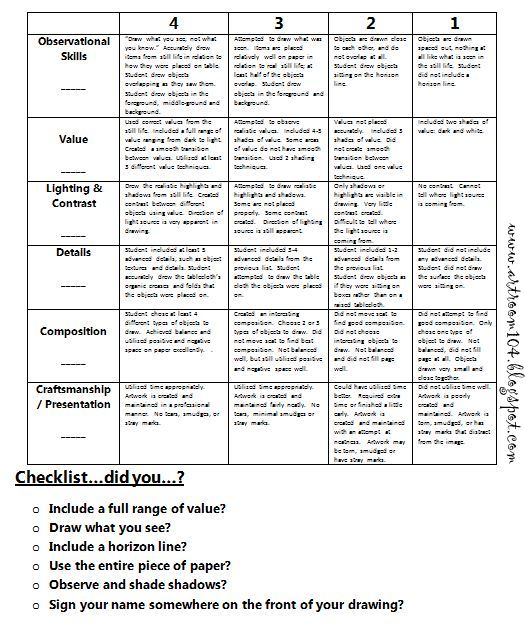
You can find the note packet I am using for this 2-D media unit, as well as the rubric for this project and the next drawing project on the SmARTteacher website.

Wednesday, June 26, 2013

4th Grade LLO Results

For the local portion of my "grade", I used my 4th graders.  Again, as with the 1st grade, I will opt to give individual goals for each student rather than saying "80% will reach...".  It's easy to see that EVERYONE definitely improved but I ended up falling short with the number of students reaching the goal.  In a lot of case, students were only 1-3 points off from reaching my goal!  Oh well.

For this assessment, I had students do a still-life drawing from a white still life.  At the beginning of the year, I gave them two days.  Everyone finished well within that time frame.  At the end of the year, they received 3-4 days.  Even the early finishers needed at least 2 1/2 days to do theirs, so this made me happy that they weren't rushing!

For the final assessment, students could shade their still life with pencil or they could paint it with acrylic, depending on which they preferred.  All year long we did a variety of projects to reinforce using value, such as the value cities, pastel poinsettias, the fall drawings with leaf prints, and the still life practice just before our post-assessment.  We also did a lot of drawing from real life this year to reinforce observational skills.


Here are the results!  Pre-assessments on the left, post-assessments on the right!
(Please pardon the junky photos of the pre-assessments...those were done at the beginning of the year before I got my new camera!)

Drastic improvement, just in this student's willingness to participate!

Great improvement in shading skills...as well as this student's self-esteem in art.  It's always amazing once a student can do once they realize their confidence!


My private lesson student.  She lost some of her value in the foreground bottles, but none the less, did an AWESOME job mixing paint on the canvas.


Awesome value improvement.


Tuesday, June 11, 2013

4th Grade Pointillism Still Life Paintings

As you may or may not remember, my local assessment for APPR is happening within the 4th grade classroom.  At the beginning of the year, I set up a white still life and asked the kids to draw it as best they could, adding value where they saw it.  I gave very little instruction to get a baseline on what they already knew how to do.  We did talk a little bit about composition and what value was, as well as went over the rubric before they started.

Throughout the year, we did various art projects that dealt with value and drawing from real life in order to gear up and get ready for the post-assessment portion (nothing like teaching to the test, huh?).  Check out my 4th Grade Art Lessons page to check out these projects from the year.

I wanted to do a pointillism unit with the students because this particular group really liked the dot painting project we did last year, so I decided to do a pointillism still life painting with 3 bottles. I love the pointillism technique (and I think the kids do too) because it's very forgiving and very easy to blend color with the paint this way! The purpose of this project was to:
        1.  Teach students how to draw realistic bottles using ellipses.
        2.  Blend and create value using paint.
        3.  Review shadows and high lights in an artwork.

The students really enjoyed this project.  Normally I would have the students use q-tips for a pointillism project, but I knew it would take forever so we simply used paint brushes and acrylic paint (primary colors, black and white).  Students had to have at least one bottle that was a secondary color in their still life.

I did not set up a still life for this, but the students did draw their still life bottles from real bottles.  They had to have two real bottles in the painting and then they could opt to make up a bottle for the third one if they wanted.

Currently, the 4th graders are spending their last art classes doing their final still life artworks.  Since so many of the liked painting, I gave them the option of painting their still life or shading with drawing pencil, whichever they felt they were better at.  I can't wait to share and compare their results from the beginning to end of the year!  They're turning out great!  (Check out some of the post-assessment still life drawings here!)


I did want to share, also, that this particular project is a big revamp on a version I did my first year of teaching.  It was the FIRST project I did that year with 4th grade, and as I look back at it now, I'm SO HAPPY with the changes I've made!  I'm really finding it interesting to look back at my old Artsonia galleries from that first year because I can see my growth in how I approach teaching various subjects to the students!

The first year, I had students trace two vases, overlapping, on a piece of tag board.  We talked about how warm colors come forward and cool colors recede (which I did not talk about in this years project...I just told students that their ground had to be black and the sky/wall had to be blue).  You can totally see how drawing from a real life still life benefited the students this year!  Their artwork looks much more mature and advanced compared to the first year!