Showing posts with label drawing pencil. Show all posts

Wednesday, June 26, 2013

4th Grade LLO Results

For the local portion of my "grade", I used my 4th graders.  Again, as with the 1st grade, I will opt to give individual goals for each student rather than saying "80% will reach...".  It's easy to see that EVERYONE definitely improved but I ended up falling short with the number of students reaching the goal.  In a lot of case, students were only 1-3 points off from reaching my goal!  Oh well.

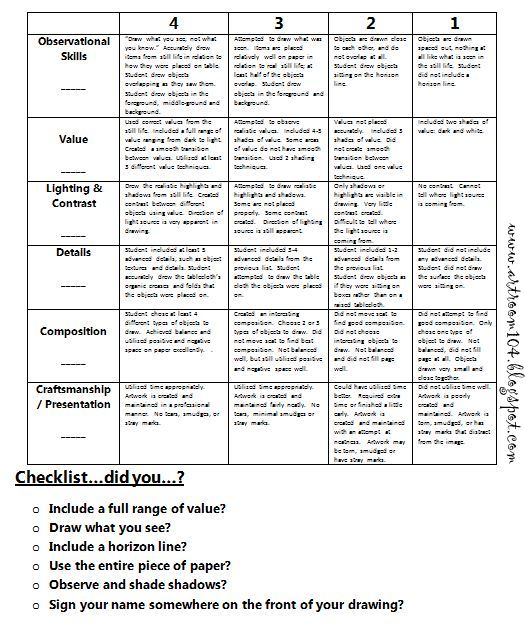
For this assessment, I had students do a still-life drawing from a white still life.  At the beginning of the year, I gave them two days.  Everyone finished well within that time frame.  At the end of the year, they received 3-4 days.  Even the early finishers needed at least 2 1/2 days to do theirs, so this made me happy that they weren't rushing!

For the final assessment, students could shade their still life with pencil or they could paint it with acrylic, depending on which they preferred.  All year long we did a variety of projects to reinforce using value, such as the value cities, pastel poinsettias, the fall drawings with leaf prints, and the still life practice just before our post-assessment.  We also did a lot of drawing from real life this year to reinforce observational skills.


Here are the results!  Pre-assessments on the left, post-assessments on the right!
(Please pardon the junky photos of the pre-assessments...those were done at the beginning of the year before I got my new camera!)

Drastic improvement, just in this student's willingness to participate!

Great improvement in shading skills...as well as this student's self-esteem in art.  It's always amazing once a student can do once they realize their confidence!


My private lesson student.  She lost some of her value in the foreground bottles, but none the less, did an AWESOME job mixing paint on the canvas.


Awesome value improvement.


Monday, June 17, 2013

Photo Booth Frogs

I saw this photo circulating on Pinterest and it gave me an idea for our last 3rd grade project.  Their teachers asked if I could do a project about frogs with the students, so I thought this photo booth project would be a great way to review the life cycle of the frog!

This project took about three and a half days total.  At the end of our last project, students had to pair up and fill out this worksheet as best as possible (I found this through a google search).  I didn't grade it, only wanted to see what they could remember about the frog life cycle since they learned about it in 1st grade and had just started the unit in class.  I did alter this worksheet a tad bit by place plain white boxes over the words and printing it out for the students.  Then I made a version in the smart notebook program so I could just move the white box out of the way to show the answer when we reviewed the worksheet.


On the first full day, we measured out the boxes.  This was quite a challenge for some students, but very easy for others.  I took large drawing paper and cut it vertically into three strips.  First we measured a 1/2" border around the outside.  Then, we measured and marked at 3" and 3 1/2".  I showed students how to measure and mark on both sides and then connect the dots to make their perfect box.  Then, we relined up the ruler and marked again at 3" and 3 1/2".  If students measured correctly, they had five boxes at the finish.

On the 2nd and 3rd day, students drew and colored their frogs.  Students were allowed to make their frogs look realistic or cartoon-y, but most of which copied the frogs almost exactly from the worksheet.  At this point, we had just enough time to finish this project before the end of the year, so I didn't pull out examples of frogs for students to draw from. Students had to draw out each stage of the frog and then they were allowed to use either colored pencils or shade with drawing pencil.  I really like the black and white versions a lot.  I think if I do this next year, I will have the students do a value scale so they can get the feel of using different pressures on the pencil and then everyone will have to use drawing pencil.