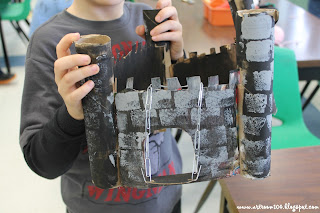
Here is the latest update on our 3rd grade castles! My previous post on these told you how I had one class paint their castles...you can see from the photos below the different technique I had the other class use...sponges. I think I like this technique better than the first!
For our last class, we spent time making our draw bridges work. I supplied yarn, paper clips, hole punches, wooden dowels and toilet paper rolls, upon request. I did not demonstrate how to make these work to students. Instead, I told them they had to use their problem solving skills and what they learned in science class to make a pulley system for their drawbridge. While some of these aren't exactly true pulleys, I'd say they did a pretty good job! One class was particularly more creative than the other with their draw bridges and a lot of the boys actually made their bridges move with a crank!


I love these so much! What a great idea :) How are the buildings constructed? Did you have to hot glue the walls?
ReplyDeleteWe used cardboard tubes and cereal boxes. You can see the construction process on this post: http://artroom104.blogspot.com/2013/01/in-progress-3rd-grade-cardboard-castle.html. I used cardboard from a box and paper towel tubes to make mine, but I knew it was going to be too difficult for the students to cut, so we used cereal boxes to make theirs. Each student needed 4 paper towel rolls and one large cereal box to make their castle. I had 3-4 hot glue guns set up as well. The students did pretty well gluing their own projects, but I did help a few. I had the students fold a tab on each side of their wall to glue it onto the cardboard tube.
Delete